
A lap shear test is a mechanical procedure used to measure the strength of an adhesive bond between two overlapping materials by pulling them in opposite directions until they fail. You fix two pieces of metal, plastic, or composite so they overlap by a specific distance, then use a machine to apply force until the glue breaks. This tells engineers exactly how much load a joint can safely hold before it pulls apart.
Key components of the shear test
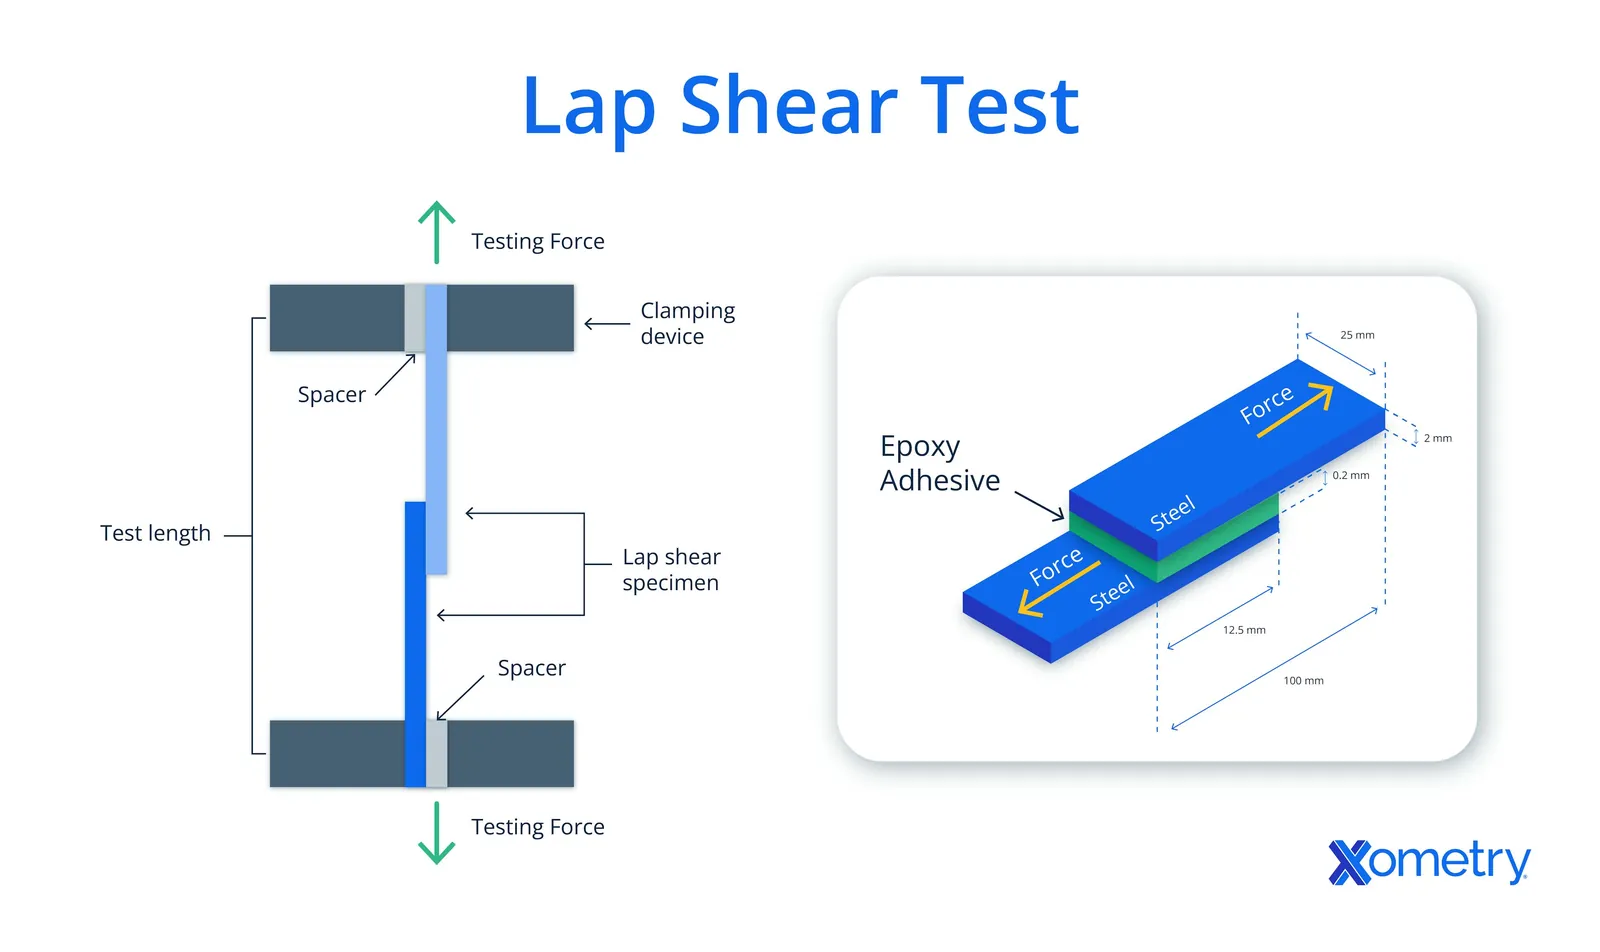
Check your specific machine’s manual for calibration intervals.
| Part or input | What it does | What you notice when it goes wrong |
|---|---|---|
| Test specimen | Holds the adhesive bond | Breaks at the material, not the glue |
| Grips | Holds the specimen steady | Specimen slips during the pull |
| Load cell | Measures the applied force | Readings fluctuate or show no change |
| Alignment jig | Keeps samples perfectly straight | Joint twists instead of pulling flat |
| Data logger | Records force over time | Missing data points or gaps in graph |
Steps to perform a lap shear test
You must follow a strict sequence to ensure the data you collect is consistent and repeatable. If the overlap length or the speed of the pull changes, the final result will be different, making it impossible to compare your findings with other tests.
- Clean the bonding surfaces thoroughly to remove any oils or dust that might weaken the adhesive, as contaminants are the most common cause of premature failure.
- Apply the adhesive to the defined overlap area and press the two materials together, ensuring the thickness of the glue layer remains consistent across the entire joint.
- Allow the adhesive to cure for the duration specified by the manufacturer, as pulling the joint before the chemical reaction finishes will yield a false low result.
- Secure the specimen into the grips of the testing machine, making sure the joint is centered and perfectly vertical to prevent any bending forces during the pull.
- Set the machine to pull the ends apart at a constant rate, typically between 1 and 2 millimeters per minute, depending on the material’s elasticity and thickness.
- Monitor the load cell as the machine pulls, noting the exact force value at the moment the joint finally separates or the adhesive bond breaks apart.
Why testing accuracy matters for joint integrity
The primary reason this test is vital is that it reveals the failure mode of your design, which tells you whether the adhesive or the material itself is the weak point. If a joint fails by tearing the base material, the adhesive is actually stronger than the structure. If the glue peels off cleanly, the bond is weak and the adhesive is likely failing under stress.
Engineers use the resulting data to choose the right glue for specific environmental conditions. A high-strength bond measured in a lab might perform differently if your application involves high heat or vibration. If the test results show a high load capacity but the failure is “brittle,” the joint might shatter suddenly rather than bending, which is a major safety risk in structural applications.
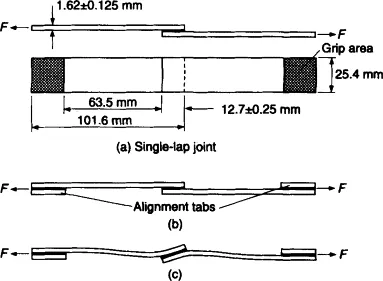
Mistakes in the testing procedure, such as failing to account for the thickness of the adhesive layer, often lead to over-engineering. If you assume a bond is stronger than it really is because you used an improper overlap distance, the entire structure could fail. Always confirm the overlap dimensions against your design requirements; if your test specimen is 25mm wide, that width must be consistent throughout the entire batch to ensure the comparative data remains valid.
Factors influencing your test results
What you control
- Surface preparation quality, such as cleaning or sanding.
- The exact thickness of the adhesive layer applied.
- The overlap length of the two materials.
- The speed at which the machine pulls the joint.
What is fixed by design
- The inherent strength of the base material.
- The chemical properties of the adhesive used.
- The geometry of the parts being tested.
If you’re testing for critical structural safety, don’t attempt to interpret failure modes without professional training. Improperly secured samples can snap and cause injury, and incorrect data could lead to structural failure in real-world use. Consult a certified materials laboratory if the results are for legal or safety-critical certifications, as they have the calibrated equipment and safety protocols required for high-load testing.
Improving your testing habits

Consistency is the most important habit when conducting these tests because minor variations in how you handle the specimens will skew your final numbers. Start by keeping a log of the ambient temperature and humidity in your workspace, as many structural adhesives are sensitive to these factors and will cure at different rates. If the humidity is above 60%, some adhesives may take twice as long to reach full strength compared to the manufacturer’s standard rating.
Always use a jig to align your samples, as even a one-degree tilt in the grips will introduce “peel” forces that the test isn’t designed to measure. This extra force will cause the bond to fail much earlier than it would in a flat, parallel pull. If your failure occurs at the edge of the bond line rather than across the entire surface, you have likely introduced this alignment error.
Keep your test samples in a temperature-controlled environment for at least 24 hours before you begin. This ensures the material and the glue are at the same baseline state. If you’re testing in a cold shop, move the samples to a heated office for that full day. Skipping this acclimation period often leads to brittle failures that don’t reflect the true performance of the adhesive.
Related guides
- TF-100 vs K-2006: Which Pool Test Kit Is Right for You in 2026
- Best Time to Test Pool Water: 5 Essential Testing Tools in 2026
- 5 Best Dog Clippers for Thick Hair: Tested and Reviewed in 2026
Frequently asked questions
Can I test different materials together?
Yes, you can test different materials, but the failure will usually happen at the interface of the weaker material. The test measures the entire system, so the result reflects the weakest link in the chain, whether that’s the adhesive, the first material, or the second material.
How long does a test take?
A single test typically takes 5 to 10 minutes once the specimen is in the machine, assuming the curing process is already complete. The exact time depends on the pull speed you select and how much the material stretches before it finally breaks under the applied load.
Is it safe to do this at home?
It isn’t safe to perform high-load testing without professional equipment and safety shields, as broken metal or plastic shards can fly off at high speeds. Only conduct these tests in a controlled laboratory setting where you have the proper protective gear and the equipment is bolted down securely.
What happens if the specimen slips?
If the specimen slips in the grips, the data is invalid and you must discard the result, as the slip adds friction and force that interferes with the measurement. You should increase the grip pressure or use a different type of grip surface, such as rubber-coated jaws, to ensure the sample stays perfectly still.
Does the adhesive thickness matter?
The thickness of the adhesive layer significantly changes the result, as a thicker bond line often creates a more flexible joint but may reduce the overall shear strength. You must keep the thickness consistent across all samples to ensure the data you collect is comparable, usually keeping it within 0.1mm of your target.
What is the most common failure?
The most common failure is adhesive failure, where the glue separates cleanly from one of the surfaces, usually indicating poor surface cleaning or an incompatible material. If you see this, go back to your preparation steps and ensure the surfaces are free of any oils, dust, or factory coatings.
Conclusion
Proper testing provides the data you need to build reliable products that hold up under real pressure. By keeping your methods consistent and paying attention to the details of your setup, you ensure that every result you record is accurate and useful for your project.
