
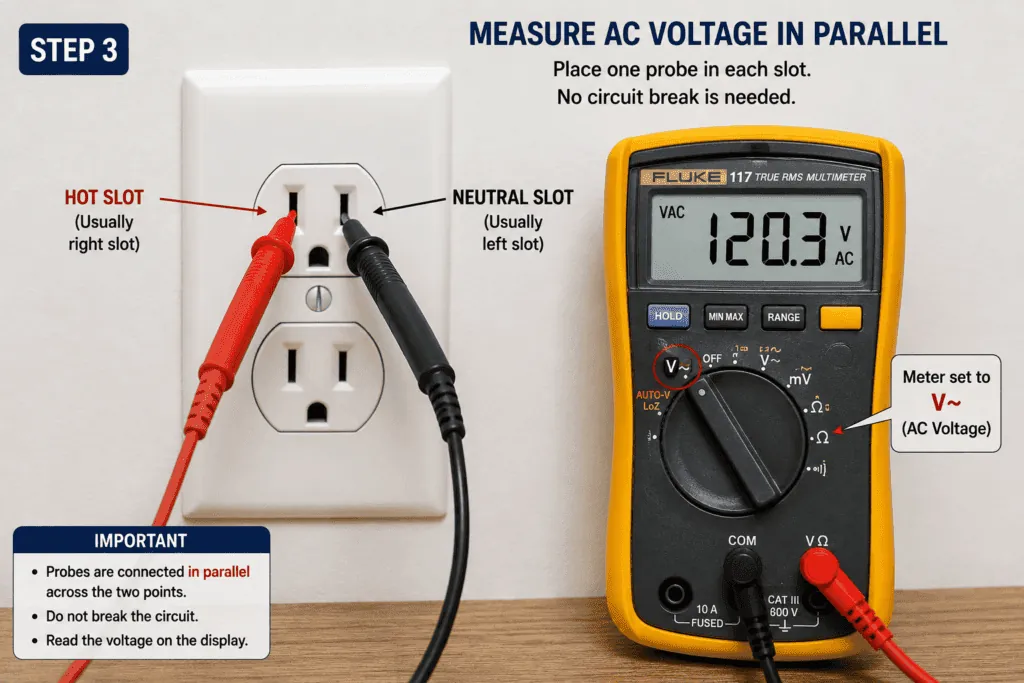
To test for AC voltage with a multimeter, set the dial to the V~ position, plug the black lead into COM and the red lead into the VΩ jack, then touch the probes to the circuit. Always confirm your meter works on a known live source first, and never hold both probes in one hand.
The single thing that decides whether this goes well or badly is the meter’s range setting. If the expected voltage is higher than the range you choose, the meter can be damaged or give a false reading.
Most people make the mistake of leaving the dial on DC voltage or resistance before they touch a live circuit. That error costs them a wrong reading at best and a destroyed meter at worst. Check the dial before every test, not just the first one.
Set the multimeter to AC voltage

Turn the dial to the V symbol accompanied by a tilde (~). This setting tells the meter to ignore steady direct current and isolate the oscillating voltage of an AC circuit.
Plug the black probe into the COM jack and the red probe into the port marked VΩ or mAVΩ. Ensure the leads are pushed firmly into the housing until they click; loose connections cause erratic, jumping numbers that lead to false troubleshooting conclusions.
Choose a range higher than the voltage you expect. If you’re uncertain, start at the highest AC range and work downward. If your meter is “auto-ranging,” it will select the scale for you; wait a moment for the reading to stabilize.
Touch the black probe to one test point and the red probe to the other. Keep your fingers behind the plastic guards on the probe handles. If the metal tips touch each other while connected to a live circuit, you’ll create a short circuit that can arc, damage the meter, or cause a burn.
Read the number on the display. If it shows OL or 1, the voltage exceeds your current setting; switch to a higher range immediately. If the reading is unstable, check that your leads are fully seated.
Test the meter on a known live outlet first. If you get a zero reading on a circuit you suspect is dead, verify the meter still works on a lamp or wall plug. A dead battery in the meter often mimics a safe, unpowered circuit.
How long testing takes
One lead swap takes seconds, but the setup decides the total time.
| Situation | How long | What changes it | What to watch for |
|---|---|---|---|
| Testing a wall outlet | 30 seconds | Easy access | Set meter to AC first |
| Testing inside an appliance | 2 to 5 minutes | Removing covers | Unplug before opening |
| Testing unknown circuits | 1 to 3 minutes | Unknown voltage | Start at highest range |
If you’re testing a circuit that seems dead, check the meter on a known live source first. This simple step prevents the mistake of assuming a circuit is safe when your fuse is actually blown. If the meter works elsewhere but shows zero here, you’re dealing with a genuine outage.
When you encounter a reading that fluctuates wildly, stop and check your lead connections. A loose probe tip often creates a false sense of danger or security. If the display remains blank after you verify your range settings and secure the probes, don’t attempt further troubleshooting. A dead reading in this context can mean no power, or it can mean a broken meter. Always call a qualified electrician if you can’t confirm the status of the circuit within three attempts.
Know when the reading is right
A steady number on the display is the main sign the test is done. The number shouldn’t jump around once the probes make good contact.
If the display shows OL or 1, the voltage is higher than the range you selected. Move the dial up one step and test again.
If the number drifts slowly, the probe tips may be loose or corroded. Clean them and retest.
People often chase a drifting reading by pressing harder against the terminal. That bends the tip and ruins your next measurement.
When the signs disagree, the one test that settles it’s measuring a known live outlet with the same meter and leads.
If that outlet reads its normal voltage, your meter is good. The original circuit simply has no power or lower voltage than expected.
If the known outlet also reads wrong, swap the leads before you blame the meter. A broken lead wire mimics every other fault.
National Fire Protection Association guidance covers electrical safety in the field, but it doesn’t publish a single meter reading that defines a safe circuit. Check the NFPA website for the standard that applies to your work.
Mistakes that spoil the reading

Leaving the dial on DC voltage gives you a near-zero reading on an AC circuit because the meter is looking for the wrong kind of current. Switch to V with a tilde before you test. Many beginners forget this step after measuring a battery, leading to confusing results that waste time. The meter isn’t broken; it’s simply listening for a steady flow rather than a wave.
Choosing a range below the actual voltage can damage the meter or show OL. Start at the highest AC range and work down until the number settles. If you guess too low on a main line, you risk blowing the internal fuse. This forces you to open the case and replace a component just to get back to work. It’s safer to lose precision temporarily than to lose functionality entirely.
Touching the two probe tips together on a live circuit creates a short that can destroy the meter and burn your hand. Keep the tips apart once they’re connected. The spark happens instantly, so relying on reflexes is a poor strategy. Hold one probe in place before bringing the second into contact. This simple habit prevents accidental bridges across terminals.
Testing with cracked or frayed leads exposes you to live metal. Replace damaged leads before the next test. Insulation fails silently until it does not, so check them visually every time you uncoil the cord. A small tear near the plug is often the first sign of fatigue.
Frequently asked questions
Can I test a wall outlet with a multimeter?
Yes, but only if the meter is set to AC voltage and the leads are in good condition. Touch one probe to each slot and read the display. If you’re unsure how to perform this test safely, contact a qualified technician to handle the measurement for you.
Why does my multimeter show OL?
OL means the voltage is higher than the range you selected. Turn the dial to a higher AC range and test again.
How long does it take to test for AC voltage?
The actual test takes seconds once the probes touch the circuit. Setting the dial and choosing the right range adds another minute or less.
Is it safe to test live wires myself?
It’s safe only for low-voltage circuits you understand, such as a wall outlet with proper leads. For anything inside a panel or appliance, call a licensed electrician.
What happens if I use the DC setting on AC power?
You’ll get a wrong reading, often near zero, and you may think the circuit is dead when it’s not. Always use the AC setting.
How often should I replace my test leads?
Replace them as soon as you see cracks, frayed insulation, or loose tips. Damaged leads can expose you to live voltage.
Conclusion
Always treat every wire as live until your meter proves otherwise, and stop if anything feels wrong. A multimeter is only as safe as the person holding it, so when the circuit is unfamiliar or inside equipment you didn’t wire, hand the job to someone licensed for it.
