
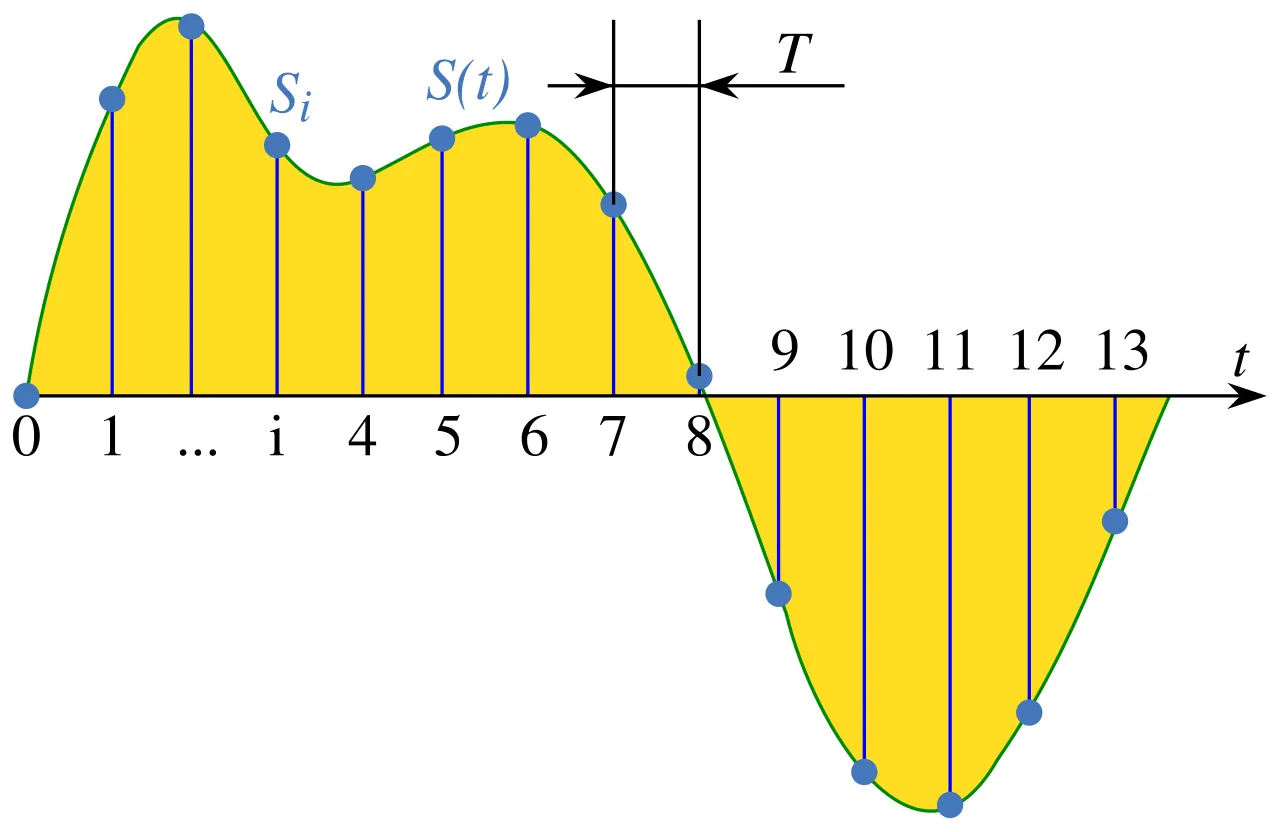
A sampling rate is the number of times per second that an analog audio signal is measured to create a digital recording. Expressed in hertz (Hz) or kilohertz (kHz), the sampling rate determines the range of frequencies a digital file can capture. If you’re recording standard music, you’ll typically use a 44.1 kHz rate, which captures the full range of human hearing without needing unnecessary storage space.
Audio signals exist as continuous waves in the physical world. To store them on a computer, we must convert these waves into a series of numbers that represent the wave’s height at specific moments. If the rate is too low, the computer misses the peaks and valleys of the sound, which causes digital distortion or “aliasing.”
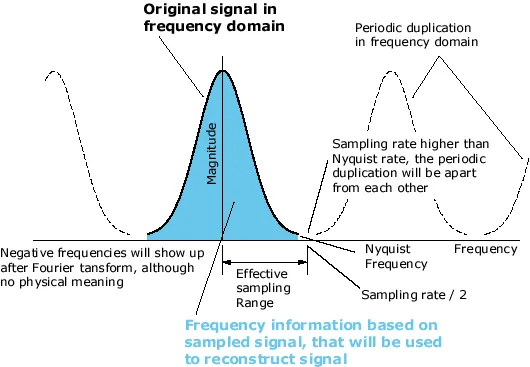
The most important factor is the Nyquist-Shannon sampling theorem, which states that your sampling rate must be at least twice the frequency of the highest sound you want to record. If you ignore this, you’ll hear artifacts or buzzing in your audio. A common mistake people make is choosing a massive rate for simple voice recordings, which just wastes disk space without improving the quality.
How to define your project sampling rate
-
Open your digital audio workstation (DAW) settings menu and locate the “Project” or “Audio” tab.
-
Select your desired rate from the drop-down menu. Use 44.1 kHz for standard music releases or 48 kHz for video projects. If you’re recording for high-end archival or complex sound design, 96 kHz provides more headroom for extreme pitch shifting.
Always set your project rate before you start recording. Changing it mid-session forces the software to resample existing files, which often causes audio to play back at the wrong speed or pitch.
-
Open your audio interface’s dedicated control panel software to ensure its hardware clock matches your DAW settings. If the interface and DAW disagree, you’ll hear intermittent digital clicks, pops, or experience total silence during playback.
-
Record a ten-second test clip to verify that the waveform appears smooth and that no digital clipping occurs. If the meters hit red, lower your interface gain immediately.
-
Save your session file as a template. This locks in your sample rate, buffer size, and routing for every future take, preventing the common mistake of starting a new project with mismatched legacy settings.
How long it takes to process audio
The time it takes to process audio depends on the complexity of your session and your hardware speed. While the recording process happens in real-time, the time needed for exporting or converting files varies based on the total duration and the number of plugins applied.
| Situation | How long | What changes it | What to watch for |
|---|---|---|---|
| Single track | Under 10 seconds | CPU speed | Background apps |
| Full album mix | 2-5 minutes | Plugin count | Thermal throttling |
| Batch conversion | Varies by file count | Disk drive speed | File format overhead |
If you’re running high-latency plugins like convolution reverbs or pitch-correction suites, expect processing times to triple. These tools require intensive real-time calculations that force your CPU to work harder during the export phase.
If your computer takes much longer than these estimates to process a simple file, check your background processes or your hard drive’s available space. A drive nearing capacity often slows down during the write-heavy export process. If you have less than 10% of your total storage remaining, move your project files to an external SSD. This simple switch prevents the system from stuttering while it manages temporary swap files.
Signs that your settings are correct
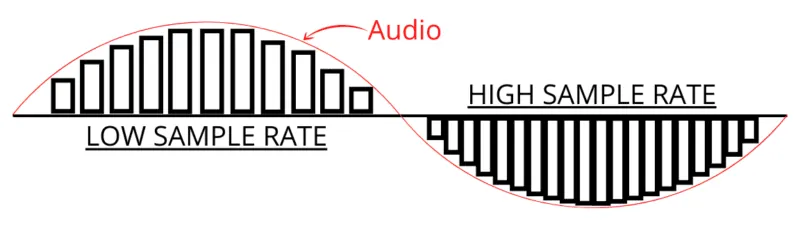
You can tell your sampling rate is correct by listening for natural, clear high-frequency sounds like cymbals or sibilance in speech. When the rate is set properly, the audio should sound identical to the source without any metallic ringing or “aliasing” distortion. If you see high-frequency noise that shouldn’t be there, your rate might be set too low for the input signal.
A reliable way to verify your settings is to record a single sustained note on a flute or violin. If you hear a warbling, watery texture in the tail of the note, increase your sample rate by one step, such as moving from 44.1 kHz to 48 kHz.
Most users mistake background hiss for digital distortion. If the noise persists after you disconnect the microphone, the issue is your gain staging, not your sample rate. You should only adjust the sample rate when you hear robotic artifacts or chirping during fast transients. If your project requires heavy pitch shifting or time stretching, always record at 96 kHz to preserve the integrity of the high-frequency harmonics.
Mistakes that ruin digital audio
Mismatching hardware and software causes the audio to pitch-shift and play at the wrong speed. If your interface is set to 44.1 kHz but your software is set to 48 kHz, the clock drift creates digital artifacts that are impossible to fix later. Always verify that both your hardware driver and your DAW project settings show the exact same number before you click record.
Recording at unnecessarily high rates creates massive files that are hard to edit and offer no audible benefit for voice. Using 192 kHz for a simple podcast consumes four times the storage space of 48 kHz without improving clarity. Stick to 48 kHz to keep your workflow fast and your storage manageable.
Ignoring the Nyquist limit causes aliasing, where high frequencies fold back into the audible range as harsh, metallic noise. This occurs when your source signal contains frequencies above half your sampling rate. If you’re recording complex synthesizers or high-frequency percussion, use a low-pass filter to roll off anything above 20 kHz.
Most beginners fail to check their gain staging before digital conversion. If your input peaks above -3 dB, you risk inter-sample clipping that remains hidden until the final export. Aim for an average level of -18 dBFS to ensure your plugins have enough headroom to process the signal without distortion.
Related guides
Frequently asked questions
Can I change the sampling rate after recording?
No, you can’t change the sampling rate of an existing recording without performing a sample rate conversion, which can introduce artifacts. You must choose the correct rate when you create your project file. If you record at 44.1 kHz, that’s the permanent resolution of your raw data, and converting it later won’t add back the high-frequency information that was lost during the initial capture.
Why is 44.1 kHz the standard?
It’s the standard because it covers the full range of human hearing, which goes up to 20 kHz, while leaving room for an anti-aliasing filter. This rate was chosen for the Compact Disc because it satisfies the Nyquist theorem for the 20 kHz limit. Most modern consumer music is still distributed at this specific rate because it’s efficient and remains compatible with every playback device.
How long does it take to convert a file?
A standard song usually takes under 10 seconds to convert if your computer has a modern processor and an SSD. The exact time depends on the length of the audio and the number of active effects plugins that need to be “rendered” into the new file. If you’re converting a large batch of files, expect the process to take longer based on your total disk write speed.
Is it safe to use 96 kHz for everything?
It’s safe for your equipment, but it’s usually unnecessary for most home recording projects. While it provides a higher ceiling for frequency capture, it also doubles the storage space required and puts more strain on your computer’s processor. Unless you’re recording high-fidelity acoustic instruments for professional film scores, 48 kHz is more than enough for high-quality results.
What happens if I record at a lower rate?
If you record at a rate lower than double the highest frequency in your signal, you’ll create digital aliasing. This sounds like strange, metallic, or dissonant tones that weren’t present in the original performance. These errors are permanent and can’t be removed by an equalizer or any other audio tool after the recording is finished.
Conclusion
Choosing the right settings doesn’t have to be complicated, but it’s worth experimenting with different options to hear how they change your audio. Try recording a short clip at a few settings to see what sounds best for your specific project. You’ll find that your ears are your best guide.
