
Are you looking to protect your home’s water system and make sure your water softener works safely? Creating an air gap for your water softener is a simple but crucial step you can take to prevent contamination and keep your water clean.
In this guide, you’ll learn exactly how to make an air gap that fits your setup, with easy-to-follow steps that anyone can handle. Keep reading to discover how this small fix can make a big difference in your water quality and home safety.
What Is An Air Gap
An air gap is a simple but important part of many water systems. It is a small space between the water outlet and the drain. This space stops dirty water from flowing back into clean water pipes. For water softeners, having an air gap helps keep your water safe and clean.
Purpose Of An Air Gap
The main purpose of an air gap is to prevent contamination. It stops dirty or used water from flowing back into the clean water supply. This is called backflow prevention. Without an air gap, water could flow backward due to pressure changes. The air gap creates a physical break, so water cannot travel back. It keeps drinking water safe and clean.
Benefits For Water Softeners
Water softeners remove minerals from hard water. They use water to flush out these minerals. The air gap makes sure this used water does not return to your home’s water system. It protects your pipes and appliances from damage. The air gap also helps meet local plumbing rules. It is a low-cost way to keep your water softener working well and safe.
Tools And Materials Needed
Creating an air gap for your water softener needs some basic tools and materials. The right items make the job easier and safer. This section lists what you need before starting.
Essential Tools
- Adjustable wrench for tightening fittings
- Pipe cutter or hacksaw to cut pipes
- Measuring tape to get exact lengths
- Screwdriver set for securing clamps
- Drill with bits for making holes
- Plumber’s tape to seal pipe threads
- Level to keep pipes straight
Recommended Materials
- Air gap fitting designed for water softeners
- Flexible water hoses or PVC pipes
- Pipe connectors and elbows
- Wall brackets or pipe clamps
- Silicone sealant to prevent leaks
- Water softener drain hose
- Bucket or container to catch water during installation
Choosing The Right Location
Choosing the right location for your air gap is key to its effectiveness. The air gap prevents dirty water from flowing back into your clean water supply. Positioning it properly ensures safety and compliance with plumbing codes.
Consider the space available near the water softener. The spot should allow easy access for maintenance and inspection. It should also connect smoothly with the drainage system.
Ideal Placement Tips
Place the air gap close to the water softener’s drain outlet. This reduces the chance of backflow. Ensure the air gap is above the flood level of the drain.
Look for a spot that is visible and easy to reach. This helps during regular checks. Avoid tight spaces that make repairs hard.
Make sure the air gap has a clear, open space around it. This allows air to flow freely, which is essential for its function.
Avoiding Common Mistakes
Do not install the air gap below the flood level of the drain. This can cause backflow and contamination. Avoid placing it too far from the water softener.
Never block the air gap with insulation or other materials. This stops proper air circulation. Also, avoid sealing the air gap tightly with glue or tape.
Do not ignore local plumbing codes. These rules often specify where and how to install air gaps. Failure to follow them can lead to fines or unsafe water.

Credit: dadinsight.com
Step-by-step Installation Process
Installing an air gap for your water softener is important to prevent backflow contamination. The process is straightforward and safe. Follow these clear steps to set up your air gap correctly. Each step helps ensure clean and safe water flow.
Preparing The Area
Start by turning off the main water supply. Clear the space around the water softener. Remove any obstacles or debris. Check the pipes and fittings for damage. Have all tools ready: wrench, screwdriver, and tubing cutter. Measure the area to fit the air gap device. Make sure the area is dry and clean. This preparation makes installation smoother and safer.
Installing The Air Gap Device
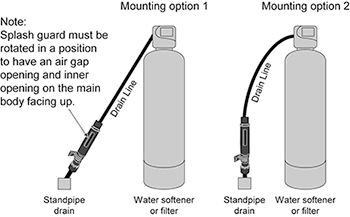
Choose the right air gap device for your water softener model. Attach the device to the drain line or designated spot. Use mounting brackets or screws to secure it firmly. Ensure the air gap opening points downward or to the drain. Avoid tight bends or pinches in the device. The device must be visible and accessible for inspection. This step prevents backflow efficiently.
Connecting Pipes And Hoses
Cut the drain pipe to the correct length. Attach one end to the air gap inlet. Connect the other end to the softener’s drain hose. Use hose clamps to secure all connections tightly. Check for leaks or loose fittings. Keep the hoses straight and free from kinks. This setup allows water to flow correctly and safely. Double-check all connections before moving on.
Securing And Testing The Setup
Fasten all parts securely to avoid movement. Turn the main water supply back on slowly. Run the water softener through a regeneration cycle. Watch the air gap for any leaks or overflow. Listen for unusual sounds that may indicate issues. Test the system several times to confirm proper function. Fix any problems immediately to ensure safety. This final step guarantees a reliable air gap installation.
Common Issues And Fixes
Air gaps in water softeners prevent dirty water from flowing back into clean water pipes. They keep your system safe and working well. Sometimes, problems happen that stop the air gap from working right. Knowing these common issues helps you fix them fast. This keeps your water softener running smoothly.
Leaks And Drips
Leaks around the air gap happen often. They may come from loose fittings or cracked parts. Check all connections and tighten them gently. Replace any damaged pieces to stop leaks. Drips can also occur if the air gap is clogged. Clean it to allow water to flow freely. Regular checks prevent water waste and damage.
Improper Drainage
Water must drain away properly from the air gap. Poor drainage can cause water to back up. This makes the air gap overflow or stop working. Make sure the drain pipe is the right size. It should be free from bends or blockages. Keep the drain line clear to avoid standing water.
Air Gap Blockages
Blockages inside the air gap block water flow. Dirt, debris, or mineral buildup can cause this. Remove the air gap cover and clean inside carefully. Use a soft brush or cloth to clear debris. Check often to keep the air gap open. A clean air gap works better and lasts longer.
Maintenance Tips For Longevity
Proper maintenance keeps your air gap for the water softener working well. It prevents blockages and leaks. Regular care extends the life of your system. Follow these simple tips to maintain your air gap effectively.
Regular Cleaning
Clean the air gap area every month. Remove any dirt, dust, or debris around the gap. Use a soft brush or cloth to wipe the surfaces. Avoid harsh chemicals that may damage the parts. Keeping it clean stops clogs and water buildup.
Inspection Schedule
Check the air gap every three months. Look for cracks, loose fittings, or signs of wear. Make sure water flows smoothly through the gap. Early detection helps fix small problems before they grow. Regular inspection ensures the system stays safe and efficient.
When To Replace Parts
Replace any damaged or worn parts immediately. Cracks or leaks can cause water damage or contamination. Use parts that match the original specifications. Changing parts on time keeps your air gap reliable. Don’t wait for a major failure to act.
Safety And Compliance
Safety and compliance are key when installing an air gap for your water softener. This ensures clean water and prevents health risks. Following rules protects your home and keeps your system working well.
Local Plumbing Codes
Check local plumbing codes before starting the installation. These rules vary by area and set the required air gap size. Following codes avoids fines and future problems. Inspectors will verify the setup meets these standards. Always get proper permits and approvals before work begins.
Avoiding Cross-contamination
An air gap stops dirty water from flowing back into clean water lines. This prevents cross-contamination and keeps water safe to use. The gap creates a physical break between the water softener drain and the household water supply. Proper placement and size of the air gap are vital. This small space helps maintain water quality and hygiene in your home.
Credit: www.swtwater.com
Credit: terrylove.com
Frequently Asked Questions
What Is An Air Gap For A Water Softener?
An air gap is a space that stops water from flowing backward into your softener. It keeps your water clean and safe. This gap helps avoid contamination.
Why Is An Air Gap Important For Water Softeners?
It prevents dirty water from flowing back into clean water pipes. This keeps your water safe to drink. The air gap protects your home’s water system.
How Do I Create An Air Gap For My Water Softener?
Place the softener’s drain hose above the flood level of the drain. Leave a small open space between the hose and drain pipe. This space acts as the air gap.
Can I Install An Air Gap Myself?
Yes, installing an air gap is simple and can be done at home. Just follow the instructions carefully. Make sure the hose is positioned correctly above the drain.
What Tools Do I Need To Make An Air Gap?
You need a hose, a clamp, and a drain pipe or standpipe. A screwdriver may help secure the hose. Basic plumbing tools are usually enough.
How High Should The Air Gap Be Above The Drain?
The hose end should be at least 1 inch above the drain’s flood level. This height prevents water from flowing back. Check your local codes for exact rules.
What Happens If There Is No Air Gap In A Water Softener?
Contaminated water can flow back into your clean water supply. This risks health and damages your plumbing system. An air gap stops this problem safely.
Conclusion
Creating an air gap for your water softener helps keep water safe and clean. It stops dirty water from flowing back into your system. You just need a few tools and some careful steps. This simple setup protects your pipes and your home.
Remember to check local rules before starting. With the right approach, you can do this job yourself. Keep your water softener working well and avoid problems down the line. Easy, safe, and smart.