
Yes, you can bake and broil in a wall oven because these units are designed with separate heating elements for each function. Most modern electric wall ovens use a lower element for baking and an upper element for intense direct heat during broiling. You’ll find that these appliances operate similarly to standard ranges, though heat retention and airflow can vary depending on the model’s internal fan settings. Check your specific manual to see if your unit requires the door to remain partially open or closed during broiling.
Who uses wall ovens for cooking
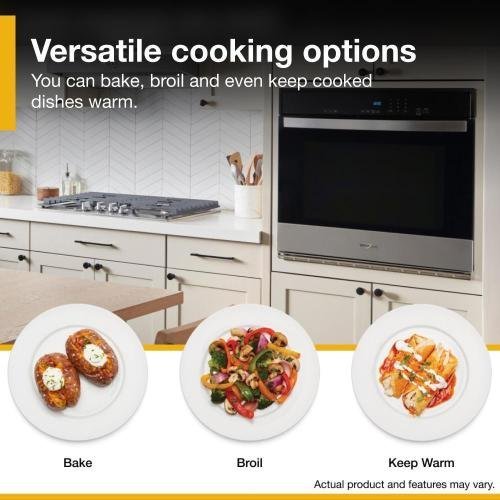
Home cooks who choose wall ovens usually value the ergonomic design that allows them to lift heavy dishes at counter height rather than bending down. These users often have integrated kitchens where the oven is installed in a cabinet, freeing up floor space for a separate cooktop. They need to know if their appliance handles both gentle heat for cakes and high-intensity heat for searing because they often rely on one single cavity for all their culinary tasks.
This page serves owners of standard built-in convection or traditional electric wall ovens. If you possess a specialized steam oven or a small microwave-combination unit, the settings and heating capabilities will differ significantly from what is described here. We assume you’re using a standard residential electric unit. If you’re a professional chef working with high-volume gas-fired industrial equipment, the safety clearance requirements and ventilation needs are much stricter than what a typical home installation requires. This information is intended for the person who wants to switch between modes safely without damaging the appliance or ruining their meal.
What decides the outcome
The type of heating element controls the intensity of your results. Most wall ovens feature a hidden bake element under the floor of the oven and an exposed broiler coil at the top. If your unit is a convection model, a fan will circulate air to ensure even browning during baking, but this fan usually turns off during the broiling process to prevent uneven charring.
Element wattage determines how fast the oven reaches the target temperature. A high-wattage broiler element reaches surface temperatures exceeding 500°F rapidly, which is ideal for browning meat. You can verify your oven’s specific power rating by checking the data plate located on the inner frame of the door or the side panel.
Door position is the most common mistake people make. Some manufacturers require the oven door to stay slightly ajar during broiling to prevent the thermostat from cutting the heat, while others require it to be fully closed. If you close the door on a model that requires venting, the internal temperature can rise too high and trigger a safety shut-off or damage the electronic control board.
Ventilation setup matters for safety. Broiling produces significant smoke, especially when cooking fatty cuts of meat. Ensure your kitchen hood is running at the highest setting before you start. If your wall oven is located in a narrow galley, the smoke can trigger your home’s fire alarm system within minutes.
Operating the oven modes
- Clear the oven cavity of all unnecessary racks, as the broiler element is usually located at the very top of the unit.
- Position the top rack 3 to 4 inches away from the broiler element for high-heat searing.
- Select the “Bake” mode on your control panel and input the desired temperature, typically 350°F for general recipes.
- Allow the oven to preheat until it reaches the set temperature, which usually takes 10 to 15 minutes depending on the unit’s power.
- Switch to “Broil” mode only when you’re ready to apply direct heat, as this mode doesn’t use the thermostat in the same way as baking.
- Place your food on a broiler pan, which allows fat to drip away from the heat source and prevents grease fires.
- Monitor the food constantly, as broiling can turn a dish from golden brown to burnt in less than 60 seconds.
- Use a food thermometer to ensure meats reach safe internal temperatures, as FoodSafety.gov’s chart provides the specific degree requirements for different proteins.
- Turn the oven off immediately after the cycle ends to allow the elements to cool down.
The judgement call that separates a professional result from a burnt one is the distance between the food and the element. If you’re broiling thin items like shrimp or thin fish fillets, move the rack down one level to avoid immediate charring.
The variations at a glance
| The situation | What to do | What it takes | What to watch for |
|---|---|---|---|
| Baking cookies | Use middle rack | 10-12 minutes | Even golden edges |
| Broiling steak | Use top rack | 5-8 minutes | Frequent flipping |
| Roasting chicken | Use bottom rack | 60-90 minutes | Internal temperature |
| Melting cheese | Use top rack | 2-3 minutes | Bubbling surface |
| Reheating pizza | Use middle rack | 5-7 minutes | Crispy crust |
Positioning matters because heat behaves differently based on proximity to the elements. The top rack is an intense heat zone, ideal for searing or browning, but it carries a high risk of burning. If you see smoke, move your tray down immediately.
The middle rack is your neutral zone. It provides the most consistent air circulation for even cooking. Use this for anything requiring a balance between a crisp exterior and a soft interior.
The bottom rack is for slow, deep heat. It’s essential for heavy items like whole poultry. If you place a chicken on the top rack, the skin will char before the meat reaches a safe internal temperature of 165°F.
Always preheat for at least 15 minutes before starting your timer. If you skip this, your cook times will be inaccurate. A common mistake is overcrowding the pan, which traps steam and prevents browning. If the pan is crowded, add two minutes to your cook time and rotate the tray halfway through. When in doubt, prioritize the middle rack to avoid burning your meal.
Elements of quality cooking
Preparation and placement
Successful baking requires consistent airflow. Always leave at least two inches of space between your pans and the oven walls to ensure the heat circulates properly. Experienced cooks place their baking sheets on the center rack to avoid the bottom element, which is often hotter than the rest of the cavity. If you use dark-colored pans, your food will brown faster than it would in light-colored aluminum pans, so you may need to reduce your temperature by 25°F to prevent the edges from burning before the center is cooked.
Monitoring the process
Broiling is an active process that requires your full attention. Never leave the kitchen while the broiler is engaged, as the high heat can ignite accumulated grease on the bottom of the pan. If you notice smoke, the rack is likely too close to the element. Lower the rack by one level and check the food again after two minutes. Always keep a fire extinguisher rated for grease fires in your kitchen, as water will only spread burning oil.
What goes wrong, and what to do
| What you notice | What it usually means | What to do first | How to stop it happening again |
|---|---|---|---|
| Heavy smoke | Fat dripping | Turn off heat | Use a deeper pan |
| Uneven browning | Poor airflow | Rotate the pan | Don’t crowd the oven |
| Burnt top | Rack too high | Move rack down | Monitor more closely |
| Food not cooking | Element failure | Call a technician | Check power supply |
| Constant beeping | Overheat error | Open the door | Clean the vent |
Most cooks assume smoke signals a ruined meal, but it often indicates a simple maintenance oversight. If you see thick, gray smoke, check the bottom of your oven for carbonized debris. A single spill left to bake for three cycles will smoke every time you exceed 350 degrees.
If your food remains raw in the center despite a charred exterior, you’re likely suffering from a calibration drift. Most residential ovens lose accuracy by 25 degrees after three years of heavy use. Use a dedicated oven thermometer to verify the internal temperature before calling for repairs. If the reading differs by more than 15 degrees, consult your manual to adjust the thermostat offset.
Never ignore a constant beep. This usually signals a blocked intake vent, which forces the internal fan to cycle indefinitely. If the vent is clear and the noise persists, check your circuit breaker. A tripped dual-pole breaker often leaves the control panel active while disabling the heating element entirely. Always wait for the unit to reach room temperature before attempting a manual reset.
The rules that apply
Safety standards for residential ovens are governed by the Underwriters Laboratories (UL) 858 standard, which dictates how appliances must handle heat and electrical load. These rules require manufacturers to include thermal cut-off switches that prevent the unit from reaching dangerous temperatures.
If your oven fails to heat, never attempt to open the control housing yourself. A common mistake is assuming a lack of power means the circuit is safe; touching the wrong terminal can result in a severe shock.
Repairs involving the heating element or the control board must be handled by a qualified appliance technician. If you’re in a rental property, consult your lease agreement. Most standard leases designate the landlord as responsible for built-in appliances, but you remain liable for damage caused by improper cleaning agents.
Always store your oven manual in a safe place. It contains the manufacturer’s specific guidance on cleaning, which is the primary factor in warranty validity. If your oven uses a pyrolytic self-cleaning cycle, check the manual for the maximum duration allowed. Running these cycles too frequently can cause the thermal fuse to trip prematurely, leading to a costly service call that the warranty won’t cover.
Use this decision rule: if the oven has power but no heat, check the breaker first. If the breaker is fine, stop immediately and call a professional. Attempting a DIY fix on the control board often voids the manufacturer’s warranty and creates a fire hazard that insurance companies may refuse to cover.
What it costs you
The real cost of using your wall oven involves the electricity consumed during long baking cycles. A typical electric wall oven uses between 2,000 and 5,000 watts of power per hour. Your specific energy cost depends on your local utility provider’s rate per kilowatt-hour, which you can find on your monthly electricity bill. To lower your costs, avoid opening the oven door unnecessarily, as each opening causes a heat loss that forces the oven to work harder to recover its temperature. If you’re cooking multiple dishes, try to bake them all at once to maximize the energy used during the preheat phase. Time is also a significant cost here, as regular cleaning of the oven interior prevents the build-up of carbonized grease, which can eventually lead to expensive repairs or the need for a full replacement.
Keeping it right afterwards
Maintenance after cooking ensures your oven continues to perform consistently. Once the oven has cooled completely, wipe down the interior with a damp cloth and mild detergent to remove food splashes. Acidic spills like tomato sauce or sugary drippings can etch the enamel lining if left for more than twenty-four hours.
If your oven has a self-cleaning feature, use it only when there’s a significant build-up of grease. The extreme heat used during this cycle can stress the electronic control board. Most technicians recommend running this cycle only occasionally to prevent premature failure of the thermal fuse.
The sign that your oven needs professional attention is a visible break in the heating element coil or a consistent temperature variance of more than 20°F from the set point. Use an independent oven thermometer to verify this variance, as internal sensors often fail to report their own inaccuracies.
If you notice these signs, don’t attempt to bypass the safety locks or replace the element yourself. Contact the manufacturer or a certified service provider to ensure the repair meets local safety codes. Always demand a written summary of the diagnostic tests performed to ensure the underlying cause, rather than just the symptom, has been addressed.
When this is the wrong approach
If you’re trying to achieve a true wood-fired crust or a smoky flavor profile, a standard wall oven won’t provide the result you want. These units lack the intense ambient heat and airflow required to blister dough properly. For these specific textures, use an outdoor grill or a dedicated pizza oven that can reach temperatures above 700°F.
Additionally, if you’re attempting to dehydrate large quantities of fruit or meat, an electric wall oven is often too efficient at retaining moisture. Even on the lowest setting, the sealed environment traps steam, which prevents the necessary evaporation for preservation. A dedicated food dehydrator with active ventilation is the correct tool for that task.
Don’t attempt to modify your wall oven by adding external fans or blocking the vents. This creates a significant fire hazard and voids your insurance coverage. If you see your oven’s internal temperature gauge fluctuating by more than 25°F during a long cycle, stop immediately. Attempting to force a tool to perform outside its design parameters often results in ruined ingredients and costly electrical repairs. Always choose the appliance built for the specific thermal output you require to ensure both safety and consistent, professional-grade culinary results.
Frequently asked questions
Can you use glass pans in a wall oven?
Yes, you can use glass pans, but you should lower the oven temperature by 25°F to prevent the glass from shattering due to thermal shock. Glass retains heat differently than metal, so check your food for doneness about five minutes earlier than the recipe suggests.
How long does it take to preheat?
Most wall ovens take 10 to 15 minutes to reach a standard baking temperature of 350°F. If your oven is an older model or a very large unit, it may take up to 20 minutes to stabilize the temperature throughout the entire cavity.
Is it safe to leave the door open while broiling?
It depends on the manufacturer’s instructions, so you must check your specific owner’s manual before you begin. Some models are designed to vent through the top of the door, while others require the door to be closed to maintain the correct internal pressure for the broiler element.
Why does my oven smoke during baking?
Smoke during baking usually means there’s leftover grease or food debris on the bottom of the oven. Clean the oven interior thoroughly to remove carbonized food particles, and ensure you aren’t using a pan that’s too small, which causes spills to hit the oven floor.
Does it matter which rack I use?
Yes, the rack position significantly changes the heat exposure because the bottom element is used for baking and the top for broiling. Use the center rack for most baking tasks to ensure even heat distribution, and use the top rack only when you need direct, intense heat from the broiler.
What happens if I use the wrong mode?
Using the wrong mode will result in uneven cooking, such as a burnt top if you use the broiler for baking or an undercooked center if the heat is too intense. Always verify that your control panel is set to the correct function before you turn the heat on.
Bake broil, in short
Start your cooking session by ensuring the oven is clean and the racks are in the correct position for your chosen mode. You’ll know the oven is ready when the preheat indicator light turns off or the display shows the target temperature. If the oven fails to reach the set temperature or produces excessive smoke, stop the process immediately and consult your manual or a technician.
Related guides