
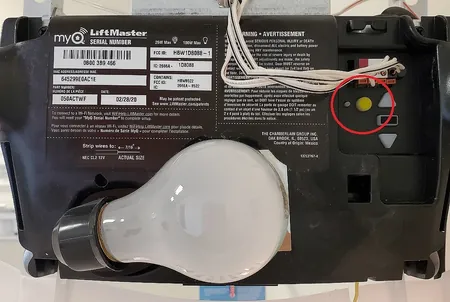
You press and hold the small, square button on the motor housing to put your garage door opener into programming mode. This overhead door phantom learn button allows you to pair a new remote or keypad with your existing system in about 30 seconds. Most homeowners find this process straightforward, provided they have a working remote and clear access to the ceiling-mounted motor unit. You should only attempt this if your wall switch currently operates the door correctly.
Essential Tools for Programming
You need a few specific items to ensure the pairing process goes smoothly. Having these ready prevents you from needing to climb up and down the ladder multiple times while the system is in its short learning window.
- A sturdy, stable ladder that reaches the motor housing safely.
- The remote control or wireless keypad you want to program.
- A flashlight if your garage lighting is dim or the motor cover blocks your view.
- A flat-head screwdriver if you need to remove the light cover to reach the button.
- Fresh batteries installed in your remote to ensure a strong signal during the sync.
You can use a standard step ladder, but never balance on chairs or boxes, as these are unstable and increase your risk of falling. If you’re unsure about the specific battery type for your remote, check the official product manuals provided by the manufacturer.
Using the wrong battery voltage often results in a weak signal that fails to register with the motor unit. If you have any mobility concerns or are uncomfortable working at heights, ask a friend to assist you or contact a local professional.
Programming Your Overhead Phantom Learn Button
Follow these steps to link your remote to your opener. You must be near the motor unit to complete this, as the signal range is very short during the learning phase.
Place your ladder securely under the garage door opener motor housing. Ensure the ladder is on level ground to prevent shifting while you reach overhead.
Locate the square button on the motor cover, often labeled as “Learn” or “Program.” Press and release this button once; a small LED indicator light will begin to glow steadily.
Stand within 10 feet of the motor unit and press the button on your remote control once. If the LED light on the motor blinks or turns off, the signal was accepted. Test the remote by pressing the button again to see if the door moves.
Don’t hold the learn button for more than 5 seconds. Doing so triggers the factory reset mode, which wipes every existing remote and keypad from the system memory. You’ll then need to manually re-pair every device you own.
If the door doesn’t respond, check the remote’s frequency. Most modern openers use 315 MHz or 390 MHz. If your remote is older than ten years, it likely operates on a different frequency than your current motor unit and will never sync.
Look for the model number on the back of your remote. If it doesn’t match the compatibility list printed on your motor housing, the hardware is incompatible.
If you have multiple remotes, program them one at a time. Wait for the LED light to stop flashing between each device. If you attempt to sync them too quickly, the motor unit may fail to register the unique rolling code for the second device.
If the light flashes but the door remains stationary, check the safety sensors at the bottom of your door tracks. If those sensors are misaligned, the motor will ignore all remote signals as a safety precaution.
Adjusting for Different Situations

The time and effort required to sync your door depend on the age of your equipment and the number of devices you’re adding. Starting with a single remote is always the safest way to verify the system is working before you add secondary units.
| Situation | Time Needed | Difficulty | Key Factor to Watch |
|---|---|---|---|
| Single Remote | 2 minutes | Low | LED confirmation light |
| Wireless Keypad | 5 minutes | Medium | PIN entry sequence |
| Multiple Remotes | 8 minutes | Medium | Rapid button presses |
| Older Model | 10 minutes | High | DIP switch alignment |
If you’re working with a system manufactured before 2005, look for a physical “Learn” button on the motor housing. If that button is missing, you must manually match the internal DIP switch patterns on both the remote and the receiver. Failing to align these switches exactly will prevent the signal from ever reaching the opener.
Always add one device at a time to ensure each one connects properly to the receiver. It’s much easier to troubleshoot a single failed connection than to try and fix a group of remotes programmed all at once.
If your LED light flashes rapidly during the process, the receiver is likely full. In this case, you must perform a factory reset on the motor to clear the memory before adding new devices. If the light remains solid, the connection is active and ready for daily use.
Verifying a Successful Connection
A successful connection is confirmed when the motor’s indicator light stops blinking or turns off immediately after you press the remote button. If the light stays on or continues to flash, the motor didn’t receive the signal. This usually happens because the remote was too far away or the button wasn’t pressed firmly enough.
If the light remains solid after your attempt, you’re likely dealing with a frequency mismatch or a full memory bank. In these cases, clear the internal memory by holding the learn button for 10 seconds before restarting the sync. Don’t skip this step, as failing to purge old codes often prevents the motor from accepting new credentials.
Keep your remote antenna clear of metal objects during the sync process. If the motor still fails to respond, move the remote within three feet of the housing. If the light flashes rapidly upon entry, the remote is out of sync with the rolling code protocol. Perform your final test while standing inside the garage with the door closed to ensure the motor is responding to your specific frequency.
Rules and System Maintenance
The safety of your garage door depends on maintaining the tension and alignment of the mechanical parts. Per the Underwriters Laboratories safety standards for garage door operators, your system must include an auto-reverse feature that triggers if the door hits an object. After programming, verify this sensor is active by placing a two-by-four piece of wood flat on the floor in the center of the door’s path.
If the door doesn’t reverse within two seconds of touching the wood, stop using the remote immediately. Disconnect the opener from the door using the emergency release cord to prevent accidental operation. Most failures occur because the infrared safety beams at the base of the door are misaligned or obstructed by debris. Check that the indicator lights on both sensors are solid, not flickering.
If the lights are dim or blinking, adjust the mounting brackets until they face each other directly. A common mistake is assuming the door is safe because it closes smoothly; this ignores the invisible risk of a sensor failure during an emergency. If you can’t get a solid signal after cleaning the lenses, contact a certified technician to perform a full system inspection. Never attempt to adjust the high-tension springs yourself, as these carry enough force to cause severe injury.
Alternative Programming Methods

Using the Wall Console
If you have a wall-mounted console with a “Program” button, you can often sync remotes without touching the ceiling motor. This is much easier if your ladder access is limited. You simply press the button on the wall station and then the button on your remote. This method works for most modern units but requires the wall station to be wired correctly to the motor.
DIP Switch Systems
Older models use a series of small physical switches inside the remote and the motor housing instead of a learn button. You must set these switches to match exactly for the remote to work. This is a manual process that requires a small tool and patience, but it’s very reliable for older hardware.
Universal Remote Kits
If your original remote is discontinued, you can purchase a universal garage door remote. These kits include a bridge or receiver that connects to your motor, allowing you to use modern remotes with an outdated opener. This is a cost-effective way to modernize your system without replacing the entire motor unit.
Related guides
Frequently asked questions
Can I program my remote without a ladder?
No, you can’t program the remote without accessing the motor housing directly to press the learn button. While some wall stations allow remote programming, you must initially ensure the wall station is paired with the motor, which often requires physical access to the motor unit during the first setup.
How long does the learn mode stay active?
The learn mode stays active for 30 seconds after you press the button on the motor housing. If you don’t press the remote button within this window, the motor will exit the programming mode, and you must start the process over.
What happens if I lose my remote?
If you lose your remote, you should clear the motor’s memory immediately by holding the learn button for 10 seconds. This erases all paired devices, ensuring that a found remote can’t be used to open your garage door by a stranger.
Is it safe to program the door alone?
Yes, it’s safe to program the door alone, provided you’re using a stable ladder and aren’t standing directly in the path of the door. Always keep your hands and body clear of the tracks and moving parts while testing the remote.
Why won’t my remote sync?
Your remote likely won’t sync because the batteries are low or the remote isn’t compatible with your opener’s frequency. Check the manual to ensure the remote model matches your motor’s specifications, and replace the batteries with fresh ones before trying again.
Conclusion
Regular maintenance of your remote batteries and annual testing of the door’s safety reversal system will keep your garage entry secure and reliable for years to come.
