
A clogged or dirty sensor is the most common reason your roomba keeps saying clean debris extractors, though it can also happen because of a damaged roller or a simple software glitch. You can usually fix this by cleaning the extractors and the sensor ports under the robot. If the message persists after a deep cleaning, you should check the extractors for physical wear or debris hidden deep inside the roller housing.
Why your Roomba keeps saying clean extractors
| Cause | How common | How to confirm it | Fix it yourself? |
|---|---|---|---|
| Clogged extractors | Very common | Visible hair or dust | Yes |
| Dirty sensors | Common | Dust on sensor ports | Yes |
| Worn extractors | Occasional | Rubber looks torn | Yes |
| Stuck roller frame | Rare | Frame won’t flex | Yes |
| Internal sensor fault | Rare | Error stays after cleaning | No |
Debris buildup is the primary culprit. If you see visible hair or dust, clear it immediately. Neglecting this causes the motor to strain, which can trigger a permanent mechanical failure.
Check the sensor ports for fine, compacted grit. If the error persists after a thorough wipe with a dry microfiber cloth, the sensor itself is likely failing. Don’t attempt to pry open the housing; internal faults require professional service.
Inspect the rubber treads on your extractors for jagged edges or thinning. If the tread depth is less than 1mm, replace the parts to prevent slippage. Many users mistake a worn extractor for a sensor error because the machine stalls during operation. If your machine stops on carpet but works on hard floors, the extractors are worn. If it stops everywhere, focus your attention on the internal sensor ports.
Removing stuck debris from extractors
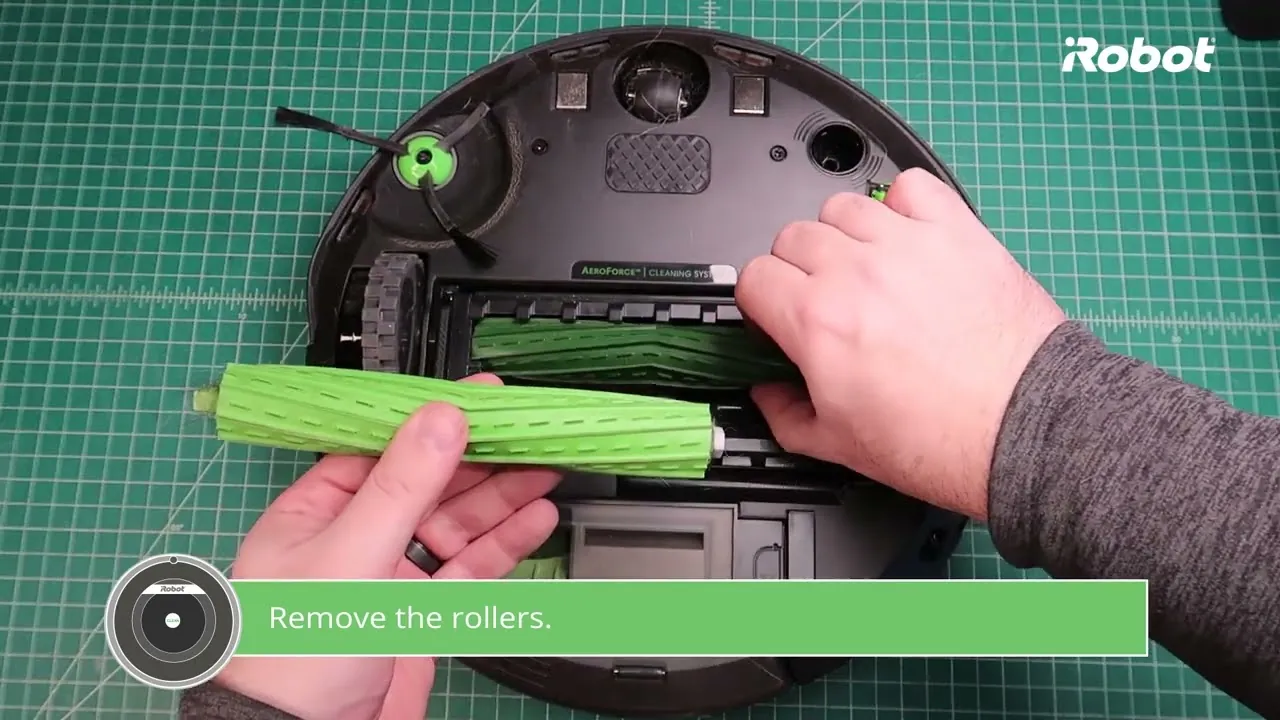
Debris trapped between the rollers often prevents the robot from spinning them freely, which triggers the error. When the machine senses high resistance, it stops to protect the motor from overheating. To fix this, turn the robot over and remove the two rubber extractors by releasing the latch on the cleaning head module. You should pull out any hair or carpet fibers wrapped around the ends of the rollers or the square pegs where the rollers connect to the motor.
Once you remove the rollers, look into the cleaning head module itself. You might find a large clump of dust or a small object like a toy or a coin blocking the path. Use a dry cloth to wipe the internal area clean. If you see dust covering the small square sensor ports inside the module, gently wipe them with a clean, dry microfiber cloth. Avoid using water or liquid cleaners, as these can damage the delicate electrical contacts.
If you find the rollers are stiff, try spinning them by hand to ensure they turn smoothly without catching. If one roller feels much tighter than the other, check the end caps for hidden debris that might be creating friction. Replacing the extractors is a straightforward task if the rubber edges are cracked or missing pieces, as these parts are designed to be user-replaceable.
Cleaning the sensor ports

Dirty sensors often trick the robot into thinking there’s a blockage when the path is actually clear. The sensors are usually located near the roller housing and rely on a clear line of sight to detect the movement of the extractors. When fine dust or pet dander coats these plastic windows, the light signal is blocked, and the system assumes the extractors are jammed.
To confirm this, look for a thin layer of grey dust on the small, recessed windows located along the sides of the cleaning head. A simple test is to shine a flashlight into the module while it’s empty. If the light doesn’t reflect clearly off the sensor windows, or if they appear dull, they need cleaning. Use a dry cotton swab to gently buff the surface of these sensors until they’re clear and shiny again.
If you have a persistent error despite a clean appearance, use a microfiber cloth dampened with a tiny drop of isopropyl alcohol. Don’t spray liquid directly into the housing, as moisture can corrode the delicate internal contacts. If the error persists after a wet wipe, the sensor is likely obscured by debris trapped behind the plastic lens. In this case, you must remove the cleaning head cover to access the internal side of the window.
Be careful not to press too hard, as you don’t want to scratch the plastic lens. If you’re cleaning in a very dusty environment, perform this task every three cleaning cycles to prevent permanent etching. If the error returns immediately after a deep cleaning, the sensor has failed. This is a hardware issue requiring a replacement module.
Addressing worn or damaged extractors
Damaged rollers can cause the robot to lose its grip on the floor or struggle to pull debris into the bin. Over time, the rubber treads on the extractors can tear or wear down, especially if the robot frequently picks up sharp objects or heavy grit. You can tell they’re worn if the rubber feels smooth, thin, or if you see pieces missing along the spiral blades.
When the extractors are worn, they no longer rotate with the intended tension, causing the software to report a jam. If you notice significant physical degradation, replacing the rollers is the only way to resolve the error. Most models use a simple snap-in design that allows you to swap the old parts for new ones in just a few seconds.
Check for hairline fractures in the plastic housing near the gear teeth. If you see white stress marks on the plastic, the extractor is likely warped and will skip teeth under load. Don’t attempt to glue these tears, as the adhesive will harden and create an uneven surface that damages the floor. If the error continues even with brand-new rollers, the issue likely lies with the drive motor or the internal gear assembly.
Rare mechanical and electrical issues
A stuck cleaning head frame prevents the rollers from maintaining proper contact with the floor, causing the robot to work harder and trigger a false jam alert. If the unit stalls on flat surfaces, check for debris wedged in the pivot points before assuming a mechanical failure.
Internal gear wear inside the module causes the rollers to bind, often accompanied by a loud grinding noise. If you hear a rhythmic clicking while the vacuum is stationary, the gears have likely stripped. This requires a module replacement, as individual teeth can’t be repaired.
A damaged motor will eventually stop responding to commands. If the rollers fail to spin despite a clean path, test the module by manually rotating the brushes. If they offer significant resistance, the motor has seized.
If the robot suffered a recent drop, internal wiring might be loose. If the unit powers on but the cleaning head remains unresponsive, the ribbon cable has likely disconnected from the motherboard.
What a fix usually involves
Fixing this problem is typically a matter of time and patience rather than expensive tools. Most of the time, you only need a dry cloth and a pair of scissors to carefully snip away hair that has become tightly wound around the roller shafts. Use a seam ripper if the hair is embedded deep within the grooves, as it slices through stubborn fibers without scratching the plastic housing.
If you need to replace the extractors, you’ll find that the cost is similar to buying a set of replacement filters. The total expense depends on whether you can solve the issue with cleaning or if you must buy a replacement module. Check the price of genuine parts directly on the manufacturer’s website by searching for your robot’s specific model number.
If the unit still grinds after you have cleared the debris, the internal gear assembly is likely stripped. In this case, stop using the vacuum immediately to prevent the motor from burning out.
If you aren’t confident in your ability to replace the cleaning head module, a professional repair service will charge for labor, which is often more expensive than the part itself. Always verify your warranty status before attempting any repairs that involve opening the robot’s main casing, as unauthorized entry voids your coverage.
Related guides
Frequently asked questions
Can I run the roomba without the debris extractors?
No, you shouldn’t run the robot without the extractors installed. The vacuum relies on these rollers to create a seal against the floor, which is necessary for the suction to work effectively. Running the machine without them will result in almost zero cleaning performance and may cause debris to get sucked directly into the internal vacuum fan, potentially damaging the motor.
How often should I clean the extractors?
You should clean the extractors at least once every week if you have pets or long hair in your home. If you have a cleaner home with no pets, checking them once every two weeks is usually sufficient to prevent the buildup that triggers error messages. Always check the rollers immediately if you notice the robot leaving behind large amounts of dirt on the floor.
Is it safe to wash the rollers with water?
No, you shouldn’t wash the rollers or the cleaning module with water. The internal components, including the motor and the sensors, aren’t waterproof and can easily short-circuit if moisture enters the housing. Use only a dry microfiber cloth or a soft-bristled brush to remove dust and hair from the extractors and the surrounding area.
How do I know if the motor is broken?
You can tell the motor is likely broken if you have thoroughly cleaned the rollers and the sensor ports, but the error message continues to appear the moment you start a new cleaning cycle. A failed motor often makes no sound at all, or it may produce a high-pitched whine that sounds different from its normal operation. In this case, the module requires a full replacement.
What happens if I ignore the error?
If you ignore the error, the robot will simply refuse to start a cleaning cycle to prevent further damage to its internal parts. The system is designed to stop immediately when it detects a resistance issue to save the motor from burning out. Continuing to force the robot to run will eventually lead to a permanent hardware failure that can’t be fixed by cleaning.
Does it matter if I use third-party extractors?
Yes, it matters because third-party parts often use different rubber compounds that may not fit perfectly or provide the same level of suction. While they’re usually cheaper, they can sometimes cause more frequent errors or wear out much faster than genuine parts. If you choose to use non-branded rollers, ensure they’re specifically listed as compatible with your exact model to avoid potential issues.
Conclusion
If the error message doesn’t disappear after you’ve cleared everything out, there might be a deeper mechanical issue at play. Don’t worry if you’re still stuck; it’s best to reach out to the manufacturer’s support team. They’ll help you determine if your vacuum needs a professional repair or a simple parts replacement.
