
Excessive heat, electrical surges, and mechanical wear are the primary causes of relay failure, and technicians can avoid these issues by addressing such factors.
Recognizing relay failure signs

When a relay begins to degrade, it often provides visible or audible warnings before it stops working entirely. You must catch these early to prevent damage to your circuits.
| What you notice | What it usually means | What to do first |
|---|---|---|
| Clicking sound but no power | Coil is active, contacts stuck | Tap the housing lightly |
| Burnt plastic smell | Internal overheating or short | Disconnect power immediately |
| Flickering connected device | Pitted or corroded contacts | Check load current rating |
| Relay stays closed | Welded contact surfaces | Inspect for voltage spikes |
| No sound when triggered | Open coil winding | Test coil for continuity |
| Discolored casing | Thermal overload damage | Verify ambient temperature |
If you hear a rapid, buzzing chatter rather than a single click, the control voltage is likely dropping below the threshold required to hold the armature. This often indicates a failing power supply or a loose connection in the trigger circuit.
Most technicians make the mistake of replacing the relay without checking the suppression diode. If the diode has failed, the resulting inductive kickback will weld the contacts of your new relay within hours. Measure the coil voltage while the relay is energized to ensure it’s within the manufacturer’s specified range.
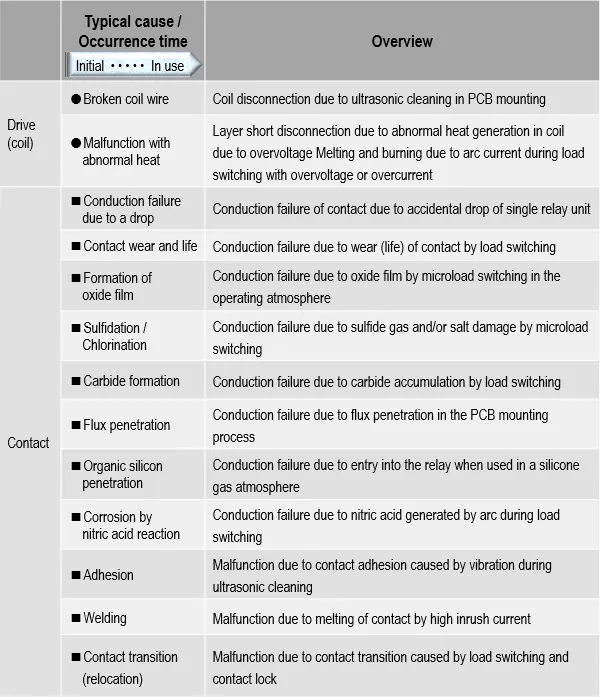
Contact welding from power surges
Contact welding happens when a high-current surge melts the metal contact points together, forcing the relay to stay “on” permanently. This is common in inductive loads like motors or solenoids that pull a massive spike of current during startup. You can confirm this by checking if the device stays powered even when the relay coil is de-energized. If the device remains on, the contacts are welded.
The fix is to install a suppression device, such as a flyback diode for DC circuits or a snubber circuit for AC loads. These components absorb the energy spike that would otherwise jump the gap between contacts.
If you’re running a load that exceeds 80% of the relay’s rated capacity, you should use a larger relay or an auxiliary contactor to handle the surge. When you hear a clean “click” and the device shuts off properly, the repair is successful. Always ensure the suppression component is rated for the specific voltage of your system.
Coil burnout from voltage issues

Coil burnout occurs when the internal electromagnetic wire receives too much voltage or remains energized for longer than its duty cycle allows. You’ll often notice a distinct, acrid smell or a darkened plastic housing once the insulation on the wire melts. To confirm this, set your multimeter to resistance (Ohms) and measure across the coil terminals; an infinite reading indicates a broken or burnt-out coil.
The fix requires replacing the relay with one that matches the exact coil voltage rating specified by the manufacturer. If your power supply fluctuates, install a voltage regulator to keep the input steady. A common mistake is using a 12V relay on a 24V line, which will cause the coil to fail in minutes.
If your application requires the relay to stay active for more than 4 hours at a time, ensure you choose a component rated for continuous duty. You know it works when the coil remains cool to the touch after 30 minutes of operation.
Causes of relay failure and how to avoid mechanical wear
Mechanical failure often results from constant vibration or exposure to dust, moisture, and extreme temperatures. These elements accelerate the oxidation of contact surfaces, increasing resistance and heat until the relay stops switching.
You can tell this apart from electrical failures because the relay might work intermittently or only when the environment is dry. If the relay works after being cleaned or moved to a stable area, environmental factors are the cause. Conversely, if the relay fails to click even in a controlled, room-temperature environment, the issue is likely a burnt coil or internal contact welding.
Many technicians mistake environmental degradation for a faulty coil, replacing the entire unit when only the terminal block requires cleaning. This oversight costs hours of unnecessary troubleshooting and premature hardware replacement.
To avoid this, use a sealed relay housing if your equipment operates in dusty or humid areas. For high-vibration environments, mount the relay on rubber dampeners to protect the delicate internal armature. If you notice signs of corrosion on the terminals, clean them with contact cleaner and ensure the connections are tight to prevent arcing. A relay that switches cleanly without hesitation is performing within its design life.
When to stop and get help
Some situations require professional attention to ensure safety and compliance with electrical codes. Don’t attempt to repair a relay yourself if you encounter these conditions:
The relay housing is cracked or melted, indicating a major short circuit. You find evidence of charred wiring or damaged insulation on the surrounding circuit. The relay is part of a high-voltage system exceeding 240V, which poses a lethal shock risk. The system requires specialized programming or complex logic integration that you aren’t trained to perform.
If you see a faint humming sound coming from the relay while the system is powered, stop immediately. This indicates a stuck contact that could cause a fire if left energized.
Most DIYers make the mistake of replacing only the relay without checking the coil voltage. If you install a new unit with the wrong coil rating, you’ll burn out the control board within minutes. Always verify the voltage printed on the relay casing against your multimeter reading. If they don’t match, call a professional.
Related guides
Frequently asked questions
Can I repair a welded relay contact?
You can’t safely repair welded contacts because the internal surface is permanently damaged and the spring tension is likely compromised. Replace the entire unit with a new one that meets the manufacturer’s specifications to prevent the relay from sticking again.
How long should a typical relay last?
A high-quality relay typically lasts between 100,000 and 1,000,000 cycles, depending on the electrical load and environmental conditions. Check the datasheet for the “mechanical life” and “electrical life” ratings, which provide the exact number of operations the component is tested to perform.
Is it safe to bypass a failed relay?
It isn’t safe to bypass a relay, as this removes the critical safety mechanism that controls the power to your device. Bypassing can lead to overheating, equipment damage, or electrical fires because the circuit will no longer have a way to shut off during a fault.
Why does my relay get hot?
A relay gets hot because of excessive current draw or high contact resistance caused by oxidation. If the casing feels hot to the touch, verify that the load current is within the limits printed on the relay label and check all terminal connections for tightness.
How do I choose the right relay?
Choose a relay by matching the coil voltage, the load current (Amps), and the contact configuration to your specific device requirements. Always select a relay with a current rating at least 20% higher than your maximum expected load to account for startup surges.
What happens if I use the wrong relay?
Using the wrong relay usually results in immediate coil burnout or contact welding, which can damage the connected device. Always verify the voltage and current ratings on the relay body against your power supply and load requirements before installation.
Does the mounting position matter?
The mounting position matters for some high-current relays that rely on gravity for the armature to return to the open position. Check the manufacturer’s installation manual to see if the relay must be mounted vertically or if it can operate in any orientation.
Conclusion
Regular maintenance doesn’t have to be a chore if you stay proactive. By keeping a close eye on your connections and monitoring for unusual heat, you’ll catch potential problems before they cause a shutdown. It’s a smart habit that’ll keep your equipment running smoothly and save you from unexpected, costly repairs later.
