
The right size depends on your vehicle’s make, model, and year, plus whether you need metric or imperial fittings. This guide explains how brake line sizing works, which fittings match which lines, and how to choose the correct replacement.
What brake line size means

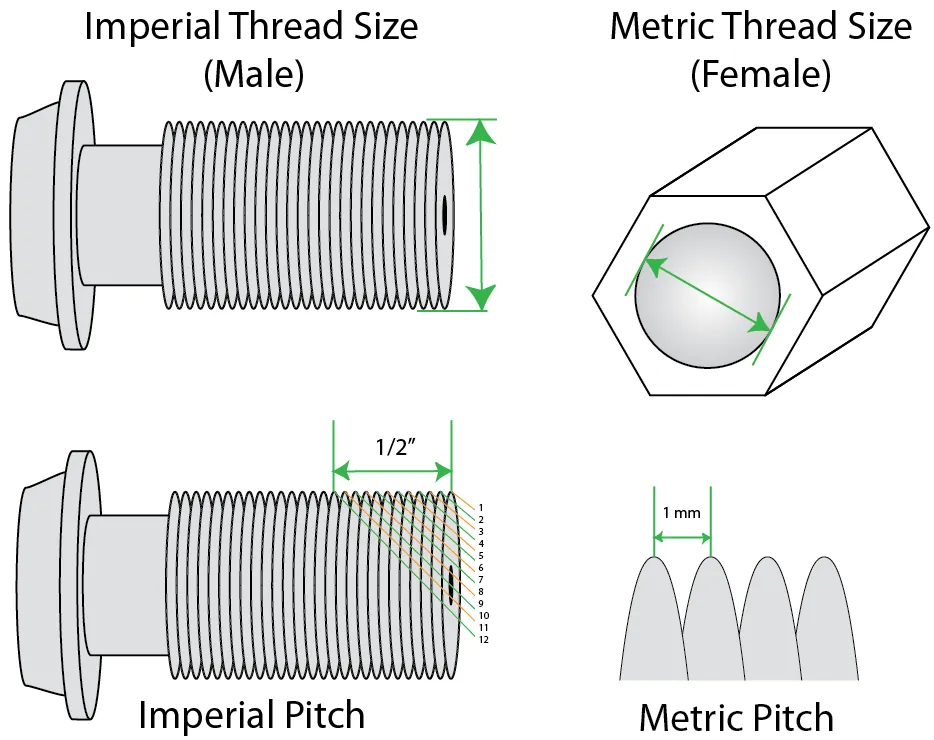
Brake line size refers to two different measurements: the outside diameter of the metal tube itself, and the size of the flare nut that connects it to the rest of the system. Most passenger vehicles use either 3/16 inch or 1/4 inch tubing. The fitting is described by its thread size and seat angle, such as a 10 mm x 1.0 mm bubble flare common on many European cars.
A common misconception is that the tube size and the fitting size are the same thing. They’re not. A 3/16 inch line often pairs with a 7/16 inch or 1/2 inch flare nut, so measuring the tube alone won’t tell you what fitting you need.
The brake system relies on high pressure, so every connection must seal exactly as the manufacturer designed it. Using the wrong size or the wrong flare type can cause a leak under pressure, which is why you should check your vehicle’s service manual before buying anything.
Choosing the right line and fitting
- Check your vehicle’s service manual or parts catalog for the original brake line size and fitting type.
- Measure the outside diameter of the existing line with a caliper, not a ruler.
- Identify the flare type: ISO bubble flare, inverted flare, or AN flare.
- Measure the thread diameter and pitch of the fitting with a thread gauge.
- Buy pre-made lines cut to length, or bulk tubing and a flaring tool if you’re experienced.
- Double-check that the new line matches the old one before you remove anything.
- Install the line and bleed the brake system according to the manufacturer’s procedure.
The single judgement call that separates a good result from a bad one is confirming the flare type before you buy. A line with the right diameter but the wrong flare won’t seal, and you can’t force it without risking a leak.
If your vehicle uses metric fittings and you buy imperial lines, they won’t thread in at all. Work on brake lines only if you have the right tools and experience; otherwise take the vehicle to a qualified brake technician.
Sizes and fittings at a glance
| Situation | What to use | How long | What to watch for | | Most passenger cars | 3/16 inch tube | Vehicle-specific | Match the flare nut thread | | Trucks and SUVs | 1/4 inch tube | Vehicle-specific | Often uses inverted flare | | European imports | Metric tube, bubble flare | Vehicle-specific | Thread pitch is usually 1.0 mm | | Custom or performance builds | AN fittings, braided hose | Measured to fit | Requires correct AN adapter | | Replacing one line | Match the old line exactly | Same as removed | Bleed the system after |
What experienced installers check first
Experienced installers never guess at brake line size. They measure the tube outside diameter with a caliper before ordering anything, because a visual estimate isn’t accurate enough for a high-pressure system. They also check the flare seat angle — bubble, inverted, or AN — since a mismatched seat will leak even if the thread screws in. Partway through the job, they verify that each new line routes exactly like the old one, with no kinks or contact with sharp edges.
They leave the old line in place until the replacement is ready to go, so they still have a reference for length and bend shape. One thing they never do is reuse an old flare nut that’s cracked or corroded, because that nut is what holds the pressure.
Problems you might notice and what to do
| What you notice | What it usually means | What to do first | | Brake pedal sinks slowly | Internal leak or failed seal | Check all line fittings for wetness | | Fluid on the ground near a wheel | Leaking line or fitting | Don’t drive; inspect that corner | | Threads won’t start | Wrong fitting size or thread pitch | Stop and verify the thread specification | | Line won’t seat fully | Wrong flare type or damaged seat | Replace the fitting, don’t force it |
If the pedal feels spongy rather than sinking, you likely have trapped air. Bleeding the system is the only fix. Never attempt to pump the pedal to compensate for a leak, as this risks total pressure loss during an emergency stop.
If you find fluid near a wheel, check the bleeder screw first. It’s often loose or corroded. If the screw is dry, trace the hard line back to the frame rail. A rusted line often pinholes under pressure, which you can confirm by having a partner press the pedal while you watch for a fine mist.
When threads resist, stop immediately. Forcing a fitting costs you the entire master cylinder or caliper, as re-tapping hardened steel is rarely successful. If the threads look clean but still bind, you’re likely mixing metric and imperial components. Always verify the pitch with a thread gauge before applying torque.
Rules and limits that apply
Brake lines are safety-critical parts, and vehicle modifications are governed by rules that vary by state. The National Highway Traffic Safety Administration publishes federal motor vehicle safety standards covering braking equipment, and many states require that brake system repairs meet those standards. If you’re replacing lines on a vehicle registered for road use, check your state’s vehicle equipment laws before you begin.
Work that affects braking performance should be done by someone with the proper training, because a mistake here can cause a loss of braking. If you aren’t confident in your ability to flare, bend, and install lines correctly, take the vehicle to a qualified brake shop.
Keeping the system sound afterward
After new brake lines are installed, the system must be bled to remove air, and the pedal should feel firm before you drive the vehicle. Check the fittings for leaks after the first few stops, and inspect the lines regularly for corrosion, cracks, or rubbing against other parts.
There’s no universal replacement interval; the sign that a line needs attention is any seepage, bulging, or external rust. If a line shows any of those signs, replace it rather than waiting. Brake fluid absorbs moisture over time, so follow the vehicle manufacturer’s schedule for fluid changes to protect the lines from internal corrosion.
When this approach is the wrong choice
This guide covers standard steel and stainless steel brake lines for passenger vehicles. It isn’t the right approach for motorcycles, aircraft, or racing vehicles that use specialized fittings and pressures beyond street use. If your vehicle has an anti-lock braking system with integrated hard lines, replacing individual sections may require dealer-level diagnostics.
In those cases, use the vehicle manufacturer’s parts and service information, or go to a technician who works on that make. Don’t attempt to adapt a line with a home flaring kit if the system runs higher pressure than the kit is rated for.
Related guides
- Best Tents for Queen Size Air Mattresses in 2026
- Best Foosball Tables by Size: Top 5 Picks in 2026
- 5 Best Full Size Professional Foosball Tables in 2026
Frequently asked questions
What size are most brake lines?
Most passenger vehicles use 3/16 inch or 1/4 inch outside diameter tubing, with the exact size set by the vehicle manufacturer.
Can I use the same fitting on every brake line?
No. Fitting size and flare type vary by vehicle, so you must match the original specification for each line.
How long does a brake line last?
There’s no fixed lifespan; inspect lines regularly and replace them at the first sign of rust, cracks, or fluid seepage.
Is it safe to flare brake lines at home?
Only if you have the correct flaring tool and experience; otherwise have a qualified technician do the work.
What happens if I use the wrong size line?
The fitting won’t seal under pressure, which can cause a brake fluid leak and loss of braking.
Why does my new line leak at the nut?
Usually the flare type or seat angle doesn’t match, or the flare nut is damaged or cross-threaded.
Conclusion
Brake line sizing isn’t one size fits all. The tube diameter, flare type, and thread pitch must all match your vehicle’s original specification, and the only safe way to confirm that’s with your service manual or a direct measurement of the old part. When in doubt, have a qualified brake technician supply and fit the lines.
