
Root mean square, or rms, is a mathematical method used to calculate the effective value of a varying quantity, such as an alternating current or voltage, by squaring the values, finding their mean, and then taking the square root. It’s important because it provides a single, consistent number that represents the heating power of a signal, allowing engineers to compare alternating current directly to steady direct current.
Understanding the mathematical core
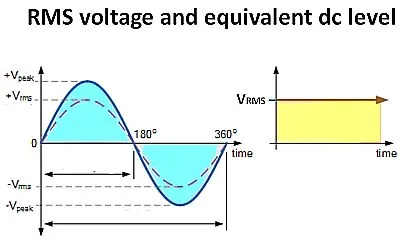
The math behind this concept helps you understand how fluctuating signals perform work. If you have a signal that swings between positive and negative, a simple average would just equal zero. By squaring every value first, you turn all numbers positive, which ensures that the peaks and troughs of the wave both contribute to the final power calculation.
This is the standard way to measure power in electrical systems. If you’re choosing a power tool or an amplifier, the rating you see is almost always an rms value. If the equipment is designed for high-load cycles, use the rms rating to calculate your heat dissipation; if it’s for short bursts, you can sometimes exceed this limit for a few seconds.
Calculating power levels
Calculating these values requires a clear understanding of the waveform shape, as the math changes depending on whether you’re looking at a sine wave, a square wave, or a triangle wave. For most household electricity, which follows a sine wave, the value is simply the peak voltage divided by the square root of two.
- Measure the peak voltage of your AC signal using an oscilloscope or a calibrated multimeter.
- Calculate the square of the peak voltage to prepare it for the mean process.
- Find the average of those squared values over one full cycle of the waveform.
- Take the square root of that average to arrive at the final effective power level.
- Apply the conversion factor of 0.707 to the peak amplitude if you’re working with a standard sine wave.
Tip: Always ensure your multimeter is set to “True RMS” mode, as cheaper meters often estimate the value based on a perfect sine wave and will provide inaccurate readings for non-sinusoidal signals.
Tip: If you’re working with high-voltage lines, ensure you have the proper safety training and insulated gear, as contact with these circuits can be fatal; check the safety guidelines provided by the Occupational Safety and Health Administration before handling any live wires.
Time requirements for measurements

The time it takes to get an accurate reading depends on the frequency of the signal you’re measuring and the speed of your equipment. A low-frequency signal requires a longer observation window to capture a full cycle, while high-frequency signals can be measured almost instantly by modern digital processors.
| Signal Type | Time to Measure | What changes it | What to watch for |
|---|---|---|---|
| 60Hz AC Power | 16.6 milliseconds | Grid frequency | Harmonic distortion |
| Audio Signals | 100-500 milliseconds | Sample rate | Peak clipping |
| Pulse Width | 1-10 milliseconds | Rise time | Signal jitter |
| DC Fluctuations | 1-5 seconds | Filter depth | Noise floor |
If your meter takes longer than these times to settle, you may have a loose connection or a signal that’s too unstable for the device to lock onto.
When measuring DC, a long settling time often indicates that the meter’s internal low-pass filter is set too deep. If you’re tracking a fast-moving transient, reduce the filter depth to improve response time, but be prepared for increased noise in your reading.
Most users mistakenly assume all signals require the same integration period. If your signal is noisy, always increase the measurement window by a factor of ten to average out the interference. If you see the reading drift steadily without stopping, the signal lacks a stable reference point, and you must switch to a peak-hold mode to capture the value.
Identifying when the calculation is complete
You know you have a stable result when the digital display on your meter stops flickering between different values. A consistent number indicates that the device has successfully averaged the squared values over one or more full cycles. If the display continues to jump, the signal likely contains significant noise or is changing too rapidly for the device’s current integration setting.
If the reading fluctuates by more than 2% over a five-second window, increase your integration time to at least ten seconds. This extra duration filters out transient spikes that lead to inaccurate power readings.
Professional engineers often verify this by observing the waveform on a screen to ensure it’s periodic. If the signal isn’t repeating in a regular pattern, the math becomes much more complex and requires specialized data logging equipment. Always check the manufacturer’s manual for your specific tool to see the minimum frequency it can reliably measure. If your signal frequency falls below this threshold, the meter will fail to lock onto a cycle, rendering the output data entirely unreliable.
Errors that spoil your results
- Measuring non-sinusoidal waves with a basic meter: Many low-cost tools assume a perfect sine wave. They will give you a reading off by as much as 30% if the wave is distorted. Use a “True RMS” meter to ensure the math accounts for the actual shape of the signal. This matters most on variable-frequency drives and dimmer circuits. Those loads chop the waveform into sharp pulses that fool average-responding meters every time.
- Ignoring the frequency range of the tool: If you try to measure a signal faster than your meter can handle, the result will be artificially low or completely wrong. Check the technical specifications of your device. Your target frequency must fall within the supported range. A standard multimeter might handle power lines at 60 Hz perfectly. That same meter often loses accuracy past 1 kHz when measuring switching power supplies.
- Poor probe contact during measurement: Any resistance at the point of contact creates heat and voltage drops. These ruin the accuracy of your calculation. Ensure your probes are clean and firmly pressed against the test points to get a stable, reliable number. Oxidation on aluminum bus bars causes the most trouble here. Always scrape through the dull surface film before taking your reading.
Related guides
- 7 Best Drill Bits for Electrical Rough In: Expert Picks in 2026
- Bidet Toilet Seat Electrical Requirements: A Safety Guide in 2026
- Are Smart Ovens Worth the Price? A Practical Value Analysis in 2026
Frequently asked questions
Can I use a standard multimeter for all measurements?
No, a standard multimeter will only give accurate rms results for a perfect sine wave. If you’re working with modern electronics, which often use square or sawtooth waves, you must use a tool labeled “True RMS” to get a correct, meaningful number.
How do I know if my device is true rms?
Look for the label “True RMS” on the front of the meter or check the technical specifications in the manual. If the box only says “average responding” or doesn’t mention rms, it’s using a simplified calculation that will be incorrect for most non-standard electrical signals.
Why does my reading change when I move the probes?
It changes because of contact resistance or because your probes are picking up electromagnetic interference from nearby wires. To get a steady reading, ensure your probes are touching clean metal and keep your hands away from the sensor tips to prevent body capacitance from affecting the result.
What happens if I use the wrong rms value?
Using the wrong value means your power calculations will be incorrect, which can lead to overheating components or equipment failure. If you calculate power based on a peak value rather than the effective value, you’ll significantly underestimate how much work the circuit can handle, leading to potential damage.
Is it safe to measure high voltage?
It’s safe only if you’re using equipment rated for the specific voltage level and you have received proper electrical safety training. Never attempt to measure high-voltage circuits without ensuring your multimeter probes and the meter itself are rated for the category of the environment you’re testing.
How often should I calibrate my meter?
You should calibrate your meter according to the manufacturer’s schedule, which is usually once every 12 months for professional use. If you drop the meter or suspect it’s reading incorrectly, perform a test against a known, stable voltage source to verify its accuracy before trusting it with critical work.
Conclusion
The accuracy of your power measurements relies entirely on using the right tool for the specific signal type you’re testing. When you match your equipment to the signal’s frequency and shape, you gain a reliable number that prevents equipment damage and ensures your circuits run exactly as intended.
