
You can safely complete a how to wire a uk plug 3 wire step by step guide by matching the colored wires to their specific terminals inside the plug casing. This process requires a small screwdriver and a sharp pair of wire strippers. This guide covers the essential safety steps and cable preparation needed to ensure your appliance works without any electrical hazards.
Understanding the Plug Components
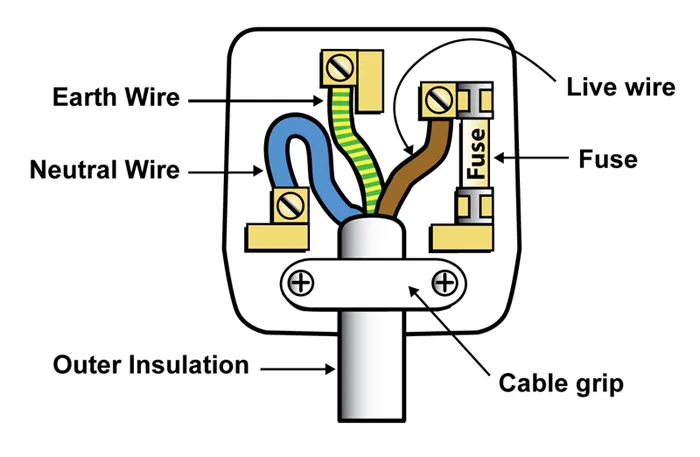
A standard UK plug, known as the BS 1363 type, is designed for safety and durability. It features three pins: the live, the neutral, and the earth. The plug housing also contains a replaceable fuse, which protects the appliance from current surges. It’s vital to use the correct fuse rating for your specific device to prevent the internal wiring from overheating during normal use.
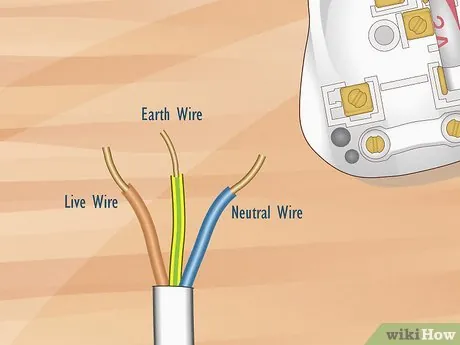
Many people assume that all plugs are wired the same way, but the internal cable length varies based on the device’s design. The most important rule to remember is that the blue wire always goes to the terminal marked ‘N’, the brown wire to the ‘L’ terminal, and the green-and-yellow striped wire to the ‘E’ or earth symbol. If you’re ever unsure about the wiring color codes, you should check the official guidance from Electrical Safety First.
Step-by-Step Guide to Wiring a 3-Pin Plug
Follow these steps carefully to ensure a secure connection. If you don’t have the proper tools, such as wire strippers, don’t attempt to use a knife, as this often nicks the copper strands and creates a fire risk.
- Unscrew the main cover screw on the back of the plug and remove the cover.
- Loosen the two screws on the cable grip at the bottom of the plug.
- Strip about 1 inch of the outer insulation from the cable to reveal the three internal wires.
- Strip about 0.5 inches of insulation from the end of each individual wire.
- Twist the exposed copper strands of each wire tightly so they don’t fray.
- Insert the blue wire into the terminal marked ‘N’ and tighten the screw firmly.
- Insert the brown wire into the terminal marked ‘L’ and tighten the screw.
- Insert the green-and-yellow wire into the ‘E’ terminal and tighten the screw.
- Tighten the cable grip over the outer insulation and replace the cover.
The key judgement call is ensuring the cable grip clamps onto the outer plastic sheath of the cable and not the individual colored wires. If the grip only holds the thin wires, they will pull loose over time, which creates a dangerous short circuit.
Essential Settings and Connections
| Connection Point | Wire Color | Screw Terminal | Purpose |
|---|---|---|---|
| Live Wire | Brown | L | Carries current |
| Neutral Wire | Blue | N | Completes circuit |
| Earth Wire | Green/Yellow | E | Safety ground |
| Cable Grip | Outer Sheath | Clamp | Keeps cable secure |
Always double-check that no stray strands of copper are touching an adjacent terminal. If you see even a single loose strand, unscrew the terminal and re-insert the wire to ensure a clean, isolated connection.
Avoiding Dangerous Mistakes
The most common mistake people make is failing to tighten the terminal screws enough. If the wire is loose, it will heat up due to resistance, which can melt the plastic plug casing. You want the screw to bite firmly into the copper, but you must not over-tighten it to the point where the screw head strips.
Another error involves leaving too much of the colored wire exposed outside the terminals. You should only have enough exposed copper to fit inside the terminal block. If you leave excess bare wire showing, you increase the chance of an accidental short circuit if the plug is dropped or opened. Experienced people always pull on the cord gently after tightening the grip to ensure it doesn’t move before they put the cover back on.
Correcting Common Issues
| What you notice | What it usually means | What to do first |
|---|---|---|
| Plug feels hot | Loose terminal connection | Unplug and tighten screws |
| Appliance won’t start | Blown fuse | Replace with same rating |
| Cable pulls out | Loose cable grip | Tighten the clamp screws |
| Buzzing sound | Stray copper strands | Re-strip and re-insert wires |
If you notice a burning smell or see discoloration on the plug pins, stop using the device immediately. These signs indicate that the internal wiring has already begun to overheat. Don’t try to repair a melted plug; simply purchase a new, high-quality replacement plug and rewire the device from scratch.
Legal and Safety Requirements
Electrical work in the UK is governed by strict standards to prevent fires and shocks. The BS 1363 standard specifies that every plug must contain a fuse. You must never replace a fuse with a piece of wire or a higher rating than the manufacturer specifies on the appliance label. If you’re working on a high-power appliance, like a heater, ensure the plug itself is rated for the correct load, or call a technician.
If you find that the internal wiring color codes don’t match the standard brown, blue, and green-yellow, the appliance may be very old or from outside the UK. In this case, don’t guess the connections. Consult a qualified electrician to identify the correct wiring configuration, as incorrect connections carry a high risk of lethal electric shock.
Maintaining Your Connections
Once the plug is wired, it should remain secure for many years if handled with care. Avoid pulling the cord to unplug the device; always grip the plug body firmly. If you notice the plug casing feels loose or the pins look tarnished, you should replace the unit.
There’s no set schedule for checking plugs, but you should inspect them whenever you move an appliance or notice a change in performance. If the cable becomes frayed near the plug, cut the cord and install a new plug to keep the connection safe.
When to Seek Help
This method works for standard household appliances, but it isn’t for every situation. If you’re working with hard-wired industrial equipment or specialized lighting systems, this plug-and-play approach won’t apply. For these cases, you need a professional electrician to ensure the circuit can handle the load. Additionally, if the appliance has a damaged cord that’s too short to strip back, don’t try to splice it. You must replace the entire cable to maintain the integrity of the insulation.
Related guides
- How to Hide Wires in Home Office Setups: A Step-by-Step Guide
- 10 Best Z Wave Smart Plug Options for Reliable Home Automation in 2026
Frequently asked questions
How long does it take to wire a plug?
It takes about 10 to 15 minutes for a person with the right tools to complete the task. The time depends on your experience with stripping wires and how easily you can access the internal terminals.
Is it safe to use a screwdriver to strip wires?
No, you should never use a screwdriver or a knife to strip wires because you’ll likely damage the copper strands. Always use proper wire stripping tools to ensure the copper remains intact and safe for electrical current.
What happens if I mix up the live and neutral wires?
If you swap the live and neutral wires, the appliance may still seem to function, but it creates a significant safety hazard. It means the internal switch might cut the neutral instead of the live, leaving the device energized even when turned off.
How do I know which fuse to use?
Check the label on the appliance or the manual, which will list the required fuse amperage. Most small appliances use a 3-amp or 5-amp fuse, while high-power devices like kettles or heaters often require a 13-amp fuse.
Why does my plug keep getting loose?
A plug gets loose usually because the cable grip isn’t tightened around the outer insulation. If the internal wires are bearing the weight of the cable, they will eventually pull out of the terminals, causing the connection to fail.
Can I reuse an old plug?
Yes, you can reuse an old plug if the casing isn’t cracked, the pins aren’t bent, and the internal terminals are clean. If you see any signs of heat damage or melting, you must discard the plug and buy a new one.
Conclusion
Properly maintaining your household plugs ensures that your electronics run safely and efficiently. Always take your time during the stripping and securing phases, as the quality of your manual work is the only thing standing between a working appliance and a potential short circuit. If you follow the color codes and tighten your connections firmly, your repair will last for years.
