
Learning how to install a toilet seat takes about 15 minutes with just a wrench or screwdriver, ensuring the fixture stays secure during use. The process involves passing two bolts through the porcelain deck and tightening the nuts underneath until the washers are flush against the china.
Two conditions change the job immediately: whether your pan uses top-fixing blind anchors or bottom-access nuts, and whether the bowl has a round 16.5-inch profile or an elongated 18.5-inch profile. Modern skirted pans hide the underside completely, which demands expanding rubber plugs driven from above rather than traditional threaded locknuts turned from below.
Who should install a toilet seat
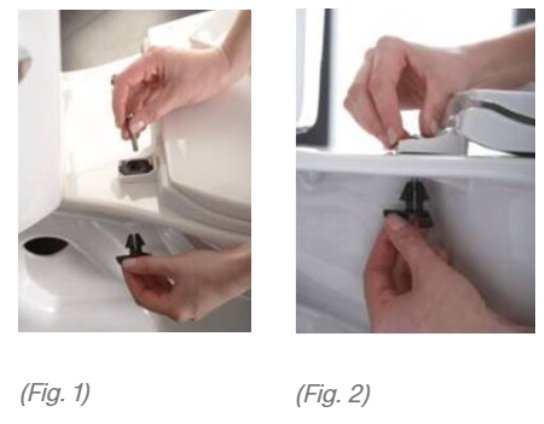
This guide serves homeowners and renters who have a loose, cracked, or stained seat and need to swap it out using basic hand tools. You likely have a standard two-piece toilet with open access underneath the rear rim, a new seat kit in a box, and an adjustable wrench or cross-head screwdriver.
A different group of readers arrives here with a fully skirted toilet base or a back-to-wall pan where porcelain blocks all reach underneath the bowl. If that describes your bathroom, standard wingnuts won’t work because your hands can’t reach behind the ceramic walls. You need top-fixing expansion bolts, which drop directly into the top of the bolt holes and swell inside the cavity as you turn the screw from above.
This page isn’t for someone dealing with a hairline fracture across the porcelain bowl itself or a cracked tank. Replacing china requires shutting off the water line, draining the tank, and lifting heavy ceramic fixtures, which demands a licensed plumber. Our instructions assume your ceramic bowl is intact, dry, and clean, with standard hole spacing across the back deck.
Factors that alter the fit
Hole spacing across the rear deck controls whether any new seat will physically mount to your porcelain bowl. In North America, the standard distance between the centers of the two mounting holes is 5.5 inches, whereas European models often measure 6 inches or use adjustable hinge brackets spanning 5 to 7 inches. If your hole spacing is 5.5 inches, choose standard domestic seats; if your spacing measures 6 inches, buy adjustable hinge assemblies. People get this measurement wrong most often because they order a replacement online without measuring the center-to-center span on the ceramic pan first.
Bowl shape dictates the length of the seat and must match your existing porcelain outline. A standard round bowl measures approximately 16.5 inches from the center of the bolt holes to the front outer edge of the porcelain rim. An elongated bowl measures roughly 18.5 inches across that same line. Installing an elongated lid on a round bowl leaves nearly 2 inches of plastic hanging over the front edge, which creates leverage that snaps plastic hinge bolts within weeks.
Access behind the bowl decides which mounting hardware you must use. Open-sided bowls let you thread plastic or brass nuts onto the bolts from underneath using your fingers or an open-ended socket. Concealed trapway toilets feature smooth, flat outer walls that seal off the underside of the deck, requiring top-fixing anchor sleeves.
Hardware material dictates long-term stability and rust resistance. Solid plastic bolts never corrode from moisture or cleaning chemicals, but they flex under heavy shifting loads. Stainless steel hardware resists lateral movement better, but standard steel will rust and seize if exposed to harsh cleansers.
How to install a toilet seat: Step by step
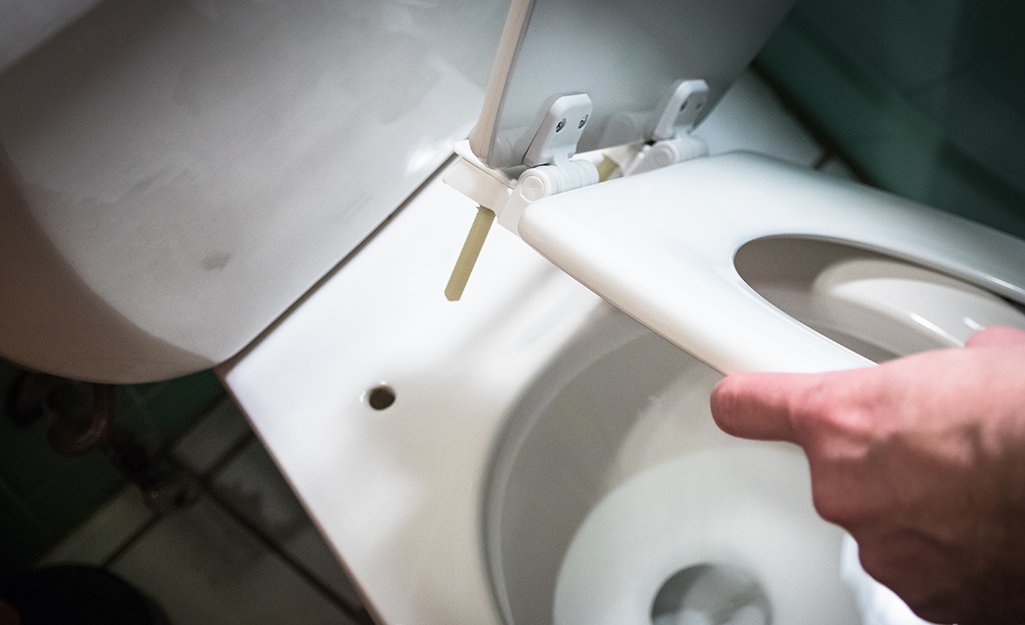
- Lift the decorative plastic hinge caps on your existing seat by prying them upward with the flat tip of a 1/4-inch slotted screwdriver until they snap open to reveal the bolt heads.
- Hold the nut under the porcelain rim with an adjustable wrench while turning the bolt head counterclockwise using a cross-head screwdriver until the threads disengage completely.
- Lift the old seat, hinges, and bolts straight up off the bowl, then set the old parts aside on newspaper or inside a heavy trash bag.
- Scrub the exposed mounting deck using an antibacterial bathroom cleaner and a scouring pad, removing all limescale, dried urine, and sediment until the porcelain feels smooth to the touch.
- Dry the bowl deck thoroughly with a clean microfiber cloth because leftover moisture causes new rubber friction washers to slide out of position during tightening.
- Press the new rubber anti-slip washers or mounting pads directly over the two bolt holes on the clean porcelain deck, aligning the holes in the washers with the holes in the china.
- Insert the new mounting bolts through the hinge bases on the seat, then lower the entire assembly onto the bowl so the threaded shafts pass down through the holes.
- Thread the included washers and nuts onto the bolt ends protruding underneath the porcelain rim from below, spinning each nut clockwise by hand until it touches the ceramic underside.
- Center the seat visually by aligning the front curve of the seat with the front curve of the porcelain rim before applying mechanical torque.
- Tighten each bolt by turning the head clockwise with your screwdriver while holding the bottom nut still with your wrench, stopping the moment the nut feels snug against the porcelain.
The single judgement call that separates a proper job from a flawed one is bolt tension. You must compress the rubber washer enough that the seat can’t pivot, but you must avoid cranking the metal or plastic threads so hard that you crack the vitreous china. Stop tightening the instant the washer flattens and resistance spikes sharply. If your pan features blind holes with stripped internal threads, stop work and hire a professional plumber to avoid damaging the internal anchor points.
Mounting styles compared
Different bathroom layouts call for distinct hardware and hinge mechanisms. Match your pan to the correct method below.
| Toilet pan style | Required hardware | Typical assembly time | What to check |
|---|---|---|---|
| Standard two-piece | Bottom-mount plastic bolts | 10 to 15 minutes | Hand access behind pan |
| Skirted concealed trapway | Top-fixing expanding plugs | 15 to 20 minutes | Plug diameter fits hole |
| Quick-release soft-close | Post-mount hinge brackets | 15 to 20 minutes | Post alignment spacing |
What separates a good result from a poor one
Preparation and bolt alignment
A durable installation depends entirely on cleaning the ceramic surface and squaring the hinge posts before locking the hardware. Experienced installers never skip degreasing the porcelain deck. Urine salts and soap scum form an invisible, slick film over glazed china; if you place new rubber washers on that film, the seat will twist sideways the first time someone sits down.
When positioning quick-release seats, fit the base plates loosely first. Snap the seat onto the hinge prongs to test the front alignment against the ceramic lip. Adjust the brackets forward or backward until the seat edge matches the bowl contour within 1/8 inch. Once aligned, carefully unclick the seat, remove it, and tighten the base screws down without letting the brackets rotate out of square.
Managing torque and materials
Experienced DIYers tighten both sides evenly in alternating passes rather than cranking one side down fully right away. Tightening one bolt all the way tilts the hinge assembly, pulling the opposite bolt sideways against the porcelain hole and causing uneven stress.
Apply three turns to the left bolt, switch to the right bolt for three turns, and repeat until both nuts compress their washers flat. Notice the trade-off here: plastic nuts never rust and yield slightly under movement, but over-tightening strips their threads instantly. Metal nuts hold rigid clamping force, but raw steel reacts with washroom cleaners and corrodes into a solid mass. Check the manufacturer label to confirm whether rubber isolation gaskets sit between metal washers and bare porcelain.
What goes wrong, and what to do
Loose parts and misaligned brackets cause most installation problems. Use this guide to resolve common issues quickly.
| What you notice | What it usually means | What to do first | How to stop it happening again |
|---|---|---|---|
| Seat slides sideways | Loose nuts or oily deck | Tighten hardware one turn | Clean deck with rubbing alcohol |
| Lid slams shut loudly | Broken soft-close damper | Check hinge cartridge alignment | Replace the hinge assembly |
| Bolt spins freely | Stripped plastic nut threads | Hold nut with locking pliers | Avoid over-tightening replacement parts |
| Uneven overhang at front | Wrong bowl size selected | Measure pan length with tape | Buy matching round or elongated lid |
| Hinge covers pop off | Hinge base plate cocked | Loosen and level the base | Ensure screws sit completely flush |
| Porcelain makes crunching noise | Missing rubber washer cushion | Loosen hardware immediately | Add rubber gaskets between surfaces |
Standards and mounting guidelines
Plumbing fixtures in North America adhere to specific dimensional codes maintained by industry standards organizations. The American Society of Mechanical Engineers publishes the ASME A112.19.2 standard alongside CSA B45.1, which establishes the dimensional requirements for vitreous china plumbing fixtures. This standard mandates that residential toilet bowls maintain a mounting hole center-to-center spacing of 5.5 inches (140 mm), with each mounting hole measuring 0.55 to 0.65 inches in diameter.
Commercial applications often follow local health codes, which may require open-front toilet seats in public restrooms. Furthermore, seats installed in public restrooms must feature smooth, nonabsorbent materials free of cracks or fabric padding to prevent bacterial harboring.
If you live in rental housing, municipal codes or tenancy agreements often regulate whether tenants may alter permanent bathroom fittings. Verify your local housing rules before swapping fixtures. If your project involves replacing broken supply lines or re-anchoring a wobbly porcelain pan to the bathroom floor, stop immediately. Work involving structural plumbing, flange repairs, or raw sewage seals requires a licensed professional plumber under local municipal building codes.
What it costs you
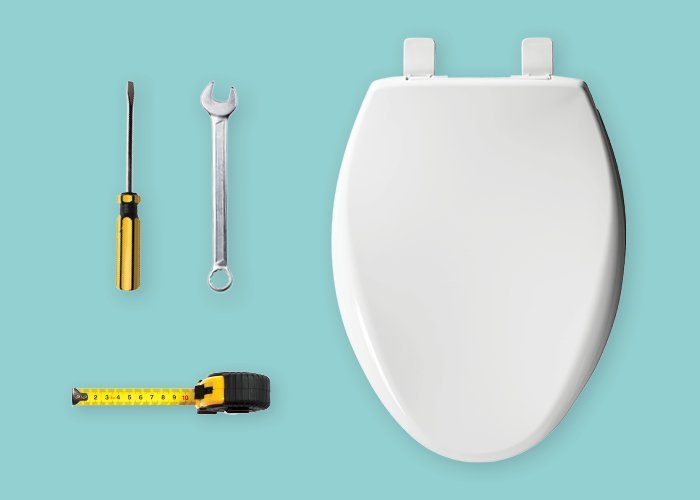
Replacing a standard toilet seat is an affordable project for basic plastic or enameled wood models bought at a home improvement center. Advanced options like bidet seats, heated bases, or heavy-duty composite designs are more expensive. The only tools you need are an adjustable wrench and a screwdriver, which are inexpensive if you don’t already own them.
Doing this repair yourself takes about 15 minutes of labor. If you hire a professional plumber, the primary cost shifts from materials to service fees. Standard trade callout rates are a significant expense simply to arrive at your home, plus hourly labor rates. You save a substantial amount by turning two bolts yourself.
The biggest risk is cracked ceramic. A replacement porcelain bowl is a costly part, plus several hours of intensive installation work. You avoid this risk completely by tightening the bolts using hand tools only, never using cordless power drills or impact drivers on porcelain fixtures.
Caring for the seat
Keep your newly fitted seat secure by cleaning it exclusively with mild liquid dish soap and warm water. Commercial spray cleaners containing harsh chemicals can damage plastic finishes and corrode metal hinge plating over time. Over time, chemical exposure can embrittle plastic nuts, potentially causing the threads to fail.
Inspect the seat for mechanical stability whenever you clean the bathroom. The clear sign that a seat requires maintenance is lateral drift: if the front rim moves more than 1/4 inch left or right when nudged with your knee, the underside locknuts have backed off their threads.
To fix lateral drift, don’t attempt to force the bolts tighter from the top without holding the bottom. Open the hinge caps, hold the bottom nut firmly with an adjustable wrench or locking pliers, and tighten the upper bolt clockwise by a half-turn until the lateral play vanishes.
When this is the wrong approach
Swapping only the seat is the wrong choice if your porcelain bowl contains physical damage. Hairline fractures around the bolt holes, running through the ceramic deck, or spreading down the trapway compromise the structural integrity of the fixture. Under human body weight, fractured china can break into razor-sharp shards that cause severe physical injury. In that situation, replace the entire toilet bowl.
A standard replacement seat is also the wrong choice if you need specialized mobility support. Standard plastic and wood seats hold downward weight, but they can’t withstand strong sideways shearing forces when a user transfers from a wheelchair. In that scenario, install an ADA-compliant transfer seat equipped with reinforced steel mounting arms anchored into the wall structure, installed by an accessibility specialist.
If your toilet bowl rocks against the bathroom floor, fixing the seat won’t solve your problem. A rocking pan indicates a failed wax gasket or broken closet flange bolts underneath the ceramic base. Never attempt flange repairs yourself if you suspect subfloor rot; shut off the water valve and call a licensed plumber.
Frequently asked questions
Can you install a round seat on an elongated toilet?
No, because a round seat measures roughly 16.5 inches while an elongated pan measures 18.5 inches. Installing a round seat leaves two inches of porcelain rim exposed at the front, creating an uncomfortable surface, exposing bare porcelain to urine splashes, and stressing the hinge hardware unevenly until the bolts snap.
Why does my new toilet seat keep wiggling?
The mounting nuts are loose, or the porcelain deck has a thin film of oil beneath the washers. If your bowl uses plastic bolts, they stretch slightly after the first few days of use. Clean the area with isopropyl alcohol and tighten the nuts firmly with a wrench while holding the bolts.
How long does it take to swap a toilet seat?
About 15 minutes for a standard toilet using a simple screwdriver and an adjustable wrench. The job takes up to 30 minutes if the old mounting bolts are rusted solid, requiring penetrating spray oil, locking pliers, or a small hacksaw blade to cut through corroded metal hardware beneath the bowl.
Is it safe to use an electric drill to tighten the bolts?
No, never use a power drill or impact driver to tighten toilet seat hardware. Power tools produce excessive torque that easily strips soft plastic threads, shears brass bolt shafts, or cracks the brittle vitreous china around the mounting holes, which ruins the entire toilet bowl instantly.
What happens if the old bolts are rusted solid?
Spray the seized threads generously with penetrating oil like WD-40, let the fluid soak for 15 minutes, and try turning the nuts using locking pliers. If the metal remains seized, wrap a piece of cloth around the porcelain to protect the glaze and saw through the bolt shaft beneath the hinge.
Does the thickness of the rubber washer matter?
Yes, because the rubber washer prevents metal or rigid plastic from contacting brittle porcelain directly while providing friction against lateral shifting. A washer that’s too thin allows the hinge bracket to slide across the ceramic glaze, while a washer that’s too thick distorts and slips sideways under load.
Can you replace a toilet seat without bottom access?
Yes, by using top-fixing expansion anchors designed specifically for skirted or back-to-wall toilet designs. These rubber or nylon sleeves push directly into the porcelain holes from above and expand inside the hole as you tighten the top screw, securing the hinge bracket firmly without needing underside hand access.
What to do next
Measure the center-to-center span of your toilet bolt holes to ensure your replacement seat kit matches your pan dimensions. You should end up with a level, stable seat that doesn’t shift or creak when pushed sideways. If you find a structural hairline crack running through the ceramic deck around the bolt holes, stop immediately and hire a licensed plumber to replace the damaged bowl.