
An electric oven heating element exploded when it experiences a short circuit or a physical break that creates an electrical arc. This event is loud and often produces sparks or a flash of light inside your oven. You should stop using the appliance immediately to avoid further damage or potential fire hazards. If you see smoke or smell burning plastic, turn off the power at the circuit breaker box before you touch the oven. Don’t attempt to use the oven again until you replace the broken part with a new, matching element.
Stopping further damage to your oven
Turn off the power at the main circuit breaker panel to ensure no electricity reaches the heating unit. Don’t rely on the oven’s control knob alone, as a shorted relay can keep current flowing to the elements even when the display appears dark.
Unplug the oven if it has a standard wall plug, though many built-in models require the breaker to be off. If you can’t locate the specific breaker, switch off the main house supply to prevent accidental arcing while you work.
Open the oven door fully to let any smoke or debris clear out of the interior space safely. If you smell ozone or see active flames, keep the door closed and use a dry chemical fire extinguisher to avoid feeding oxygen to the fire.
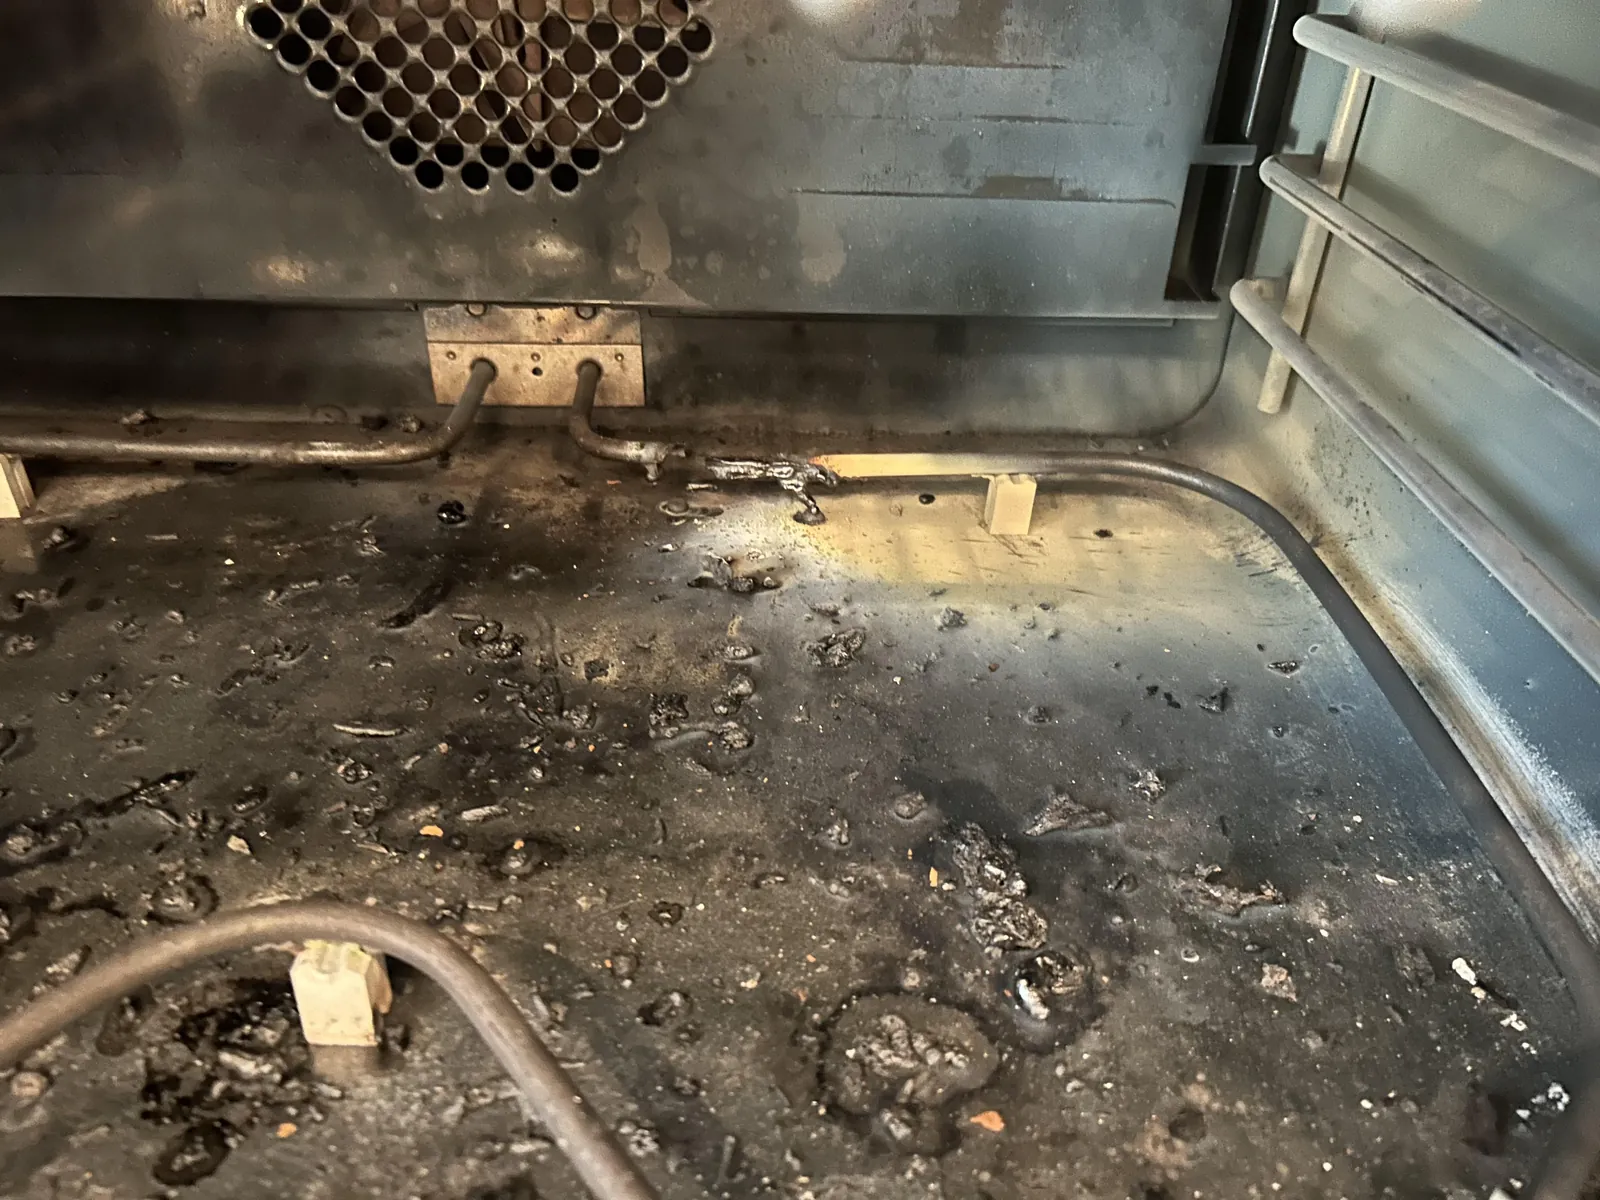
Inspect the area to see if the metal element has visibly snapped or if there are burn marks on the oven walls. A clean break in the element is a simple replacement, but charred wiring or melted insulation behind the rear panel indicates a deeper electrical fault that requires a professional technician.
Take a photo of the model number, usually found on a sticker inside the door frame, so you can order the correct replacement. Buying parts based on generic measurements often leads to incompatible connections that trigger a second, more expensive failure.
How the heating element fails
The heating element acts as a resistor that turns electrical energy into heat through a process called Joule heating. Inside the metal tube, a coiled wire sits surrounded by magnesium oxide powder, which provides electrical insulation while transferring heat. When this wire breaks due to metal fatigue or a manufacturing defect, the two ends can still conduct electricity if they remain close together. This often triggers an electrical arc, which is a high-temperature spark that jumps across the gap.
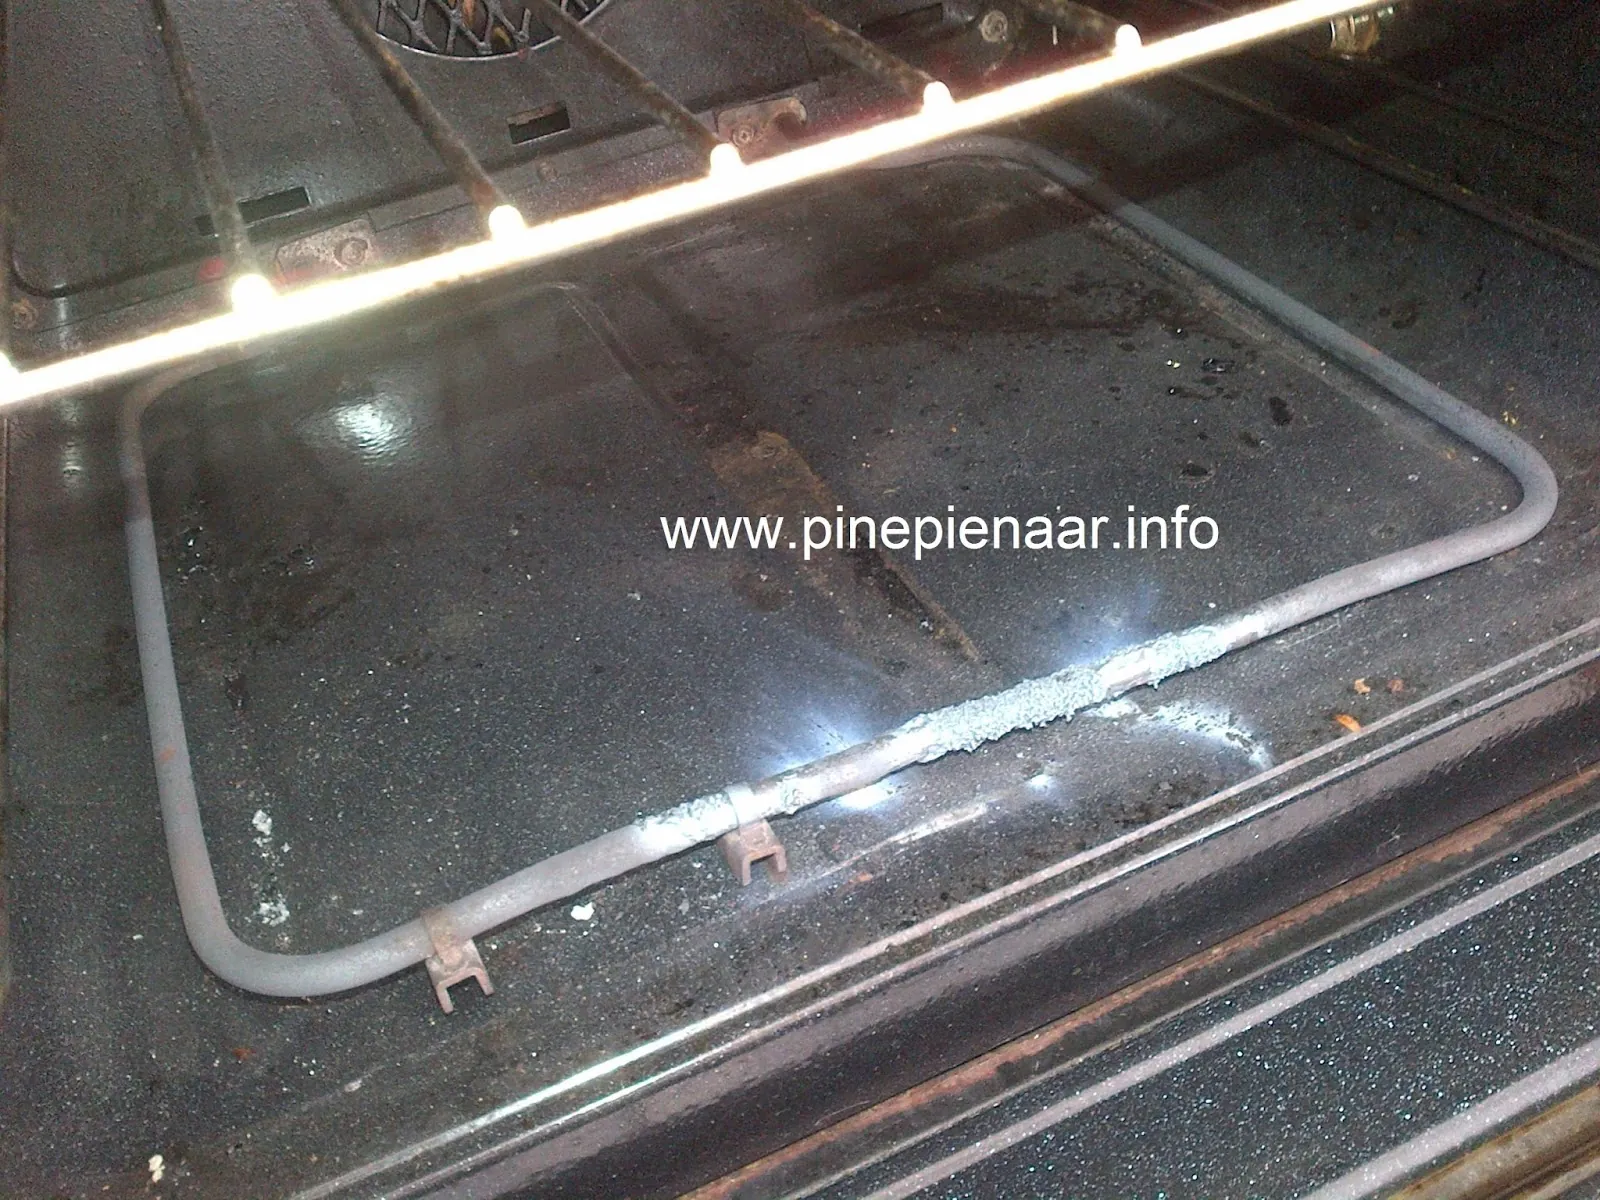
If the element snaps while it’s on, the arc can be intense enough to melt the metal casing and create a popping sound. This is the moment when an electric oven heating element exploded, leaving behind a charred or snapped piece of metal.
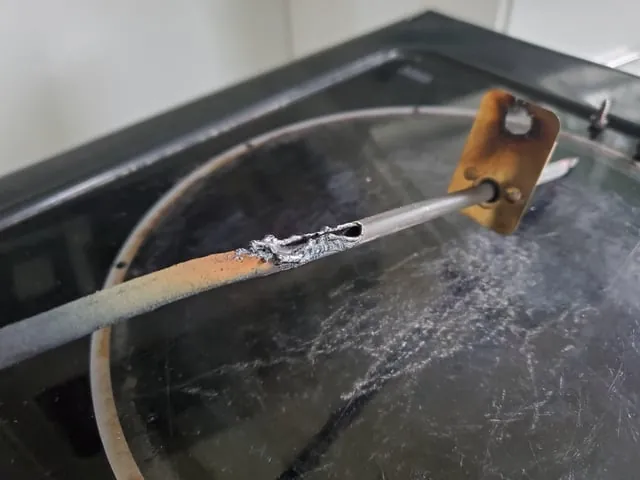
You might see a small hole in the casing where the arc escaped, or the element might simply be hanging loose from its mounting bracket. This failure is most common in older ovens where the metal has gone through thousands of heating and cooling cycles.
Inspect the element surface for localized pitting or dark, blistered spots. These are early warning signs of internal wire degradation before a total break occurs. Replacing it now prevents the arc from damaging the oven’s internal wiring or the control board.
If you notice the element is sagging, it may be touching the metal wall of the oven, which creates a short circuit. This causes the metal to glow bright orange or white and eventually burn through. If you see this happen, turn off the power immediately at the circuit breaker. Don’t rely on the oven’s control knob, as a shorted element can remain energized even when the thermostat is set to off.
Distinguish between a mechanical break and a ground fault by looking at the oven’s behavior. If the element stops heating but the oven light and display remain functional, the internal coil has simply snapped. If the oven’s main breaker trips the moment you turn the unit on, the element has likely warped and touched the grounded oven chassis.
A snapped element is a simple part replacement, but a grounded element requires you to inspect the mounting terminals for heat damage. If the terminal block is melted or discolored, you must replace that connector as well, or the new element will fail within days.
Troubleshooting the broken component
You should verify the damage before buying a new part to ensure the issue isn’t a faulty control board.
Check the visual break
Look closely at the element for any visible gaps or melted spots. A clear break in the metal tube confirms that the heating element is the cause of the failure.
Test the mounting clips
Check if the clips holding the element are still secure and not loose. If the clips are broken, the element might sag and touch the oven walls, which leads to a short circuit during use.
Inspect the terminal block
Check the back of the oven where the element connects to the power wires. If the terminal block is charred or melted, you’ll need to replace the wiring harness along with the heating element itself.
Verify the oven controls
Turn the oven on briefly after the power is back on to see if the display shows an error code. An error code often points to a specific sensor or control board issue that might have contributed to the element overheating.
Replacing the damaged element
Replacing the element is a straightforward task that you can perform with a simple screwdriver. First, remove the two screws that hold the element to the back wall of the oven interior. Gently pull the element forward until you see the electrical connectors, then disconnect the wires.
Be careful not to let the wires slip back into the hole in the wall, as they can be difficult to retrieve. If they do fall, you’ll likely need to remove the entire rear panel of the appliance to fish them out. To prevent this, tape the wires to the wall or use a piece of string to tether them before you fully disconnect the terminals.
Hold the wires with needle-nose pliers while you attach them to the new heating element. Once connected, push the new element back into the brackets and secure it with the original screws. Ensure the new part matches your specific model number exactly, as the wattage and dimensions vary between oven brands. A mismatch here often leads to uneven baking or a tripped circuit breaker.
If the element fits snugly and the connections are tight, it should work perfectly. You’ll know the fix is successful when the oven reaches the set temperature without any popping sounds or flashes.
If the oven heats but the element glows unevenly, check the mounting brackets for corrosion. Clean these contact points with a wire brush to ensure optimal electrical conductivity, which prevents the new part from burning out prematurely due to localized resistance.
When to hire a professional
You should stop working on the oven if you discover that the wires behind the back wall are melted or if the terminal block is fused to the oven frame. This level of damage often means the internal wiring harness has sustained heat damage that requires a professional technician to repair. Never attempt to splice or tape damaged high-voltage wires yourself, as this creates a serious fire risk.
A certified appliance repair person can test the electrical continuity of the circuit and ensure the new element is installed according to safety standards. If you feel unsure about handling the electrical connections or if you can’t remove the old element without using excessive force, call a technician. They will likely start by checking the voltage at the terminal block to ensure the control board is sending the correct power.
If the oven trips your home’s main circuit breaker immediately after you attempt a repair, stop. This indicates a dead short to the chassis, which is often caused by a pinched wire or an improperly seated heating element. Continuing to reset the breaker can weld internal contacts or damage your home’s wiring.
If you find that the mounting screws for the element are seized with rust, don’t use a hammer or impact driver. These screws often thread into a fragile ceramic block that cracks easily. A professional will use specialized penetrating oil and heat induction tools to remove them without destroying the oven’s structural integrity.
Frequently asked questions
Can I fix a broken heating element?
No, you can’t repair a broken heating element because the internal wire is damaged beyond use. You must replace the entire component with a new one that matches your oven’s specific model number.
Is it safe to use the oven with a broken element?
No, it isn’t safe to use the oven because the exposed electrical arc can start a fire or cause a short circuit. You must disconnect the power until you install a new, intact heating element.
How do I know which element to buy?
You find the correct part by searching for the model number printed on the sticker inside your oven door. The manufacturer’s website will list the exact part number for your specific unit based on that code.
What happens if I buy the wrong size element?
If the element is the wrong size, it won’t connect to the terminals or it will touch the oven walls and cause another short circuit. Always verify the part number against your oven’s manual before you finalize the purchase.
Does the oven need to be cold before I start?
Yes, the oven must be completely cold to prevent accidental burns during the replacement process. Wait at least 60 minutes after the last use before you open the door to inspect or remove the part.
Why did my oven spark?
The spark happens when the broken ends of the heating element create an electrical arc. This arc is a high-temperature discharge that occurs when the circuit is incomplete but still receiving power.
How long does a new element last?
The lifespan of a new element depends on your usage frequency, but most quality replacements last for many years under normal cooking conditions. You can extend its life by keeping the oven interior clean and avoiding heavy impacts on the element.
Conclusion
Replacing this component is a straightforward task, but you’ll want to check your oven’s manual for the exact part number first. Once you’ve installed the new element, your kitchen will be back to normal. You’re going to enjoy baking again without any worries once you’ve confirmed the connections are secure.
