
Finding brown water after shocking well systems is a common occurrence that often causes alarm for homeowners, yet it’s typically a temporary side effect of the chemical reaction required to sanitize your water supply. When you introduce high concentrations of chlorine into your well to neutralize bacteria, the oxidizing power of the bleach reacts with minerals already present in your plumbing and well casing. This process effectively dislodges oxidized iron, manganese, and organic sediment that have accumulated over time, flushing them into your pipes and out through your faucets. While the discoloration is unsightly, it generally indicates that the shock process is successfully scouring the interior surfaces of your well and distribution system.
Key Takeaways
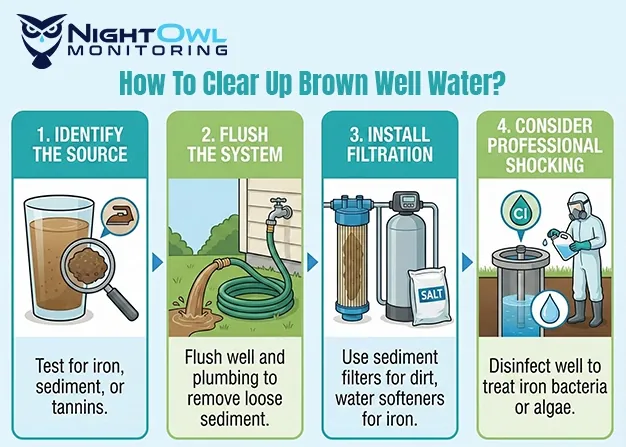
- Discoloration is usually caused by oxidized iron and manganese being stirred up by the high-concentration chlorine treatment.
- System flushing is the primary method for clearing the brown water from your household plumbing.
- Wait at least 12 to 24 hours after the initial shock before attempting to flush the lines to ensure proper disinfection.
- Avoid using your water for drinking, cooking, or laundry until the chlorine smell has dissipated and the water runs completely clear.
- If water remains brown after several days of flushing, you may need to investigate sediment buildup or well casing corrosion.
Why Does My Water Look Brown?
When you pour chlorine into a well, you’re creating a powerful oxidizing environment. Minerals such as iron and manganese, which are often dissolved in groundwater, react with the chlorine to form solid particles. This is the same chemical principle used in industrial water treatment plants to precipitate contaminants out of the water. When these particles break loose from the well walls or the inside of your pipes, they turn the water brown, yellow, or orange.
Oxidized minerals are the most frequent culprit. If your well water has historically had a metallic taste or left rust stains in sinks, the shock treatment has simply accelerated the oxidation process, turning those dissolved metals into visible sediment. This sediment is harmless in the short term, but it’s aesthetically unpleasant and can potentially clog aerators or sensitive appliances if not flushed out properly.
Managing the Shock Treatment Process
The shock treatment process involves more than just dumping bleach into the well. It requires careful calculation of the volume of water in your well to determine the correct amount of chlorine needed for effective disinfection.
Preparation and Safety Steps
Before you begin, gather the necessary supplies. You’ll need plain, unscented household bleach, a garden hose, and protective equipment.
- Protective Gear: Wear rubber gloves, safety goggles, and old clothing to prevent skin irritation or fabric bleaching.
- Bleach Selection: Use only standard, unscented household bleach with a concentration of 5% to 8% sodium hypochlorite.
- Calculated Volume: Determine your well’s depth and diameter to estimate total water volume, ensuring you add enough bleach to achieve a 50-100 ppm concentration.
Clearing Brown Water After Shocking Well
Once the chlorine has sat in the well for the recommended time, usually 12 to 24 hours, you must flush the system. The goal is to move the highly chlorinated, sediment-heavy water out of your home’s plumbing and into a safe drainage area.
Step-by-Step Flushing Procedure
- Exterior Flushing: Connect a garden hose to an outdoor spigot located closest to the wellhead. Direct the hose away from gardens, septic systems, or streams, as the high chlorine content can kill vegetation and harm aquatic life.
- Interior Flushing: Open every cold-water faucet inside the house, including showers, bathtubs, and utility sinks. Let the water run until the smell of chlorine is faint and the water runs clear.
- Appliance Management: Don’t run your dishwasher or washing machine during the initial flush. You don’t want that sediment-heavy water entering those internal filters or delicate seals.
- Toilet Cycling: Flush each toilet in the home multiple times to ensure the water in the tank and the bowl is refreshed.
| Flushing Stage | Goal | Action |
|---|---|---|
| Initial | Remove heavy sediment | Run outdoor spigot for 30 minutes |
| Secondary | Clear interior lines | Run all indoor cold taps until clear |
| Final | Sanitize fixtures | Flush toilets and clean aerators |
Troubleshooting Persistent Discoloration

If you have flushed the system for several hours and the water remains brown, you may be dealing with more than just temporary sediment. Sometimes, the shock process can loosen years of buildup that’s too heavy to move quickly.
Persistent sediment can indicate that your well needs mechanical cleaning or that the pump is drawing from the bottom of the well where silt collects. If the water doesn’t clear after 48 hours of intermittent flushing, perform a check on your sediment filters. You may find them completely clogged with rust-colored debris.
When to Call a Professional
If the water remains consistently brown, you should consult a licensed well contractor. They can perform a down-hole camera inspection to see if there’s significant corrosion on the well casing or if the pump is sitting too low in the well column.
- Well Casing Corrosion: Older steel casings can rust through, allowing dirt from the borehole wall to enter the water supply.
- Pump Depth Issues: If your pump is set too close to the bottom, it will suck up sand and silt every time it cycles on.
- Filter Upgrades: If your water is high in iron, you may need a permanent iron filtration system installed after the pressure tank to prevent future discoloration.
Maintenance and Prevention Tips
Preventing brown water is easier than fixing it. Regular maintenance ensures that your well remains a reliable source of clean water and reduces the frequency with which you need to perform aggressive shock treatments.
Pro Tip: Install a whole-house sediment filter with a 5-micron rating immediately after your pressure tank. This will catch the majority of oxidized minerals and sediment before they reach your faucets or appliances, extending the life of your plumbing fixtures.
Regular Well Maintenance Schedule
| Maintenance Task | Frequency | Purpose |
|---|---|---|
| Water Quality Testing | Once per year | Detect bacteria and mineral changes |
| Sediment Filter Change | Every 3-6 months | Prevent clogs and appliance damage |
| Well Cap Inspection | Once per year | Ensure no surface water enters well |
| Pressure Tank Check | Every 2 years | Maintain consistent flow and pressure |
Understanding Chlorine Concentrations
The strength of your shock treatment is critical. If you use too little, you won’t kill the bacteria; if you use too much, you risk damaging plastic pipes and seals. Using a standard chlorine test kit can help you verify that you have achieved the correct levels.
Chlorine levels should ideally be tested at the furthest faucet from the well. If you can’t detect a strong chlorine odor or register a positive reading on a test strip, the chlorine may have been neutralized by the organic matter in the well before it could disinfect the system. In such cases, a second, more concentrated shock treatment may be necessary to ensure the water is safe for consumption.
Equipment and Supply Costs

Performing a well shock yourself is inexpensive, but requires a small investment in testing and filtration components.
- Bleach: Expect to pay between $4.00 and $12.00 for a large jug of standard household bleach.
- Test Strips: A pack of chlorine test strips usually costs between $8.00 and $20.00.
- Sediment Filters: Replacement cartridges range from $5.00 to $35.00 depending on the filtration capacity and brand.
- Professional Well Cleaning: If you require a service call to address persistent sediment, costs typically range from $300.00 to $800.00, depending on the depth of the well and the complexity of the issue.
Frequently Asked Questions
Is it safe to drink brown water?
No, you shouldn’t drink, cook with, or brush your teeth with brown water, even if it’s a result of a shock treatment. The discoloration indicates that the water is carrying high levels of sediment and potentially high concentrations of chlorine. Wait until the water runs completely clear and the chlorine smell has faded to safe, undetectable levels before resuming normal use.
How long should the water stay brown?
In most cases, the brown water should clear within 24 to 48 hours of consistent flushing. If the water remains brown after several days, it’s likely that the shock treatment has dislodged a significant amount of sediment from the well casing or pipes. In these instances, you may need to replace your sediment filter cartridge, as it’s likely saturated with debris.
Can brown water damage my appliances?
Yes, running heavily sedimented water through your appliances can cause significant damage. The grit can clog internal filters, damage the seals in your dishwasher and washing machine, and potentially ruin the heating elements in your water heater. Always bypass or shut off appliances during the initial flushing phase of your well shock process to protect your investment in these machines.
What if the water is still brown after a week?
If the water remains brown after a week of flushing, you may have a structural issue with your well. This could include a corroded well casing that’s letting in silt, or a pump that’s positioned too deep in the well. You should contact a professional well water technician to conduct a formal inspection and water quality test to determine the exact source of the persistent sediment.
Do I need to test my water after shocking?
Yes, it’s highly recommended to test your water for total coliform bacteria and E. coli after the chlorine has been fully flushed from the system. The shock process is a temporary fix, and if the root cause of the contamination isn’t resolved, bacteria may return. Wait at least one week after flushing before taking a sample to ensure all residual chlorine is gone.
Conclusion
Addressing the discoloration caused by well shocking is a manageable task that requires patience and careful monitoring of your plumbing system. By flushing the lines thoroughly and managing your sediment filters, you can restore your water clarity quickly. If issues persist beyond a few days, reach out to a certified professional to assess the integrity of your well and ensure your water supply remains safe for your household.
