
Installing a new door system requires precision, and getting the garage door jamb framing right is the most critical step to ensure your door operates smoothly for years. If you’re preparing for a new installation, you should budget between $150 and $600 for the lumber and hardware required for a standard residential opening. This framing provides the structural support for the vertical tracks, the header, and the spring system that balances the weight of the door panels.
Key Takeaways
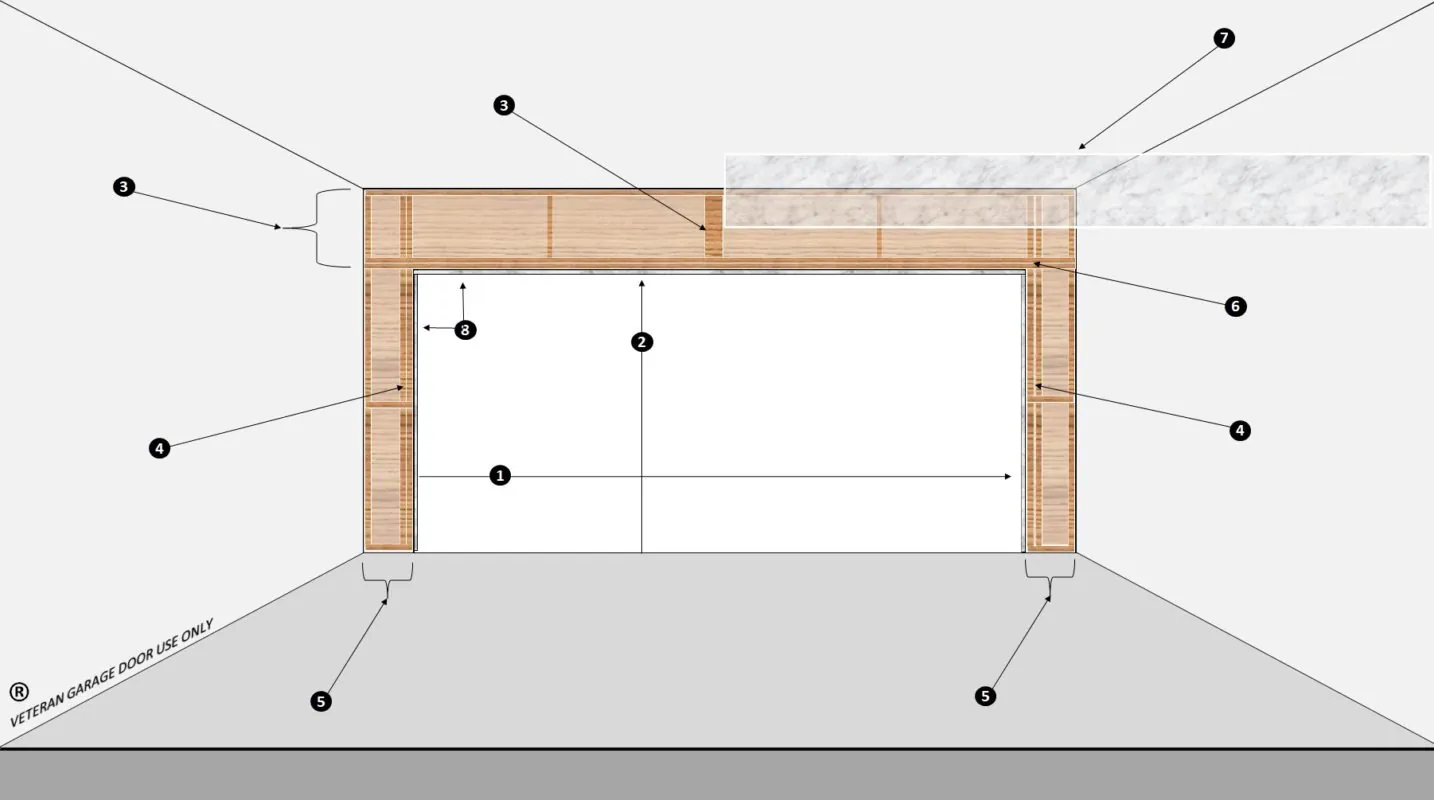
- Always verify that your framing is perfectly plumb and level, as even a quarter-inch deviation can cause premature wear on the garage door opener.
- Use pressure-treated lumber for the bottom plates that touch the concrete floor to prevent moisture-related rot.
- Ensure your header size matches the load-bearing requirements of your garage structure, especially if you’re installing a heavy carriage-style door.
- Always check local building codes for specific fastening requirements, as seismic or high-wind zones often mandate specific hardware.
- Pre-drill all holes in your framing to prevent the wood from splitting when you drive in heavy-duty lag screws.
Why Framing Quality Matters
The structural integrity of your garage opening determines how well the door seals against the elements. If the framing is twisted or bowed, your weatherstripping will leave gaps, allowing wind, pests, and moisture to enter the garage. Furthermore, modern garage door openers are sensitive to the friction caused by misaligned tracks. A perfectly square frame ensures that the rollers transition smoothly, reducing the strain on the motor and extending the lifespan of your entire system.
Essential Tools and Materials
You’ll need a specific set of tools to construct a high-quality frame. Most professional installers rely on the following items for accuracy and speed:
- Laser level for ensuring vertical and horizontal alignment.
- Impact driver for driving long structural screws into the studs.
- Circular saw for cutting headers and jack studs to length.
- Framing square to verify 90-degree angles at every corner.
- Pressure-treated lumber for the base plates.
| Material | Purpose | Typical Quantity |
|---|---|---|
| 2×6 or 2×8 Studs | Vertical Jambs | 4-6 pieces |
| 2×10 or 2×12 Header | Top Support | 1-2 pieces |
| Galvanized Lag Screws | Fastening to Masonry | 12-20 units |
| Construction Adhesive | Sealing and Bonding | 2-3 tubes |
How to Calculate Opening Dimensions
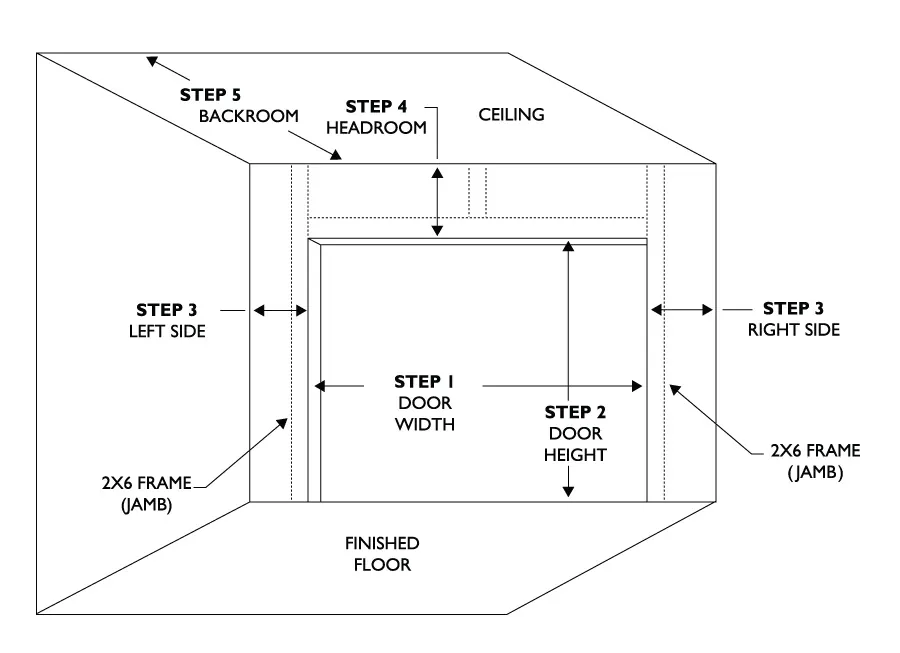
Your rough opening should be exactly the size of the garage door itself, plus any specific tolerances required by the manufacturer. Most standard doors come in widths of 8, 9, 10, 16, or 18 feet. If you’re framing for a new door, measure the width at the floor, the middle, and the top.
Use the narrowest measurement to ensure the door can fit, but keep in mind that the frame must be perfectly plumb. The International Residential Code provides specific guidelines for structural wall elements that your framing must meet to remain compliant with safety standards.
Installing Vertical Jambs
The vertical jambs serve as the mounting surface for the door tracks. You must attach these to the existing wall studs using heavy-duty fasteners. If you’re working with a concrete foundation, ensure the bottom of the jambs are treated to prevent decay. Use shims to bring the jambs into a perfectly vertical position. Plumb alignment is non-negotiable here, as the track system relies on this plane to keep the door from binding.
Managing the Header
The header is the horizontal beam that spans the top of the opening. It must be strong enough to carry the weight of the framing above it, as well as the force applied by the garage door springs. If you’re replacing a door, inspect the existing header for signs of sagging. If the header bows downward even slightly, the door won’t seal properly at the top, and the opener will struggle to lift the weight.
Troubleshooting Garage Door Jamb Framing Errors
Even experienced DIYers encounter issues during the framing process. Here is a breakdown of common problems and how to solve them:
| Problem | Cause | Solution |
|---|---|---|
| Binding Door | Out of Plumb | Adjust shims behind the vertical jambs. |
| Gap at Top | Sagging Header | Install a steel plate or sister the header. |
| Track Vibration | Loose Fasteners | Use longer lag screws into solid studs. |
| Rotting Base | Moisture Exposure | Replace with pressure-treated lumber. |
What Is the Proper Fastening Method?
The connection between your framing and the garage walls must be robust. Avoid using standard drywall screws, as they lack the shear strength required for moving mechanical parts. Instead, utilize structural lag screws or high-strength deck screws with a protective coating. These fasteners should penetrate at least 2 inches into the structural framing behind the door jamb.
Questions About Structural Load
Many homeowners wonder if they can simply frame a garage opening without considering the load above. This is a dangerous assumption. The wall above the garage door is often a load-bearing wall, especially in homes with living spaces above the garage. If the header is undersized, the roof or floor above can sag, causing the entire garage door system to fail. Always consult a structural engineer if you’re widening an existing opening.
Can I Use Engineered Lumber?
Engineered lumber, such as Laminated Veneer Lumber (LVL), is often superior to solid sawn timber for garage door headers. LVLs are manufactured to be perfectly straight and possess higher load-bearing capacities than standard 2×10 or 2×12 boards. If you’re installing a wide door, such as a 16-foot span, using an LVL header will prevent the “crown” or sagging that often plagues traditional wood beams.
Selecting the Right Weatherstripping
Once your framing is complete, you must consider how the door interacts with the wood. A high-quality vinyl weather seal should be nailed to the exterior of the jambs. This seal acts as the final barrier against weather. Ensure your framing allows for enough surface area on the jamb to mount this seal securely. If the jamb is too narrow, the seal won’t sit flush against the door, creating an air leak.
Maintenance and Long-Term Care
To keep your framing in top condition, perform an annual inspection. Check for signs of insect damage, soft wood, or loose fasteners. Tighten any bolts that have worked their way loose due to the vibration of the garage door opener. If you notice any cracks in the wood near the track mounting points, reinforce the area with a steel backing plate to distribute the load more evenly.
Frequently Asked Questions
Is it necessary to use pressure-treated wood for all framing?
You only need to use pressure-treated lumber for the members that come into direct contact with concrete, such as the bottom plates. The rest of the framing, including the vertical jambs and the header, should be standard kiln-dried framing lumber, as pressure-treated wood can warp and twist as it dries out, which would throw your door alignment off significantly.
How do I ensure my framing is perfectly square?
Measure diagonally from the top left corner to the bottom right corner, then repeat for the opposite diagonal. If the two measurements are identical, your frame is perfectly square. If there’s a discrepancy, adjust the vertical jambs using shims until the diagonals match. This simple geometric check prevents the door from binding during its travel.
What size lumber is standard for a residential garage?
For most residential garage door openings, 2×6 or 2×8 studs are used for the vertical jambs. The header size depends on the width of the opening and the load it supports, but a double 2×10 or 2×12 is common for single-car doors, while wider or multi-car openings often require engineered LVL headers to handle the increased load and prevent mid-span sagging over time.
Can I install a garage door on a metal-framed garage?
Yes, you can install a garage door on a metal-framed structure, but you’ll need to add wood blocking or specialized steel brackets to provide a surface for the tracks to attach to. Metal studs are generally not thick enough to hold the lag screws used for garage door tracks. Always follow the manufacturer’s instructions regarding the specific hardware required for steel-stud mounting.
How deep should the side clearances be?
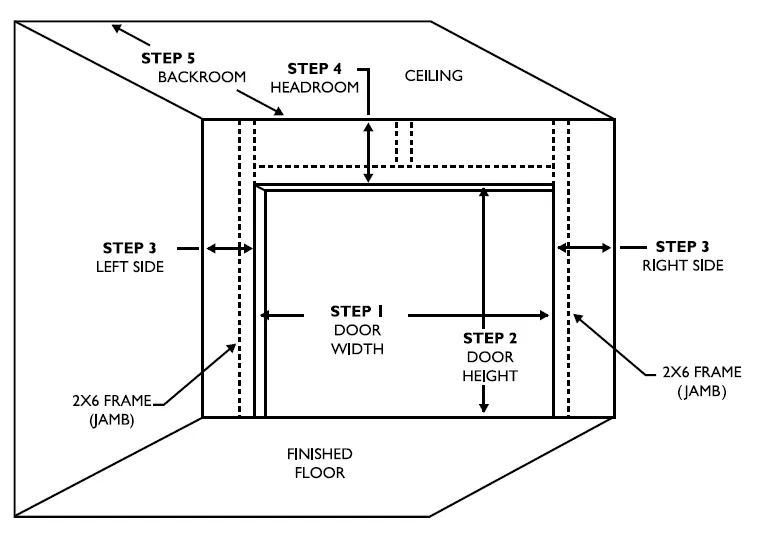
Most standard garage door tracks require at least 4 to 5 inches of clearance on each side of the opening. This space allows for the vertical tracks, the mounting brackets, and the torsion spring system. If your framing is too tight, you may need to use a low-clearance track kit, which is specifically designed for garages with limited side or overhead space.
Conclusion
If you find that your current framing is significantly out of square or suffering from structural rot, it’s best to consult a professional carpenter before attempting to hang the door. A solid, plumb frame is the foundation of a quiet and reliable garage door system. Once your framing is secure, you can proceed to install your tracks and springs according to the manufacturer’s specific manual.
