
Conceptual design in engineering is the initial phase of product development where engineers translate abstract requirements into a high-level technical vision before any detailed blueprints are drafted. This stage serves as the blueprint for the entire project lifecycle, allowing teams to explore multiple creative solutions while minimizing the financial risk of pursuing an unfeasible path. By focusing on fundamental physics, core functionality, and user needs, engineers establish the essential framework that guides all subsequent design, simulation, and manufacturing efforts.
Key Takeaways

- Prioritize functional requirements early to ensure the final product solves the intended problem effectively.
- Use sketching and modeling to visualize concepts quickly without investing time in high-fidelity computer-aided design.
- Evaluate multiple design alternatives to identify the most cost-effective and technically sound approach.
- Document all design assumptions to provide clarity for the detailed engineering team later in the process.
- Maintain a focus on system integration to ensure that disparate components will function harmoniously.
Defining Conceptual Design in Engineering
Conceptual design acts as the bridge between a vague market need and a concrete technical specification. During this stage, the primary objective is to define the “what” and the “why” of a product rather than the “how” of manufacturing. Engineers identify the core constraints, such as material limitations, size requirements, and environmental operating conditions. This phase is characterized by a high degree of ambiguity, requiring iterative brainstorming and constant feedback from stakeholders to refine the vision.
Engineering agility is vital here because the cost of changing a design is lowest during this period. Once the project moves into the detailed engineering phase, the cost to modify the architecture increases exponentially. By establishing a robust conceptual foundation, you prevent common pitfalls such as scope creep and technical debt. You’re essentially setting the boundaries of the design space to ensure that the final output remains within budget and performance targets.
The Core Process Steps
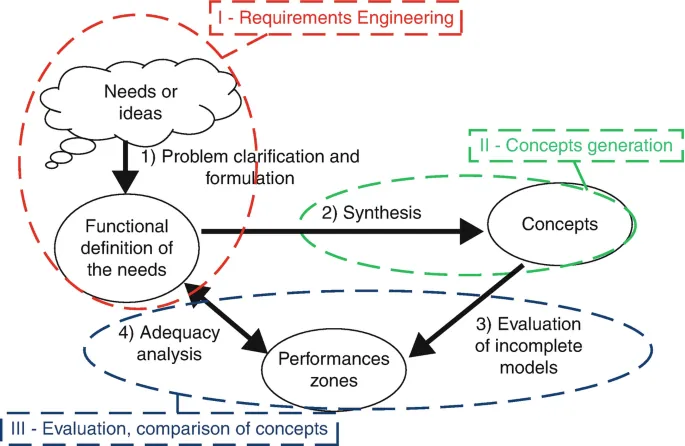
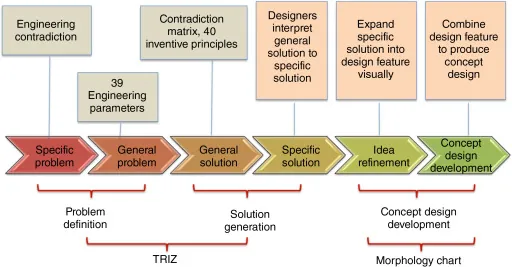
Moving from a blank sheet to a viable concept requires a structured approach. The following table outlines the typical progression of a conceptual design project.
| Phase | Action | Goal |
|---|---|---|
| Problem Definition | Analyze Requirements | Clarify user needs and constraints |
| Ideation | Generate Concepts | Produce multiple potential solutions |
| Evaluation | Screening Methods | Filter out unfeasible or expensive ideas |
| Selection | Decision Matrices | Rank ideas based on technical performance |
| Documentation | Design Synthesis | Create a high-level technical brief |
Tools for Conceptualization
Effective conceptualization relies on a mix of traditional and modern tools. Engineers often start with pen-and-paper sketching to capture rapid-fire ideas. Once these sketches are vetted, they move toward low-fidelity prototyping. This might involve using cardboard, foam board, or basic 3D-printed mockups to test ergonomics or spatial constraints.
Pro Tip: Use low-fidelity models to test physical interactions early, as these often reveal usability issues that digital models fail to highlight.
For more complex systems, engineers utilize block diagrams and system architecture software to map out data flows and energy requirements. These diagrams don’t show the final geometry of the product; instead, they define how the subsystems interact. By focusing on these relationships, you ensure that the electrical, mechanical, and software teams are aligned on the interface requirements from the very beginning.
Why Brainstorming Matters
Brainstorming isn’t just about quantity; it’s about exploring the edges of what is physically possible. In a professional engineering environment, this involves cross-functional teams including manufacturing engineers, supply chain specialists, and user experience designers. By involving diverse perspectives, you avoid tunnel vision and ensure that the chosen concept is manufacturable and profitable.
Structured brainstorming techniques, such as SCAMPER (Substitute, Combine, Adapt, Modify, Put to another use, Eliminate, Reverse), help teams break out of conventional thinking patterns. When you explore unconventional paths, you often discover more efficient ways to achieve the desired function, which can lead to significant patentable innovations or cost savings.
How to Evaluate Design Alternatives
Evaluation is the most critical hurdle in the conceptual phase. Not every creative idea is a viable product. To objectively assess concepts, engineers utilize a weighted decision matrix. This tool forces teams to assign numerical values to competing concepts based on criteria like weight, power consumption, cost, and ease of assembly.
Warning: Avoid “analysis paralysis” by setting a strict time limit for the evaluation phase. If a concept can’t be validated within the allotted timeframe, it should be deprioritized in favor of more mature alternatives.
By applying consistent criteria across all concepts, you remove personal bias and ensure that the final selection is based on data-driven performance expectations rather than subjective preference.
Managing Technical Constraints
Every conceptual design is constrained by the laws of physics and the realities of the marketplace. Managing these constraints requires a deep understanding of the design space. For instance, if your product requires a battery, the energy density of current technology dictates the size and weight of the enclosure.
You must define these hard constraints early to prevent wasted effort. If a project requires a device to operate for 48 hours on a single charge but the current battery technology only allows for 20 hours, you must adjust the conceptual scope immediately. Ignoring these physical limits is the most common cause of failure in the transition from conceptual design to prototype manufacturing.
Documentation and Knowledge Transfer
Once a concept is selected, it must be documented clearly for the detailed design team. This documentation should include the design intent, which explains why specific choices were made. This is distinct from a specification sheet, which only lists the final requirements. Knowing why a specific motor was chosen—perhaps due to its torque curve rather than just its price—allows the next set of engineers to make informed decisions if that part becomes unavailable.
A comprehensive conceptual document should include:
- High-level functional requirements.
- System block diagrams.
- Risk assessment and mitigation plans.
- Material and component assumptions.
- Preliminary cost estimates.
Common Pitfalls to Avoid
Even experienced teams fall into traps during the conceptual phase. One frequent error is “over-engineering” the concept by adding features that aren’t required by the core user needs. This inflates the project timeline and increases the complexity of the final product. Another mistake is failing to engage with manufacturing experts early on. A beautiful design that’s impossible to assemble or machine is effectively useless.
Pro Tip: Conduct a “Design for Manufacturing” review at the end of the conceptual stage to ensure that the proposed geometry can be produced using standard industry processes.
Maintaining a focus on the minimum viable product (MVP) is essential. By stripping away non-essential features, you can focus on perfecting the core functionality that provides the most value to the end user. This lean approach allows for faster iteration and a more robust final product.
Addressing Stakeholder Expectations
Managing the expectations of non-technical stakeholders is a significant part of the conceptual design engineer’s role. It’s common for stakeholders to assume that a concept is a finished product. You must communicate that conceptual design is inherently experimental and that the final product may deviate significantly from the initial sketches as technical hurdles are addressed.
Regular updates that focus on risk reduction rather than visual progress are often more effective. By showing how you have solved a specific technical challenge or mitigated a potential manufacturing risk, you demonstrate value to stakeholders who might otherwise be concerned about the lack of a “final” look. Transparency regarding the iterative nature of the process builds trust and provides the team with the freedom to explore the most effective solutions.
Related guides
- 10 Best Phosphate Removers to Keep Your Pool Clear in 2026
- How to Hide Office in Living Room: 5 Fast Design Solutions
- Best Drain Unblockers: How to Clear Clogs Effectively in 2026
Frequently Asked Questions
What is the difference between conceptual and detailed design?
Conceptual design focuses on the “what” and the “why,” defining high-level functionality and system architecture. Detailed design focuses on the “how,” moving into specific dimensions, material specifications, and manufacturing tolerances. While conceptual design is about exploring the design space and feasibility, detailed design is about optimizing the final product for production and performance.
How long should conceptual design take?
The duration depends on project complexity, but it typically occupies 10% to 20% of the total product development timeline. For simple consumer products, this might take two to four weeks. For complex aerospace or medical devices, it can span several months. The goal is to spend enough time to mitigate major risks without delaying the overall project schedule unnecessarily.
Can I skip conceptual design?
Skipping this phase is a high-risk strategy that often leads to significant cost overruns and design failures. Without a conceptual framework, teams lack a shared vision, leading to disjointed subsystems and inconsistent performance. It’s almost always more expensive to fix fundamental architectural errors during the manufacturing phase than it’s to address them during the initial conceptual planning.
What are common conceptual design outputs?
Key outputs include concept sketches, system block diagrams, decision matrices, risk assessment logs, and a technical requirements document. These items serve as the roadmap for the detailed design phase. They ensure that every member of the engineering team understands the project constraints and the intended functionality of the final product before any CAD software is opened for final part modeling.
How do I know when a concept is ready?
A concept is ready for the next phase when it satisfies the core functional requirements, aligns with the project budget, and has undergone a preliminary risk assessment. You should feel confident that the proposed architecture is physically feasible and that the primary technical challenges have been identified. If you have clear, validated answers for the “why” and “what,” you’re ready to proceed.
Conclusion
To advance your project, start by creating a comprehensive list of your absolute, non-negotiable functional requirements. Once you have these, schedule a dedicated brainstorming session with your core team to sketch out at least three distinct architectural approaches. Selecting the best one through a weighted decision matrix will provide you with the solid technical direction needed to begin your detailed engineering process with total confidence.
