
An ultrasonic cleaner is a device that uses high-frequency sound waves in a liquid bath to remove dirt, grease, and debris from items through a process called cavitation. It works by sending electrical energy into transducers that vibrate at ultrasonic frequencies, creating millions of tiny vacuum bubbles in the water. As these bubbles collapse against the surface of your objects, they scrub away contaminants even from deep crevices that brushes can’t reach.
The key to success is choosing the right cleaning solution for your specific item. If you have metal parts, a water-based detergent works well, but you should never use flammable solvents like gasoline or alcohol in the tank. The most common mistake people make is overloading the basket. If you pack too many items inside, the sound waves can’t circulate properly, and the machine will fail to clean the gaps between the objects.
How to operate your ultrasonic cleaner
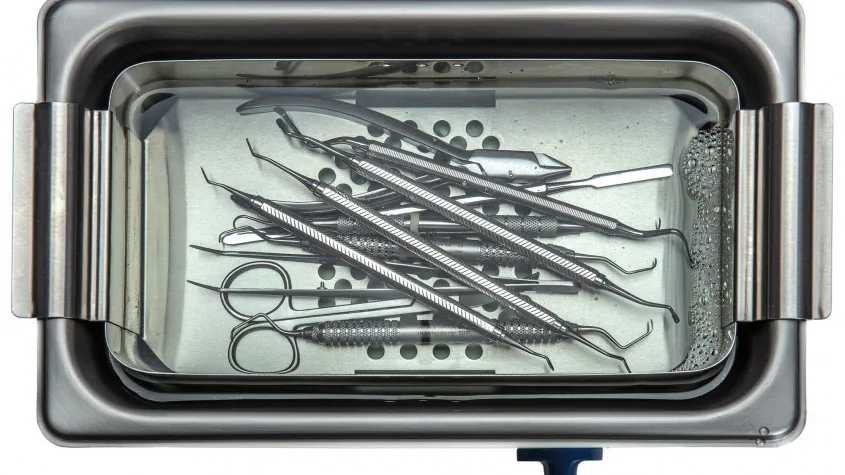
- Fill the stainless steel tank with water up to the fill line, then add the recommended cleaning concentrate as specified by the manufacturer.
- Plug the unit into a grounded outlet and turn it on for 5 minutes to degas the liquid, which removes trapped air and improves cavitation performance.
- Place your items into the cleaning basket, ensuring they’re fully submerged but not touching each other or the walls of the tank.
- Set the timer and temperature according to your item’s material; most delicate jewelry requires lower heat, while heavy machine parts need higher settings.
- Remove the items once the cycle finishes and rinse them thoroughly under clean, running water to remove any remaining chemical residue.
- Dry the objects immediately using a soft cloth or compressed air to prevent water spots or oxidation on sensitive surfaces.
Tip: If you’re cleaning delicate electronics, verify the manufacturer allows liquid submersion, as some components can be permanently damaged by the intense pressure of cavitation.
Tip: Avoid using tap water for high-precision optical parts; use distilled water to prevent mineral deposits from drying on the surface.
Cleaning cycle duration
The time needed for an effective clean depends on the amount of grime and the density of the items.
| Situation | How long | What changes it | What to watch for |
|---|---|---|---|
| Light dust/oils | 3–5 minutes | Water temperature | Bubbles clearing |
| Heavy grease | 10–20 minutes | Power wattage | Cloudiness in bath |
| Hardened carbon | 30+ minutes | Solution strength | Visible debris |
If the items remain dirty after the recommended time, don’t simply increase the heat, as this can damage delicate coatings; instead, replace the cleaning solution, as it’s likely saturated with contaminants.
Most users make the mistake of overloading the basket, which forces the machine to work twice as long to achieve the same result. If you can’t see at least an inch of space between items, the ultrasonic waves will scatter rather than penetrate.
If you’re cleaning porous materials, cap your cycle at fifteen minutes to prevent structural degradation. Non-porous metals can handle longer sessions, but they require a fresh rinse cycle immediately after removal to stop chemical etching. If the bath water turns opaque before the timer ends, stop the machine. The solution is spent, and further cleaning will only redeposit loosened grime onto your components.
Signs of a successful cleaning
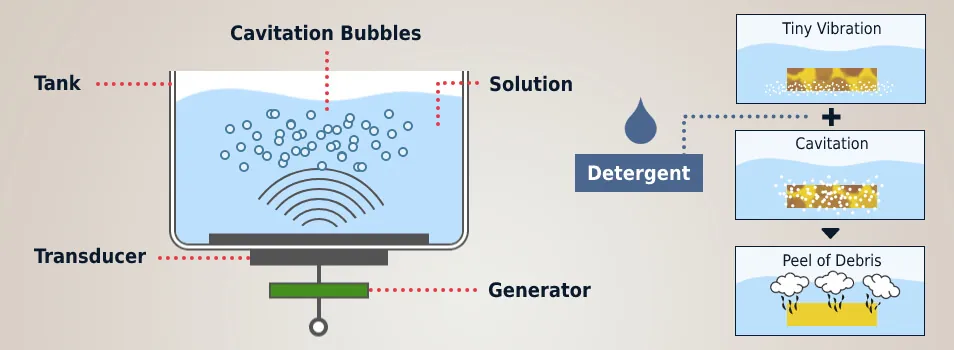
You can tell the process is complete by inspecting the clarity of the liquid and the appearance of your items. The water often turns cloudy or changes color as oils and dirt are stripped away from the surfaces. If the item has complex geometry, use a magnifying glass to check deep holes or threaded areas for any remaining particles.
If the surface looks dull or has a white film, you likely used too much detergent or failed to rinse the item enough. You should hold the item under a bright light to check for streaks. If the water remains clear after a cycle, the cleaning solution has lost its effectiveness and needs to be replaced.
A reliable test for total cleanliness is the water break test. If water beads up on the surface, contaminants remain. If the water sheets off in a smooth, continuous layer, the surface is truly clean. If your item is metal, a dark residue on a white cloth after wiping indicates oxidation that the solution failed to lift.
Common cleaning errors
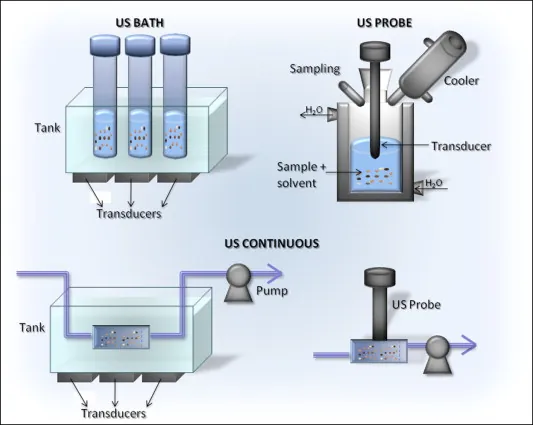
Using harsh chemicals often strips protective finishes or corrodes soft metals like brass and aluminum. Before pouring, check the manufacturer’s manual to confirm the detergent is pH-neutral and safe for your specific material. If the manual is missing, test a tiny drop on an inconspicuous underside area first.
Operating an ultrasonic cleaner without enough liquid will destroy the transducers and burn out the heating element within minutes. Always ensure the water level is at least two-thirds full before switching the power on. If you’re cleaning large objects, account for the liquid displacement to avoid an overflow.
Skipping the degassing phase leaves microscopic air bubbles in the solution. These bubbles absorb the energy of the sound waves, which significantly reduces your cleaning power. Run the machine for 5 minutes without items to ensure the water is ready for the cycle. You know it’s ready when the water stops hissing and the surface appears perfectly still. If you see bubbles clinging to the tank walls, the liquid isn’t yet degassed.
Related guides
Frequently asked questions
Can I clean jewelry in an ultrasonic cleaner?
Yes, most jewelry pieces can be cleaned, but you must avoid using this method for soft or porous gemstones like opals, pearls, or emeralds. The intense vibrations can cause these stones to crack or lose their luster. If your jewelry contains diamonds or gold, it’s generally safe, provided the settings are kept to a low temperature and a short cycle time of 3 minutes.
Is it safe to use flammable liquids?
No, you should never use flammable liquids like acetone, alcohol, or gasoline in an ultrasonic cleaner. The cavitation process generates heat and pressure that can ignite the vapors, creating a fire hazard. Always use water-based detergents specifically designed for ultrasonic machines to ensure your safety and protect the electronics inside the unit from damage or combustion.
How often should I change the cleaning solution?
You should change the solution whenever the water becomes visibly cloudy or when you notice the cleaning performance dropping significantly. For heavy-duty use, many shops change the fluid once per day to ensure consistent results. If you only use the device occasionally, replace the liquid after every 3 or 4 cycles to prevent the buildup of oils from re-depositing onto the items you’re trying to clean.
Why do my items look cloudy after cleaning?
The cloudiness is usually caused by using too much detergent or failing to rinse the items thoroughly after the cycle. If the residue dries on the surface, it creates a filmy appearance that’s difficult to remove. To fix this, soak the items in clean, lukewarm water for 2 minutes and wipe them dry with a microfiber cloth immediately to prevent water spots from forming.
How much water should be in the tank?
The tank should be filled to the manufacturer’s recommended level, usually indicated by a line on the inside wall. If the water level is too low, the transducers may overheat, and if it’s too high, the liquid may spill over during the vibration cycle. Always check your specific model’s manual, as the required depth often varies depending on the total volume of the tank.
Does the temperature setting matter?
Yes, the temperature is vital because most cleaning detergents work best between 120°F and 140°F. If the water is too cold, the chemicals can’t effectively break down thick grease or wax. Conversely, setting the heat too high can damage sensitive materials or cause certain cleaning agents to evaporate too quickly. Always check the label on your cleaning solution to find the ideal temperature range for your specific task.
Conclusion
Cleanliness is the most important factor in keeping your tools or jewelry in good shape. By using the right solution and respecting the limits of your machine, you can keep your belongings in top condition for years. Always monitor the water temperature and clarity to ensure your device is working as expected.
