
An infrared oven cooks food faster than a conventional oven because it uses direct radiant energy to heat the surface of the food instead of heating the surrounding air. If you want speed, choose infrared; if you want consistent, even browning for large roasts or complex baking, a conventional oven is the better tool. This comparison between an infrared oven vs conventional oven shows that your choice depends entirely on whether you prioritize time or texture.
Infrared oven vs conventional oven: Comparing heating methods
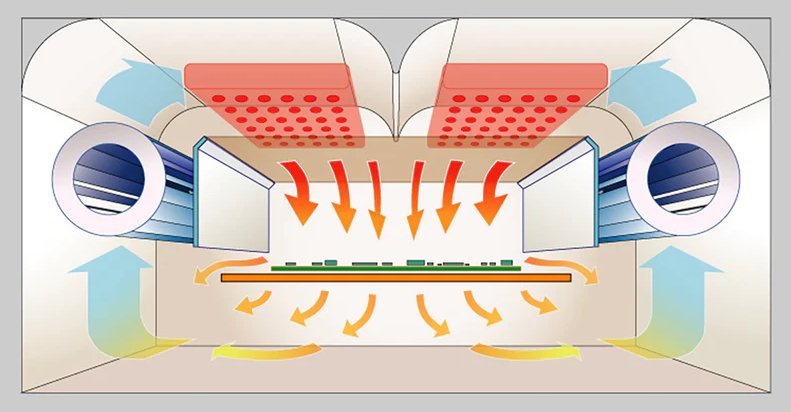
Choosing the right appliance depends on your cooking style and the space you have available. While infrared models focus on intense, direct heat, conventional units rely on thermal convection or radiation to cook food more gradually. The table below highlights the key differences between these technologies.
| Method | How long | Effort | Cost | Best for |
|---|---|---|---|---|
| Infrared | Fast | Low | Medium | Quick snacks |
| Conventional | Slow | Medium | High | Large roasts |
| Convection | Moderate | Medium | High | Even baking |
Infrared technology is ideal for busy households, while conventional ovens remain the standard for traditional meal preparation. If you have limited counter space, infrared often provides a compact solution. However, conventional ovens offer larger capacities for batch cooking or multi-rack tasks.
The most common mistake is choosing based on speed alone, ignoring the “moisture trap” effect. Infrared units excel at searing surfaces but frequently dry out proteins that require long, slow heat to break down connective tissues. If your weekly routine involves braising or slow-roasting cuts like brisket, a conventional oven is mandatory.
Use this decision rule: if your primary goal is crisping, browning, or reheating leftovers, prioritize infrared. If you’re baking delicate pastries or cooking for more than four people, stick to convection. Convection units use a fan to circulate air, which eliminates hot spots.
Direct heat with infrared technology
Infrared ovens use electromagnetic waves to transfer heat directly to the food. This avoids the need to preheat the entire air volume of the cooking chamber. Because the energy penetrates surfaces instantly, you save significant time on thin items.
- Place your food on the rack, ensuring it isn’t touching the heat elements.
- Set the timer for roughly 60% of the duration you would use in a standard oven.
- Check the food frequently, as the high intensity can cause burning if left unattended.
- Use a food thermometer to ensure ground meat reaches 160°F or poultry reaches 165°F as noted in the safe minimum internal temperatures from FoodSafety.gov.
This method is excellent for searing steaks, crisping toast, or reheating pizza. However, don’t attempt to cook roasts or whole chickens this way. The main weakness is that it struggles to heat the center of thick, dense items before the outside dries out or burns.
A common mistake is assuming infrared cooks like a microwave. While both are fast, infrared creates a Maillard reaction on the surface, whereas microwaves produce soggy textures. If the surface of your food begins to darken while the center remains cold, lower the power setting immediately. Because of the intense heat, you must stay nearby to monitor progress. Constant vigilance prevents the transition from perfectly seared to carbonized in seconds.
Traditional thermal cooking
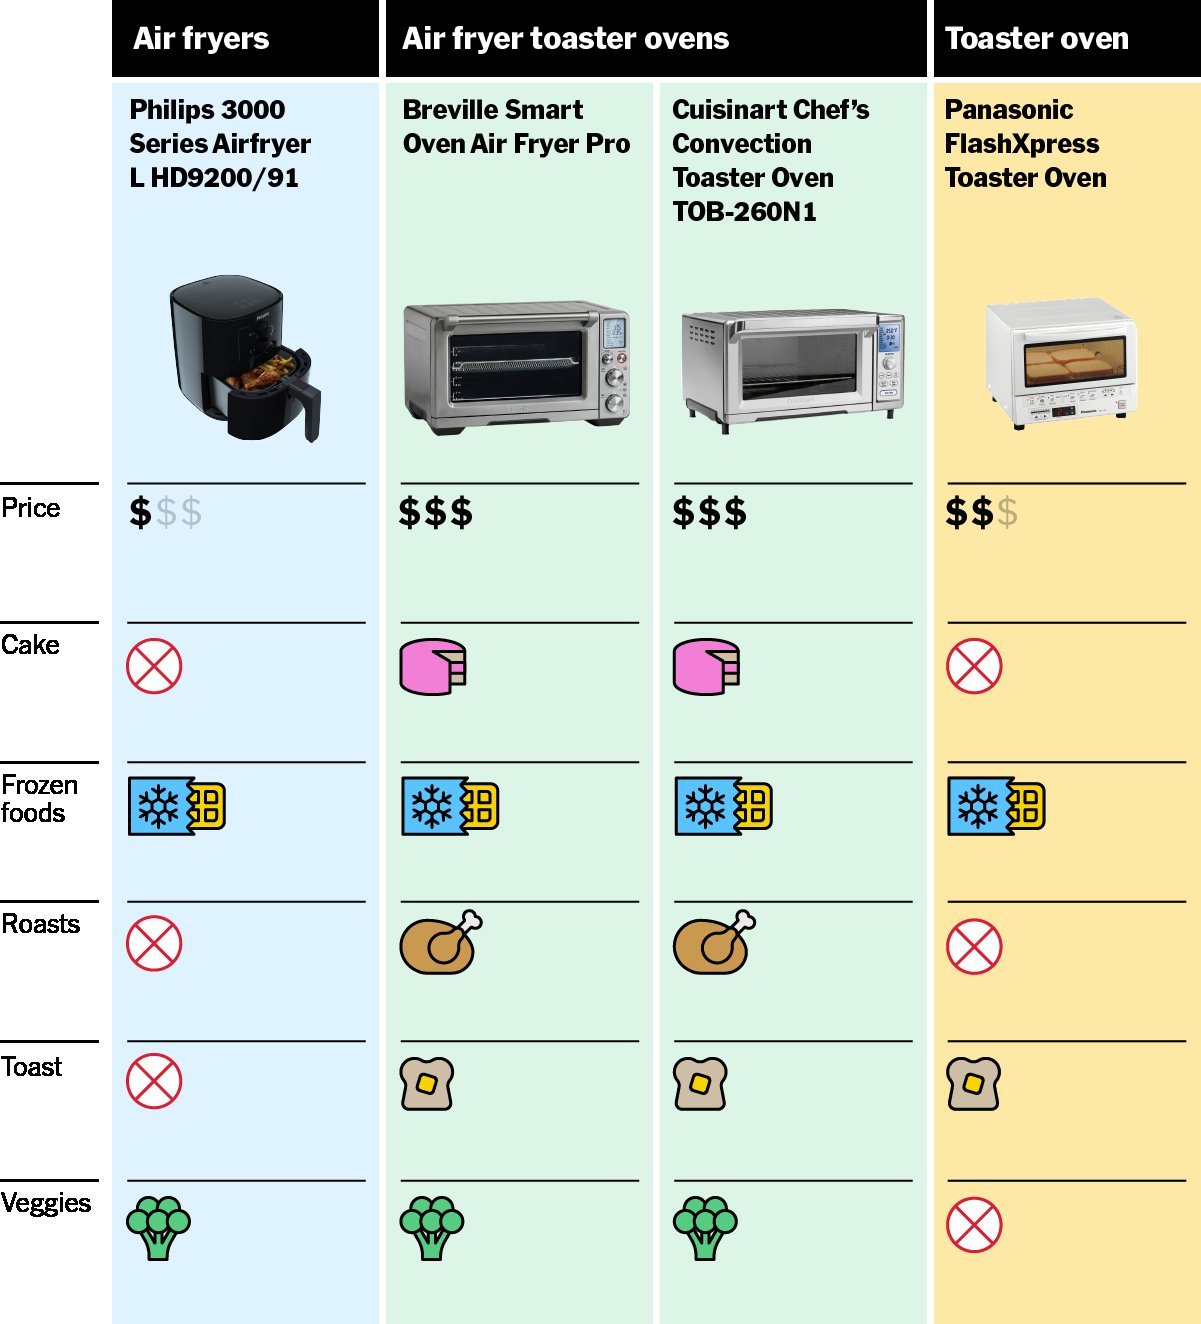
Conventional ovens heat the air inside the box, which then transfers heat to the food through conduction and convection. This process is slower but allows for deep, even cooking.
Preheat the oven to the desired temperature, usually 350°F to 400°F. If you’re baking delicate items like soufflés, wait an additional ten minutes after the light turns off to ensure the thermal mass of the walls has stabilized.
Position your baking dish in the center of the rack for uniform airflow. Placing items too close to the heating elements at the top or bottom creates hot spots that burn the exterior before the center sets.
Cook until the food reaches the appropriate doneness, checking internal temperatures for proteins. Use a probe thermometer to hit 165°F for poultry or 145°F for roasts.
Remove the food carefully, as the heavy rack and walls retain high heat for a long time.
This method is superior for delicate pastries, cakes, and large whole birds that need time to cook through without scorching. The main weakness is the long preheating time and the significant energy usage compared to smaller units.
Check for air leaks by holding a thin piece of paper against the closed door; if it falls, replace the gasket.
For those with complex electrical setups, installation requires a licensed electrician to avoid fire hazards and ensure the circuit matches the appliance’s power draw.
The best oven for your kitchen
When you’re in a hurry, an infrared oven is your best choice because the lack of a lengthy preheat phase saves you 10 to 15 minutes on every meal. These units use halogen lamps to penetrate food directly, making them ideal for quick searing or reheating leftovers.
If you’re doing this for the first time, a conventional oven is more forgiving. Its slower, ambient heat gives you a larger margin of error before the food becomes overcooked. If you want the best possible result whatever it takes, choose a conventional oven with a convection setting. This provides the most consistent texture for everything from bread to roasts by circulating hot air evenly.
The trade-off is clear: infrared gives you speed at the expense of delicate control, while conventional ovens give you professional-level control at the expense of time. If you bake delicate pastries, choose convection; if you primarily cook frozen goods or quick proteins, choose infrared.
If your kitchen layout is small, infrared is often the only option that fits. However, verify the manufacturer’s ventilation requirements to prevent heat damage to your cabinets. This varies by model; check the label on the back of the unit for clearance instructions before you install it. If your unit requires two inches of clearance, don’t attempt to flush-mount it. If you can’t provide the necessary space, you must choose a different model or risk a fire hazard.
Rules for safe and effective cooking
Regardless of the oven you choose, certain standards ensure your food is prepared safely. You must always prepare your workspace by clearing flammable items—such as paper towels, plastic utensils, or dishcloths—at least six inches away from the unit’s exterior vents. These vents dissipate intense heat, and proximity to combustibles is the leading cause of kitchen fires.
During the cooking process, check your food halfway through the suggested time to see if browning is occurring too quickly. If the top of the dish is darkening while the center remains cool, tent the item with aluminum foil for the remainder of the cycle. At the end, always use heat-resistant silicone mitts to handle trays.
If you’re using a high-powered unit, ensure your wall outlet is rated for the appliance’s wattage to prevent electrical failure. A common mistake is daisy-chaining these ovens through a standard power strip; this creates a fire hazard by drawing more current than the strip can safely handle. Always plug the unit directly into a dedicated wall receptacle.
If you suspect your oven is malfunctioning, never attempt to open the outer casing yourself. Internal components like capacitors can hold a lethal charge even when the unit is unplugged. If the appliance fails to heat or the door seal is damaged, the unit is no longer safe for operation. Contact a certified technician immediately. Following these guidelines protects your home and ensures your meals reach the internal temperatures necessary to eliminate foodborne pathogens.
Frequently asked questions
Can I use metal in an infrared oven?
Avoid using plastic or glass unless the manufacturer explicitly labels the item as oven-safe for high-intensity heat. If you’re unsure, stick to stainless steel or aluminum, as these materials handle direct heat well and won’t shatter or melt during the shorter, intense cooking cycles.
How long does an infrared oven take to preheat?
Most infrared ovens require no preheating, allowing you to start cooking within seconds of turning the power on. This is the biggest advantage over conventional models, which often require 10 to 20 minutes to reach a stable temperature. If you’re cooking something that needs a precise starting temperature for a crust, check your manual, as some models have a quick-start cycle that mimics a brief preheat.
Is it safe to leave an infrared oven unattended?
No, you should never leave an infrared oven unattended while it’s in operation because the high intensity of the heat elements can cause food to ignite or burn rapidly. Unlike conventional ovens that cook slowly, infrared units work quickly and can transition from perfectly cooked to charred in just a few minutes. Always keep a close eye on your meal until you’re familiar with how your specific model performs.
How much energy does a conventional oven use?
A standard conventional oven typically uses between 2,000 and 5,000 watts depending on its size and active heating elements. This is significantly more than an infrared unit, which operates at a lower total wattage due to its focused heating method. Note that total energy consumption depends on how long the oven maintains your target temperature.
What happens if I use the wrong oven setting?
Using a setting that’s too high will likely burn the exterior of your food while leaving the inside raw. This often happens when switching to infrared units because people underestimate the speed of radiant heat. If this occurs, lower the power setting immediately and tent the food with foil to finish cooking.
Infrared oven, in short
Think about your favorite weekly meals and how much time you usually have to prepare them. If you’re often in a rush, an infrared model won’t let you down. Otherwise, stick with your traditional oven for those weekend projects. You’ll find that picking the right tool makes every dinner easier.
Related guides