
Common Vulcan OmniPro 220 issues include inconsistent wire feed, unstable arcs, or software glitches. These problems often stem from mismatched settings or poor connections. Because these machines rely on precise digital feedback, ensure your ground is secure and your gun liner is clear. If an error code appears, consult a professional technician to inspect your internal power input and cable connections.
Common Vulcan OmniPro 220 issues
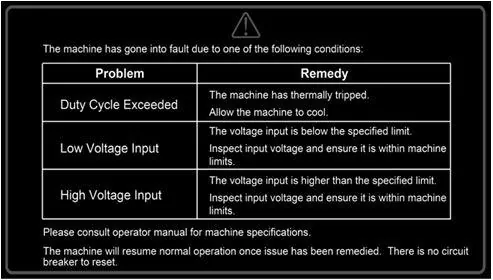
Every welding machine has unique traits that influence how it behaves under different shop conditions. This table outlines common concerns reported by operators when using various multi-process welders in a professional setting.
| Machine Type | Primary Issue | Best For | Typical Example |
|---|---|---|---|
| Multi-process | Inconsistent wire feed | Fabrication shops | Vulcan OmniPro 220 |
| MIG welder | Contact tip burnback | Auto body work | Miller Multimatic 215 |
| TIG welder | High frequency interference | Precision aluminum | Lincoln Square Wave |
| Stick welder | Electrode sticking | Field repairs | Hobart Stickmate 160 |
If your wire feed surges, check your drive roll tension first. A common mistake is overtightening the tensioner, which deforms the wire and creates friction inside the liner. If the wire creates a bird’s nest at the rollers, loosen the tension until you can stop the wire with two fingers.
For contact tip burnback, ensure your stick-out remains consistent. If you hold the torch too close to the puddle, the heat will fuse the wire to the tip instantly. Use a tip-to-work distance of approximately 3/8 to 1/2 inch, depending on the specific wire diameter and shielding gas.
When dealing with high-frequency interference, keep your ground cable at least three feet away from sensitive shop electronics. If you see erratic behavior in nearby digital displays, move your grounding point closer to the weld zone to shorten the electrical path.
Wire feed speed inconsistencies
Inconsistent wire feed is a frequent complaint that usually stems from mechanical resistance rather than a defect in the machine itself. If the wire doesn’t travel smoothly through the liner, the digital drive motor senses the drag and attempts to compensate, which leads to a pulsing arc. This mistake often costs operators their weld penetration, as the arc length fluctuates rapidly during the pass.
- Check the tension on the drive rolls to ensure they aren’t crushing the wire.
- Replace the gun liner if you notice any kinks or debris inside the conduit.
- Ensure the drive roll size matches the wire diameter exactly, as a mismatch causes slipping.
- Clean the contact tip regularly to prevent the wire from sticking during the feed process.
If the wire continues to jerk, inspect the spool hub for excessive drag or loose tension nuts. You can verify the manufacturer’s recommended settings for different wire gauges by consulting the Harbor Freight owner’s manual for this specific model.
Arc stability on thin materials
Difficulty maintaining a stable arc on thin gauge steel often occurs because the machine’s Synergic mode is calibrated for standard industrial thicknesses. If the arc feels too aggressive or blows through the material, you must switch to manual mode to lower the voltage independently of the wire speed. This trade-off means you lose the convenience of the one-touch settings but gain control over heat input.
- Consult a technician to adjust the heat intensity settings if you experience excessive penetration.
- Increase the travel speed to prevent the puddle from becoming too large and falling through.
- Use a smaller diameter welding wire, such as .023 inch, for better control on thin sheets.
- Ensure the ground clamp is attached directly to the workpiece to prevent arc wandering.
This setup isn’t for beginners who rely solely on the pre-programmed digital presets. If you’re working on material thinner than 24 gauge, you’ll find it difficult to avoid burn-through regardless of the settings.
Software and display glitches
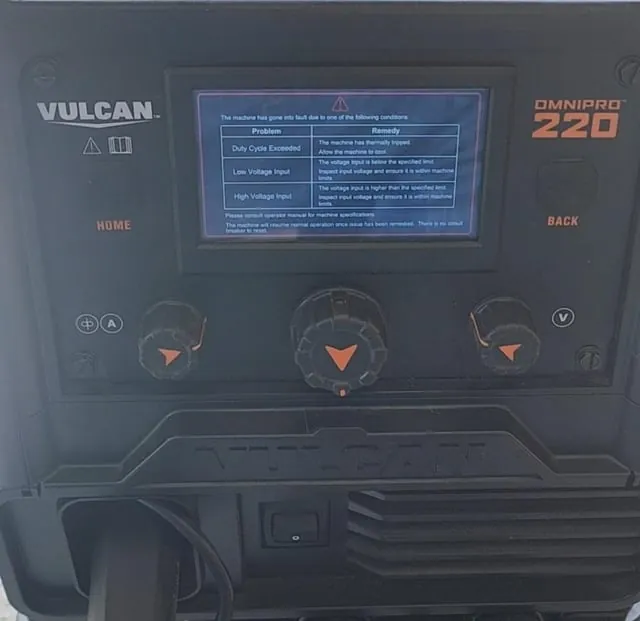
Software glitches can manifest as unresponsive menus or incorrect parameter displays when switching between welding processes. These errors usually happen if the machine is powered on while the gun trigger is depressed or if the voltage fluctuates from an unstable power source. If the screen freezes, turning the machine off for 30 seconds allows the internal capacitors to discharge fully.
- Cycle the power switch to reset the digital processor when the display hangs.
- Verify the input voltage matches the 120V or 240V requirements listed on the back panel.
- Avoid using long, thin extension cords which cause voltage drops and digital errors.
- Check that the gas solenoid is clicking when you pull the trigger in MIG mode.
This is a common point of failure for users who attempt to run the machine on a shared household circuit. If the display remains blank or shows a persistent error code, the control board may require professional repair by an authorized technician.
Grounding and electrical connectivity
Poor grounding is the most common cause of arc starts failing or the machine shutting down unexpectedly. If the ground clamp has a weak spring or the cable has internal breaks, the resistance increases and tricks the machine into thinking the circuit is open. Many operators blame the machine for arc instability when the real cause is a dirty or painted surface at the connection point.
Grind the metal to bright, bare steel before attaching the ground clamp. A connection made over mill scale or rust acts like a resistor, bleeding off voltage that your arc needs to stabilize. If your clamp feels warm to the touch after three minutes of welding, you have a high-resistance connection that’s costing you penetration depth.
Check the cable lugs for signs of heat discoloration or melting plastic. These indicate a loose connection where current is arcing internally, which will eventually melt the lug off the cable entirely.
Keep the work lead as short as possible to minimize electrical resistance during use. If you must run a long lead, increase the cable gauge by two sizes to compensate for the voltage drop.
Ensure the power outlet provides the full 240V, 50A service required for maximum output. If you’re using a generator, ensure it provides clean power with a stable sine wave. Using a dirty power source will frequently cause the machine to trip its internal thermal protection circuit.
Other potential operational challenges
Gas flow issues often stem from more than just leaks. If you notice porosity, check the nozzle for spatter buildup that disrupts the laminar flow of your shielding gas. A simple rule applies: if the gas flow rate exceeds 30 cubic feet per hour, turbulence can disrupt the shielding gas coverage and lead to weld porosity.
Drive roll tension requires a delicate touch. If you can stop the wire by pinching it with gloved fingers while the trigger is pulled, the tension is too low. Conversely, if the wire shows teeth marks or flattened sections, you have over-tightened the rolls. This deformation forces the wire to bind in the contact tip, leading to erratic arc starts.
Polarity errors are common when switching processes. Always remember that solid wire typically runs electrode positive, while most self-shielded flux-core wires require electrode negative. Failing to swap these leads results in excessive spatter and poor penetration, forcing you to grind out and re-weld the entire joint.
Choosing the right settings
Deciding which settings to use depends on the material thickness and the joint configuration of your project. If you’re welding thicker plate, you must use the 240V input to achieve the necessary penetration, whereas 120V is sufficient for light fabrication under 1/8 inch.
Matching the wire speed to the voltage is a skill that requires manual adjustment if the Synergic mode doesn’t produce the desired arc sound. These two settings are linked by the machine’s software, meaning changing one often requires a slight tweak to the other to keep the arc steady.
Listen for a crisp, bacon-frying sizzle. If you hear a loud, sporadic popping sound, your wire speed is likely too low for the current voltage. Increase the speed in 5% increments until the arc stabilizes. Conversely, a dull, stubbing sound indicates the wire is feeding too fast, which will cause the torch to push back against your hand.
Related guides
- Aqua Genie Skimmer Problems: 3 Common Causes and Fixes in 2026
- Pentair Globrite Problems: Top 10 Issues and Complaints in 2026
- Pentair IntelliBrite 5G Problems: How to Spot and Fix Them in 2026
Frequently asked questions
How long should the duty cycle last?
The duty cycle is limited, so you must weld for only 3 minutes out of every 10-minute period before the machine needs to cool down. If you exceed this limit, the thermal protection light will turn on, and you must wait until the fan cools the internal components.
Is it safe to use this welder on a household outlet?
You can use a 120V outlet for light work, but you’ll be limited to thinner materials and lower duty cycles. Always ensure your household circuit is rated for the proper capacity to prevent tripping the breaker. If you need to weld materials thicker than 1/8 inch, you must connect the machine to a dedicated 240V circuit.
Why does the wire feed motor make a clicking sound?
A clicking sound usually indicates that the drive rolls are slipping because of tension issues or a blockage in the gun liner. Check the liner for debris and verify that the wire isn’t tangling on the spool. If the clicking continues, inspect the drive motor gears for any signs of stripping or mechanical damage.
What happens if I use the wrong shielding gas?
Using the wrong gas, such as pure CO2 instead of a mix, will result in excessive spatter and a difficult-to-control arc. Always verify the gas type matches the wire you’re using, usually 75% Argon and 25% CO2 for steel. If you’re unsure, check the wire packaging for the recommended gas mixture.
Does it matter if I use an extension cord?
Using an extension cord significantly affects performance if it isn’t the correct gauge for the welder’s power draw. You should use a 10-gauge or 8-gauge cord no longer than 25 feet to avoid voltage drops. A thin cord will cause the machine to struggle with arc starts and may lead to internal damage.
How often should I replace the contact tip?
You should replace the contact tip whenever you notice the opening has become oval-shaped or if the wire starts to stick. A worn tip causes poor electrical contact, which leads to an erratic arc and increased spatter. Keep a supply of tips that match your wire diameter on hand, as they’re consumable parts that wear out quickly.
Conclusion
Begin by checking the power input and ensuring your ground clamp has a clean, metal-to-metal connection. You should expect a smooth, consistent arc once the wire tension is correctly balanced and the gas flow is set to 20-25 cubic feet per hour. If the machine continues to display error codes after you have verified these basic connections, stop using the unit immediately and contact a qualified service professional for a full diagnostic inspection.
