
A pop up drain is the best choice for most bathrooms because it stops jewelry from falling down the pipe, while a grid drain is better if you want a sink that never clogs. Choosing between a pop up drain vs grid drain usually comes down to whether you value easy cleaning or a clean look for your basin.
Comparing bathroom sink drain types
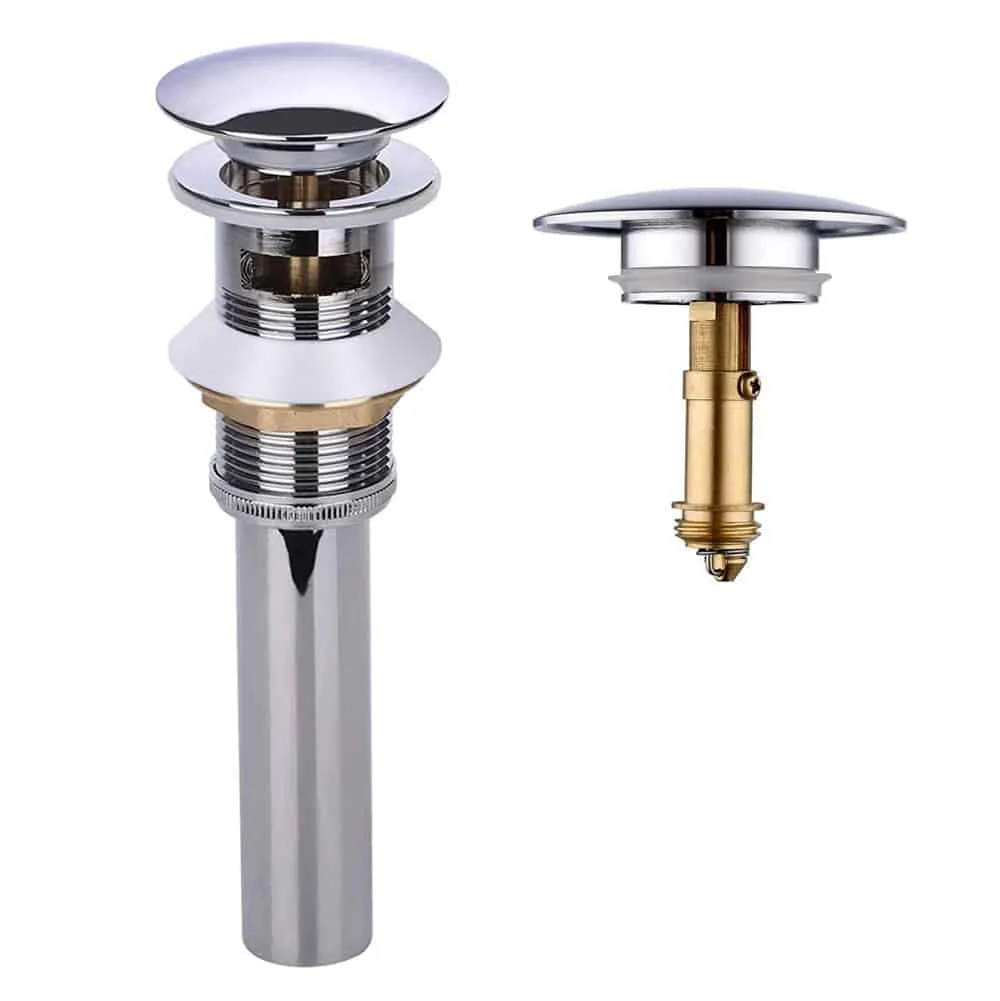
The main difference between these drains is how they handle debris and water flow. A pop-up drain uses a stopper to hold water, while a grid drain stays open at all times to let water pass through freely.
| Method | How long | Effort | Cost | Best for |
|---|---|---|---|---|
| Pop up drain | 30 mins | Medium | Medium | Standard vanity sinks |
| Grid drain | 20 mins | Low | Low | Vessel sinks |
| Push-seal drain | 15 mins | Low | Medium | Modern minimal sinks |
If you have a sink that fills up often, a pop-up drain is the right pick. If you have a vessel sink without an overflow hole, you must be careful not to leave the faucet running, as a grid drain can’t prevent the sink from overflowing.
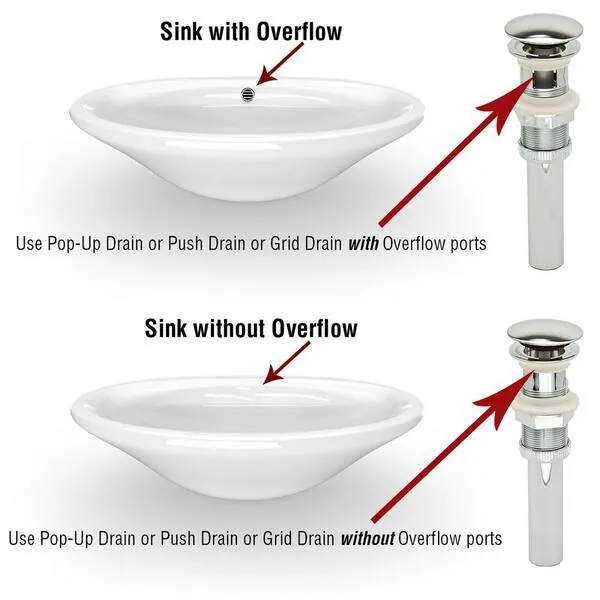
Choose your drain based on your sink’s overflow configuration. If your basin lacks an overflow hole, you must use an unslotted drain to prevent leaks behind the wall. If your basin has an overflow hole, use a slotted drain to allow water that enters the overflow channel to drain into the tailpiece.
Many homeowners mistakenly install slotted drains in overflow-free sinks, which creates a permanent, hidden leak point. This error often goes unnoticed until water damage appears on your vanity cabinet floor. If you’re unsure, fill your sink and check the underside for a small drain hole near the rim. If you find one, buy a slotted model. If the basin is solid porcelain, stick to unslotted.
How a pop up drain works
A pop up drain uses a mechanical lever or a spring to open and close the sink basin. This allows you to fill the sink with water for shaving or washing your face.
- Remove the old drain assembly by loosening the lock nut underneath the sink with a basin wrench.
- Apply a thin ring of plumber’s putty around the underside of the new drain flange.
- Insert the drain body through the sink hole and tighten the mounting nut from below.
- Connect the lift rod to the horizontal rod on the drain tailpiece.
- Test the seal by filling the sink and checking for leaks under the cabinet.
This style is excellent for families who need to hold water in the sink. However, the internal parts often catch hair and soap scum, which means you’ll need to unscrew the stopper to clean it out every few months. If you aren’t comfortable working with plumbing pipes under the sink, consult a licensed plumber to avoid water damage.
How a grid drain works
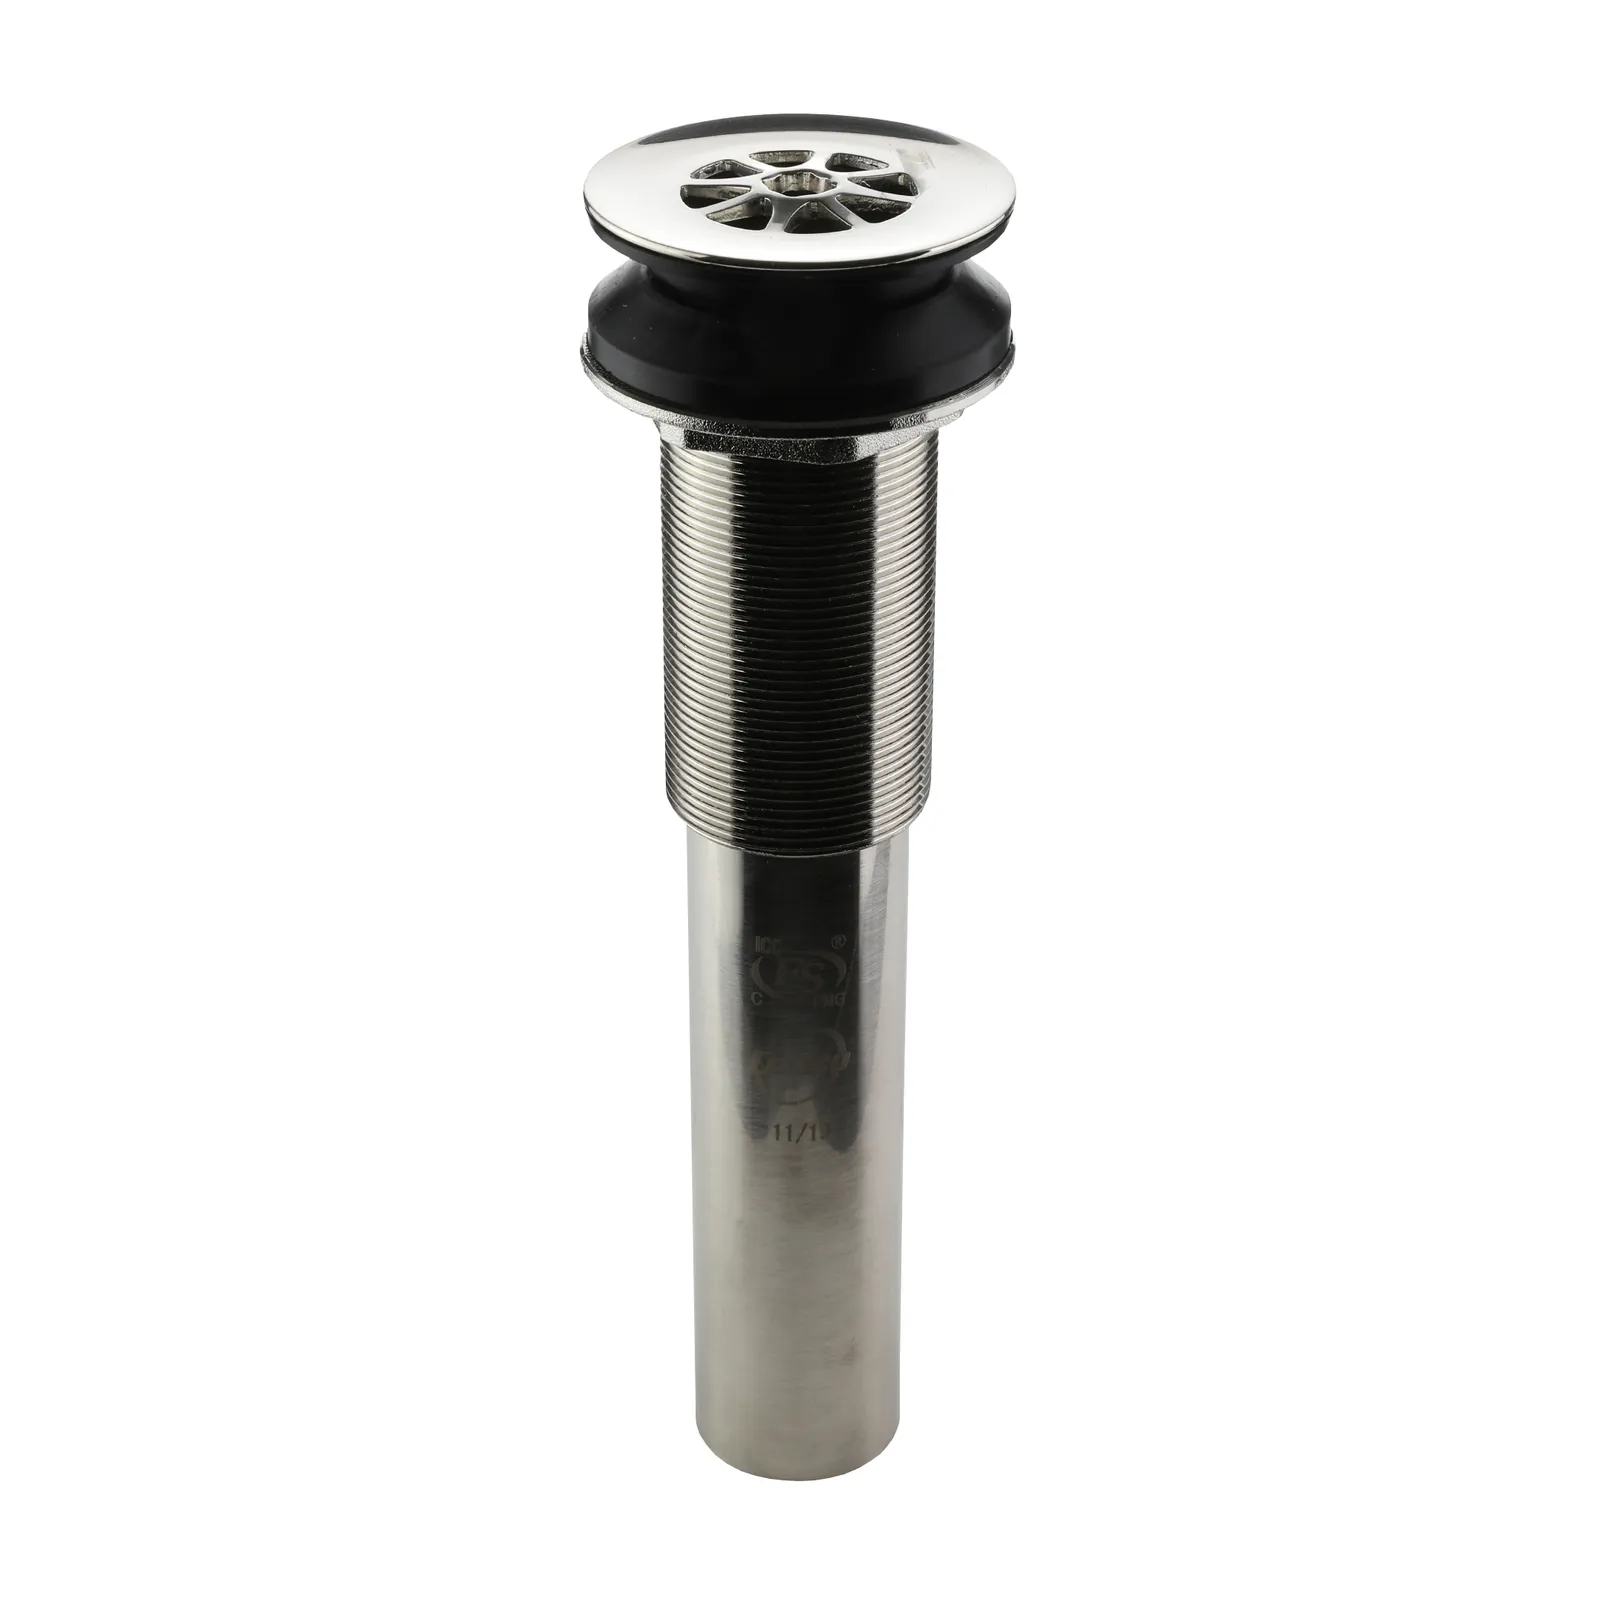
A grid drain consists of a fixed metal grate that sits at the bottom of your sink. It acts as a permanent strainer that lets water flow out while catching large items.
Clean the sink drain hole to remove any old silicone or debris. Place the rubber gasket provided with your drain kit onto the drain flange. Insert the drain through the sink basin and screw on the rubber washer and nut from underneath. Tighten the nut until the drain is firm against the sink surface. Connect the tailpiece to your existing p-trap.
If you’re installing this on a vessel sink, use a bead of plumber’s putty under the flange to ensure a watertight seal. Without this, water will seep behind the flange and ruin your countertop.
Grid drains are perfect for vessel sinks because they look sleek and never need a lift rod. Because they have no moving parts, they’re very reliable. The downside is that you can’t plug the sink to fill it with water.
Choose a grid drain only if your sink has an integrated overflow hole. If your sink lacks an overflow, water will spill over the rim if you accidentally leave the faucet running. In that case, you must choose a standard pop-up drain instead. Proper installation of these assemblies is vital to maintain a sanitary bathroom environment and prevent sewer gas leaks.
How a push-seal drain works
A push-seal drain, also called a click-clack drain, works by pressing the center cap down to engage a spring-loaded mechanism that seals the drain. You press it again to release the water.
Unscrew the top cap from the drain body. Apply a thin, consistent bead of silicone sealant to the underside of the drain flange. Insert the drain body into the sink and tighten the mounting nut from below until snug. Avoid overtightening, as this can crack porcelain basins or strip plastic threads. Finally, screw the top cap back onto the assembly.
This method is easy to use and requires no extra rods or levers. It’s a great choice for a clean, modern look. However, verify if your sink has an overflow hole. If your basin lacks an overflow, you must purchase a non-overflow drain model. Using a standard drain in a non-overflow sink will prevent the water from draining properly or create a hidden leak point.
The limit is the size of your sink hole. These drains usually fit standard 1.5-inch or 1.75-inch openings. Measure your existing drain hole before buying a new unit to ensure a perfect fit. If the hole is irregular or chipped, the silicone seal will fail, causing water to drip into your vanity cabinet.
Choosing the right drain for your needs
When you’re in a hurry to finish a renovation, a push-seal drain is the fastest option because it has fewer parts to install. If you’re doing this for the first time, a grid drain is the easiest to manage since it lacks complicated levers or rods that require adjustment. If you want the best possible result regardless of the effort, a high-quality pop-up drain offers the most utility for a busy household.
The trade-off is simple: you either choose a drain that lets you hold water but requires frequent hair removal, or a grid drain that stays open and stays clean but can’t hold water. If you have a sink with an overflow hole, you must buy a drain assembly explicitly marked for overflow compatibility.
Check your sink basin for a small hole near the rim. If you find one, buy the overflow model. If the basin is solid porcelain without a port, choose the standard drain. Beginners often mistake the two, which forces a full tear-out of the plumbing seal to fix the mistake. Always verify this before applying your plumber’s putty.
Rules for every drain installation
Regardless of the drain type, always use a silicone sealant if the manufacturer doesn’t provide a thick enough rubber gasket. This prevents leaks that can rot your vanity cabinet over time. Before you start, turn off the water supply to the faucet to avoid accidents.
Always check the drain connection under the sink after you have run the water for the first time. Even a small drip can cause major damage if left alone. If you find a leak, tighten the nut by a quarter turn; if it still leaks, you may need to take it apart and re-apply the sealant. If you lack the proper tools, such as a basin wrench, don’t force the nuts with pliers, as you might crack the porcelain sink.
A common mistake is overtightening the slip nuts, which strips the plastic threads and guarantees a permanent drip. If the connection feels snug but still weeps, don’t keep cranking; instead, back it off and check that the beveled washer is seated squarely against the pipe.
If your drain assembly uses a metal tailpiece, apply a thin bead of plumber’s putty under the flange before tightening the nut from below. If you’re working with plastic components, use silicone sealant instead, as putty can degrade certain plastics. Stick to this rule: if the material is metal, use putty; if it’s plastic, use silicone.
Related guides
- Does Iron Float in Water? Why Solid Blocks Always Sink in 2026
- 10 Best Under Sink Drain Pump Picks for Reliable Drainage in 2026
Frequently asked questions
Can I install a grid drain on any sink?
No, you can only use a grid drain on a sink that doesn’t need to hold water. If your sink has an overflow, a grid drain won’t stop water from rising high enough to reach the overflow hole, but it’s best suited for vessel sinks that lack an overflow entirely. Always check your sink basin for an overflow opening before choosing a drain type.
How long does a pop up drain last?
A high-quality brass pop up drain can last for a long duration with regular cleaning. The lifespan varies based on the hardness of your water and how often you use the stopper. If you notice the finish wearing off or the spring mechanism sticking, it’s usually time to replace the internal cartridge rather than the entire drain assembly.
Is it safe to install a drain myself?
Yes, it’s safe to install a drain if you follow the manufacturer’s steps and don’t overtighten the parts. The most common mistake people make is using too much plumber’s putty, which can prevent a tight seal. Hand-tighten the nuts first, then use a wrench to give them one final turn to ensure they’re secure without cracking the basin.
What happens if I choose a drain without an overflow?
If you install a non-overflow drain in a sink that has an overflow hole, the overflow feature won’t function, meaning water won’t drain if the sink is filled past the overflow level. This can lead to hidden mold or water damage inside your vanity cabinet. Always match the drain type to your sink’s specific design; if your sink has a small hole near the top of the basin, you must use an overflow-compatible drain.
How often should I clean the drain?
You should clean the drain every 3 to 6 months to prevent hair buildup and slow drainage. If you notice the water draining slower than usual, it’s time for a check. Simply unscrew the stopper or the grid cap and pull out any trapped debris to keep your plumbing running smoothly and prevent blockages from forming deep in the p-trap.
Why is my new drain leaking?
A new drain usually leaks because the rubber gasket is misaligned or the nut isn’t tight enough. Ensure the gasket is sitting flat against the bottom of the sink before tightening the nut. If the leak persists, remove the drain, clean off the old silicone, and apply a fresh, even layer to ensure a watertight seal around the entire hole.
Conclusion
Think about how you use your sink every day before you make your final choice. If you’re still unsure, head to a local hardware store to see both styles in person. You’ll find it’s much easier to decide once you’ve held them and pictured how they’ll look in your own bathroom.