
A simple plumbing repair cost falls between $175 and $450 for a standard service call in the US, assuming a licensed plumber working one to two hours on an accessible fixture. That figure covers common jobs like replacing a faucet, fixing a leaking pipe joint, or clearing a basic drain clog. The price you actually pay depends entirely on what broke, where it is, and who fixes it.
Three things change that number for every home: the specific part that failed, whether your pipes sit behind drywall or under concrete, and your local labor rate. You’ll read exactly how each one shifts the final bill below.
Who needs plumbing repair pricing

Someone with a dripping kitchen faucet types this query to decide if they should call a pro or buy a wrench. They already know where the leak is, but they don’t know what a plumber charges just to walk through the door. What they need is a baseline number so they aren’t surprised by the first invoice.
A homeowner staring at water on the basement floor searches the same words out of panic. They don’t have a diagnosis yet, only damage. They need to know the hourly emergency rate before they dial the phone, because waiting until morning might save hundreds of dollars if the main shutoff valve works.
A property manager comparing bids for a repipe job also lands here. They’ve got three quotes and want to know which line items are normal and which ones are padded. They need the breakdown of materials versus labor to spot the outlier.
This page serves the first reader best — the one facing a single, defined problem in an accessible location. If your pipes are buried under a slab foundation or your entire house needs new copper lines, you need a specialized estimating guide instead. The numbers below assume a standard residential repair involving one fixture or one short section of pipe, performed during normal business hours.
What changes the final bill
The type of failure matters more than anything else. A worn washer inside a shutoff valve takes ten minutes to swap. A cracked cast-iron drain stack requires cutting, fitting, and supporting heavy pipe overhead. The first costs a minimum call-out fee; the second eats half a day. Look at the broken part yourself before calling. If you can see it clearly without removing walls, expect the lower end of the range.
Where the pipe sits is the second biggest factor. Exposed plumbing in an unfinished basement gives a worker room to use both hands. Pipes hidden behind finished drywall force someone to cut access holes, work blindly, and patch the wall afterward. That extra hour of demolition doubles the labor charge even when the actual fix takes five minutes. Check your own walls. If the leak is behind tile or plaster, add the cost of a handyman to your plumbing budget.
Your zip code sets the hourly rate. Plumbers in rural areas might charge $75 an hour while those in major coastal cities bill over $200 for the same time block. You can check the current average wage for plumbers in your area through the Bureau of Labor Statistics occupational data to see what local professionals earn before markup.
The time you call shifts everything too. Weekday repairs fall under standard rates. Nights, weekends, and holidays trigger emergency premiums that often double the base hourly charge. If water isn’t actively flooding your home, wait until Monday morning.
Materials themselves rarely drive the price up unless you choose premium fixtures. Standard brass fittings cost a few dollars. A high-end smart toilet valve costs significantly more. The mistake people make most often is assuming parts are the expensive piece. Labor almost always accounts for 60% to 80% of the total bill.
Steps to get an accurate plumbing estimate
You don’t need a plumber to tell you what’s wrong before you ask for a price. Doing these steps yourself prevents you from paying someone for an hour of basic investigation.
- Shut off the water supply to the broken fixture using its local isolation valve, or close the main house shutoff if no local valve exists. Confirm the water stops flowing before moving to the next step.
- Place a dry bucket under the leak and wait 15 minutes. Count the drops per minute if it still drips. This tells the plumber whether they’re dealing with a slow seal failure or active pressure loss.
- Clear a 3-foot workspace around the problem area. Move boxes, shelves, or furniture out of the way so the worker doesn’t charge you for time spent moving your belongings.
- Take three clear photos: one wide shot showing the whole fixture, one medium shot of the connection point, and one close-up of the damage or corrosion. Text these to the company when requesting the quote.
- Call at least three licensed local companies. Read them the exact description of the problem and state that the workspace is cleared and water is shut off. Ask for their flat-rate price for that specific job first.
- If they won’t give a flat rate, ask for their diagnostic fee plus their hourly labor charge. Write down both numbers alongside the company name.
- Ask each company if their quoted price includes the replacement parts or if materials are billed separately at a markup. Note which ones include parts in the base price.
- Compare the three written estimates. If one is less than half the others, ask them what they excluded that the rest included. A suspiciously low bid usually means missing permits or substandard parts.
The judgment call that separates a proper repair from a temporary patch is whether the plumber replaces the surrounding seals and washers while the joint is apart. If they only swap the single broken piece and leave the old rubber gaskets in place, you’ll likely call them back within six months. Always ask explicitly if adjacent wear items are included in the scope.
If your repair involves gas lines or sewage mains buried under public streets, stop here. Those jobs require municipal permits and specialized licenses. Contact your city’s building department directly.
Repair prices by situation
Different problems demand different approaches, and the price follows the complexity. Here is what you’ll face based on the specific issue in your home.
| Situation | Action needed | Effort required | Watch for |
|---|---|---|---|
| Dripping faucet handle | Replace cartridge or stem | 1 hour labor | Corroded valve seat |
| Running toilet tank | Swap flapper and fill valve | 45 minutes labor | Cracked porcelain overflow |
| Slow draining sink | Snake the P-trap | 1 to 2 hours | Grease buildup further down |
| Leaking exposed copper joint | Cut and resolder fitting | 2 hours labor | Green oxidation nearby |
| Burst pipe behind drywall | Cut wall, replace section, patch | Half day labor | Mold growth inside cavity |
| Broken main shutoff valve | Replace full gate or ball valve | 3 hours labor | City water meter pressure |
| Water heater relief drip | Test and replace TPR valve | 1 hour labor | Tank rust at bottom seam |
These times assume standard residential conditions with accessible pipes. If your home has galvanized steel pipes installed before 1970, threaded connections may seize. That adds significant time to any task above because forcing old steel risks snapping the pipe inside the wall.
Details that separate good repairs
Checking the work before paying
A proper repair leaves the joint completely dry under full system pressure. Turn the water back on slowly after the plumber finishes. Don’t just open the valve all at once, as sudden pressure shocks weak joints. Let the water fill the line gradually over about thirty seconds.
Run your bare finger along the underside of the repaired connection. Leave it there for a full minute. Your skin detects moisture faster than your eyes do in dim cabinet lighting. If you feel even slight dampness, the seal hasn’t set correctly.
Check the water flow at the fixture itself. A newly replaced cartridge shouldn’t restrict pressure compared to your other sinks. If the stream feels noticeably weaker, debris from the old part might be lodged in the aerator screen.
Leaving the right things alone
Don’t let anyone apply thread sealant tape to compression fittings. Those joints rely on metal-to-metal contact or a rubber ferrule to hold pressure. Adding tape creates a gap that guarantees a future leak.
Avoid overtightening supply lines under sinks. Hand-tighten the nut, then use a wrench for about one quarter-turn more. Cranking it harder can crack the ferrule or deform the seal, causing leaks.
Leave old shutoff valves closed if they haven’t been moved in years. Forcing a frozen valve stem can snap it off entirely, turning a minor drip into a flooded room. If a valve won’t turn easily with gentle hand pressure, it needs replacement, not muscle.
Common plumbing problems and fixes
When something goes wrong, the symptom rarely points to just one cause. Use this table to match what you see to the likely fix before you spend money on a diagnostic visit.
| What you notice | What it usually means | What to do first | How to stop it happening again |
|---|---|---|---|
| Water pooling under sink | Loose slip nut connection | Tighten nut by hand | Avoid hanging heavy items on pipes |
| Gurgling sound in drain | Blocked vent stack airflow | Run hot water briefly | Clear roof vents annually |
| Brown water from tap | Rust inside iron pipes | Flush cold lines outside | Install sediment filter |
| No hot water at all | Tripped breaker or pilot | Check electrical panel | Schedule annual heater maintenance |
| Constant running noise | Worn toilet flapper seal | Jiggle flush handle | Replace flapper every two years |
| Foul smell near floor drain | Evaporated trap water seal | Pour two cups water down | Run unused drains monthly |
Never ignore a foul smell near a floor drain. An empty trap allows sewer gas into your living space, which carries real health risks according to environmental safety standards. Pouring water down restores the barrier immediately.
Permits and plumbing rules
Local building codes dictate what you’re legally allowed to touch in your own plumbing system. In nearly all US jurisdictions, homeowners can replace faucets, showerheads, and toilet internal components without pulling a permit. These are considered minor maintenance tasks.
However, altering the routing of water supply lines, changing pipe materials, or installing new fixtures where none existed requires a permit from your local building department. The International Association of Plumbing and Mechanical Officials publishes the model codes that most states adopt, but your city inspector enforces the local version.
If you hire a plumber for permitted work, verify their license number on your state’s contractor board website before they start. Unpermitted work discovered during a future home sale forces you to tear out walls and redo the job legally. That costs far more than the original permit fee.
Gas line repairs operate under much stricter rules. Only licensed professionals should touch gas piping. The risk of explosion or carbon monoxide poisoning makes this a hard boundary. If you suspect a gas leak, leave the house immediately and call your utility provider from outside. Don’t attempt to tighten gas fittings yourself under any circumstances.
What you actually pay for
The money you hand over covers three distinct buckets: the trip charge, the labor time, and the materials markup. Knowing this prevents sticker shock when the invoice arrives.
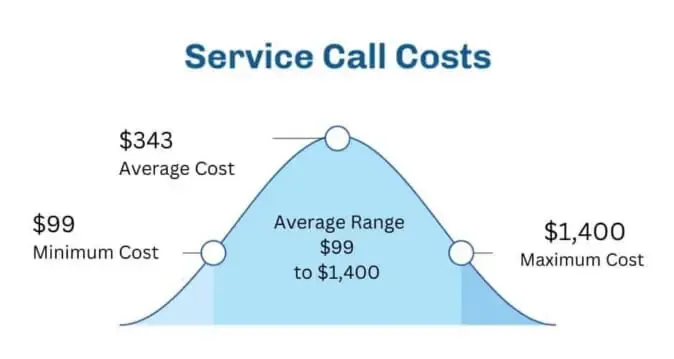
The trip charge, sometimes called a dispatch fee, pays for the truck rolling to your driveway. It typically ranges from $50 to $150 depending on your distance from their shop. Some companies waive this fee if you approve the full repair, while others charge it regardless. Always ask if the diagnostic fee applies toward the final bill.
Labor is calculated either by the hour or as a flat rate for a known task. Hourly billing means you pay for unexpected complications. Flat-rate pricing transfers that risk to the plumber, which is why flat rates often look slightly higher upfront. If your pipes are old and fragile, flat-rate protects your budget.
Materials carry a markup, usually between 20% and 50% over wholesale cost. This covers the plumber’s time sourcing the correct part and guaranteeing it fits. You can buy your own fixtures to avoid this markup, but many professionals won’t warranty a repair if they didn’t supply the part. Decide beforehand if saving $30 on a valve is worth losing the labor guarantee.
Keeping pipes healthy afterward
Once the repair is done, how you treat the system determines when you’ll need another one. Hard water accelerates mineral buildup inside fresh joints. If your home lacks a water softener and your faucets show white crust, scale will attack the new parts quickly.
Flush your water heater once a year to remove sediment that travels downstream and clogs newly installed cartridges. Attach a garden hose to the drain valve at the bottom of the tank, run it outside, and open the valve until the water runs clear. Turn off the power or gas to the heater before doing this.
Keep a record of what was replaced and when. Write the date and part number on a piece of masking tape stuck inside the cabinet door near the repair. When the next leak happens, the plumber sees exactly what’s already been tried instead of guessing.
Watch for persistent wet spots or dripping near the repair site. Catching a leak early may allow a simple re-seal rather than cutting out another section of pipe.
When DIY plumbing fails

Attempting a repair yourself saves money only when you have the right tools and a straightforward problem. If your home has original galvanized steel pipes, DIY is the wrong choice. Those pipes corrode from the inside out, and turning a wrench often snaps them cleanly off inside the wall. Hire a professional who specializes in older homes.
If the leak originates from a shared wall in a condominium or apartment, touching it yourself violates most HOA rules and lease agreements. The association’s master plumber must handle it, because your fix might push water into the neighbor’s unit. Contact your property manager first.
Any issue involving the main sewer line backing up into floor drains requires industrial equipment like hydro-jetting machines that cost thousands of dollars to rent. Plunging a mainline backup simply moves the waste to another drain. Call a drain cleaning specialist with camera inspection capabilities instead.
Working on pressurized systems without knowing how to safely bleed residual pressure risks serious injury. If you can’t confidently locate and operate every shutoff valve between the street and your fixture, stop and call a licensed plumber.
Frequently asked questions
Can I negotiate plumbing repair prices?
Yes, especially for larger jobs taking more than four hours. Ask for a line-item breakdown and request they match a competitor’s written estimate. Small emergency calls rarely have negotiation room because the dispatch cost is fixed.
Why do plumbers charge so much per hour?
The hourly rate covers insurance, vehicle maintenance, licensing fees, and years of apprenticeship training. You’re paying for the knowledge of what not to break, which prevents thousands of dollars in secondary water damage.
How long does a standard pipe repair take?
Replacing a single accessible joint or fixture takes one to two hours for a licensed plumber. If the pipe is behind drywall or under a concrete slab, expect the job to stretch across four to eight hours including restoration work.
Is it safe to use chemical drain cleaners?
No, chemical drain cleaners generate intense heat that warps PVC pipes and eats away at older metal joints. They also create toxic fumes in enclosed bathroom spaces. Use a manual drain snake or call a professional instead.
What happens if I ignore a small leak?
A steady drip wastes gallons daily and rots wooden structural framing over weeks. Hidden moisture breeds black mold inside wall cavities, which requires expensive environmental remediation far beyond the original plumbing bill.
Does homeowner insurance cover plumbing repairs?
Insurance typically covers sudden accidental damage like a burst pipe, but excludes gradual wear and tear or lack of maintenance. Check your specific policy declarations page, as coverage limits and deductibles vary widely by provider.
How often should plumbing inspections happen?
Schedule a professional inspection every two years for homes over twenty years old. Newer construction can go five years between checks. Inspectors use cameras to find thinning pipe walls before they fail catastrophically.
Do I need a permit to replace a faucet?
Generally, no. Swapping an existing fixture for a new one in the same location is considered maintenance. You only need permits when extending new water lines or changing the drainage layout permanently.
Starting your plumbing repair
Call three licensed plumbers tomorrow morning and describe your specific leak using the photos you took. Expect a firm estimate within 24 hours that details labor, parts, and trip fees separately. If any company refuses to put their quote in writing or pressures you to pay cash before starting, hang up and move to the next name on your list.