
Yes, you can make casseroles in a camping oven provided you manage the heat carefully to maintain a steady temperature. Because these ovens often lack the insulation and precise thermostats of home ranges, you must use a thermometer to ensure your dish reaches a safe internal temperature of 165°F for leftovers or poultry, as noted by FoodSafety.gov’s chart. Your success depends on your ability to monitor the heat source, the thickness of your cookware, and the wind conditions at your campsite.
Can I make casseroles in a camping oven? The best models
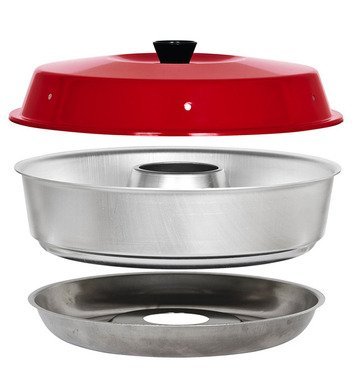
This method serves campers who enjoy slow-cooked meals and have the patience to monitor a fire or stove. If you’re an ultralight backpacker who relies on boiling water for freeze-dried meals, this isn’t for you. You need a stable base and a fuel source that can run for 45 to 90 minutes without interruption.
The ideal reader here is someone using a portable stove or a dedicated camping oven unit like a Camp Chef or Coleman folding oven. You must assume your equipment doesn’t have a reliable temperature gauge. If your oven lacks a built-in thermometer, you must purchase a hanging oven thermometer. Without this, you’re guessing, which leads to either raw centers or scorched bottoms.
The primary mistake is failing to account for wind, which causes temperature swings that ruin delicate breads. If your cooking area is exposed, you must build a windscreen using reflective foil or rocks to stabilize the heat.
This page assumes you have a heat-resistant surface and basic cast iron or heavy aluminum cookware. Use cast iron for long roasts to retain steady heat. Use aluminum for quick bakes where you need the temperature to fluctuate rapidly.
Factors that influence your bake
The heat source is the most critical factor. Camping ovens, especially those that sit on top of a single-burner stove, create intense hotspots directly above the flame. If you use a thin metal pan, the bottom of your casserole will burn before the top is even warm. Always place a heat diffuser or a small metal trivet between the burner and your casserole dish to spread the heat evenly.
Wind is the second factor that ruins a good bake. A breeze can drop the interior temperature of a folding camping oven by 50°F or more in seconds. If you’re cooking outdoors, you must set up a windscreen around your stove. If the wind is strong, your fuel consumption will double because the burner must work harder to maintain the heat.
The size and material of your cookware matter significantly. Cast iron is the best choice because it holds heat well and provides a steady, even bake. However, it takes longer to reach temperature.
Most people make the mistake of opening the oven door too often. Every time you peek, you lose precious heat that takes time to recover. If you have a clear window on your oven, use it. If not, wait at least 30 minutes before checking the progress of your meal.
Cooking your meal step by step
- Place your heat diffuser or trivet on the center of the camp stove grate.
- Preheat the camping oven for 10 minutes on a medium-low flame.
- Prepare your casserole in a cast iron pan, ensuring the depth is no more than 3 inches for even cooking.
- Place the pan on the center of the trivet inside the oven and close the door immediately.
- Adjust the stove flame until the hanging thermometer reads 350°F.
- Maintain this heat for 45 to 60 minutes, adjusting the flame if the temperature drifts by more than 25°F.
- Check the center of the casserole with a digital thermometer; it must reach 165°F for safety.
- Remove the pan carefully using insulated heat-resistant gloves, as the handle will be extremely hot.
- Let the casserole rest for 10 minutes before serving to allow the heat to distribute evenly.
The judgment call that separates a perfect meal from a ruined one is the flame height. If you start with a high flame to “speed things up,” you’ll char the bottom before the middle cooks. Keep the flame low and steady. If you notice the edges bubbling aggressively while the center is still cold, turn the flame down and move the pan slightly to the side if the burner has a hotspot.
Comparing your cooking options
| Situation | Action to take | Time/Effort | What to watch for |
|---|---|---|---|
| Windy day | Use wind guards | High effort | Temperature drops |
| Thick casserole | Reduce heat | Long time | Burnt bottom |
| Thin pan | Add trivet | Medium effort | Hotspots |
| High altitude | Increase time | 20% extra time | Uneven cooking |
| Frozen ingredients | Thaw first | More prep | Raw center |
The table above provides a baseline, but your specific equipment dictates the real-world outcome. If you’re cooking on a portable butane stove, wind guards are mandatory rather than optional. Without them, your fuel efficiency drops by nearly 40% as the flame struggles to maintain contact with the pot.
When managing thick casseroles or dense stews, rely on the “flicker test” to avoid a burnt bottom. If the surface bubbles violently while the base remains silent, your heat source is too concentrated. Move the pot to a diffuser or simply rotate it every five minutes to distribute the thermal load evenly.
At high altitudes, the boiling point of water decreases by roughly 1°F for every 500 feet of elevation. This is why you must increase cook times by 20%.
Finally, distinguish between thin-gauge aluminum and cast iron. Thin pans create immediate hotspots that scorch delicate sauces. Use a heavy-duty trivet to create an air gap, which acts as a buffer.
Getting the best result
Managing heat distribution
Experienced campers know that the bottom of the oven is the danger zone. Because the heat source is usually at the bottom, the bottom of your casserole dish will always cook faster than the top. You can mitigate this by placing a layer of aluminum foil on the bottom shelf of the oven to deflect direct heat. If you’re baking something that needs a golden top, you can carefully rotate the pan halfway through the cooking time, but do this quickly to keep the heat inside.
Monitoring your progress
Never rely on the smell of the food to tell you it’s done. A casserole that smells ready might still be cold in the center, especially if you have used dense ingredients like potatoes or thick cuts of meat. Use a probe thermometer inserted into the thickest part of the dish. If the thermometer reads below 165°F, keep the heat on for another 10 minutes and check again. Don’t trust the “doneness” of the top layer alone, as the surface heats up much faster than the core.
Problems and solutions
| What you notice | What it means | What to do first | How to stop it |
|---|---|---|---|
| Burnt bottom | Too much direct heat | Add another trivet | Use thicker pans |
| Cold center | Heat is too low | Increase flame | Preheat longer |
| Soggy top | Excess moisture | Remove lid | Vent the steam |
| Long cook time | Heat loss | Use windscreen | Shield the stove |
| Uneven browning | Hotspots | Rotate pan | Use diffuser |
The most common mistake is assuming your stove operates like a home range. Camping stoves often lack the thermal mass of cast iron or heavy stainless steel, meaning they respond instantly to wind gusts.
Use this decision rule to diagnose your setup: if the bottom of your cookware shows a blackened ring smaller than the burner head, your heat is too concentrated. Move the pan two inches higher. If the ring is wider than the burner, you’re losing heat to the air and need a windscreen.
Thickness matters for heat distribution. A pan thinner than 2mm will develop hotspots regardless of your flame control. If you can’t replace your gear, place a flat, heavy-gauge steel diffuser between the flame and your pan. This creates a buffer that prevents localized scorching.
Finally, watch for the “steam trap.” If your lid fits too tightly, moisture condenses and drips back onto the food, creating a mushy texture.
Standards for safe cooking
The U.S. Department of Agriculture sets the safety standards for preparing food in non-traditional environments. You must ensure that your cooking equipment is stable and placed on a non-flammable surface to prevent accidental fires.
If you’re using a portable propane stove, always check the connections for leaks before igniting the burner. A small leak can flare up inside an enclosed oven, leading to a sudden pressure release. To test for this, brush a mixture of soap and water over the hose fittings. If bubbles form, don’t light the stove.
If you’re camping in a national park or forest, check the local fire restrictions before you light your stove. Some areas prohibit the use of open flames during dry seasons, regardless of whether it’s a contained camping stove. You can find the fire safety guidelines for your specific location on the official website of the land management agency, such as the National Park Service or the Bureau of Land Management.
Never leave your stove unattended while the oven is running. Many people mistakenly assume that the internal thermostat prevents overheating, but mechanical failures are common in portable units. If the burner flame sputters or changes color to yellow, shut the fuel valve immediately. This indicates incomplete combustion, which often leads to dangerous carbon monoxide buildup in small, enclosed spaces.
The cost of your meal
The true cost of using a camping oven is measured in fuel and patience. A standard 16-ounce canister of propane typically lasts for 2 to 4 hours of cooking time depending on the intensity of the flame.
Most beginners mistake the fuel rating for a guarantee. In reality, wind exposure can cut your burn time by 50 percent. If your stove lacks a dedicated windscreen, expect to burn through a full canister in under 90 minutes. Always carry a backup fuel source if you plan to bake at high altitudes, where lower oxygen levels force you to run the burner hotter to maintain the same internal oven temperature.
Beyond fuel, the cost includes the weight of the gear you must carry. A folding oven and a heavy cast iron pan add significant weight and bulk to your kit. If you’re car camping, this is a minor detail. If you’re hiking, you must weigh the benefit of a hot, home-style meal against the physical effort of carrying the extra pounds.
Use this rule: if your trek exceeds five miles per day, leave the oven behind. If you’re base-camping, the weight penalty is negligible. Always compare the cost of pre-packaged meals against the cost of fresh ingredients and fuel to see if this method fits your budget.
Keeping your equipment clean
After your meal is finished, allow the oven and the pan to cool completely before attempting to clean them. This can take up to 45 minutes for cast iron. Wipe the interior of the oven with a damp cloth to remove any grease splatters. If you leave grease inside, it will smoke the next time you use it.
Store your pans in a dry place to prevent rust. If you used a cast iron pan, ensure it’s properly seasoned before you pack it away. If the casserole stuck to the pan, don’t use harsh metal scrapers, as these will damage the seasoning. Instead, pour a small amount of warm water into the pan while it’s still warm to loosen the food, then scrub it gently with a soft brush. Keep the oven in its protective bag to prevent dust and debris from entering the burner assembly during transport.
When to avoid this method
Don’t attempt to use a camping oven if you’re in a high-wind area without a proper windscreen. The heat will dissipate too quickly, and you’ll waste fuel while failing to cook the food safely. If you don’t have a reliable thermometer, don’t attempt to cook raw meat in a casserole. The lack of temperature control makes it impossible to guarantee that the center reaches a safe 165°F.
If you’re in a remote location and don’t have a backup fuel source, avoid long-cooking recipes. Running out of fuel halfway through the process leaves you with a half-cooked, unsafe meal that you can’t finish. In these cases, it’s safer to stick to simple, one-pot meals cooked directly on the burner. If you’re unsure about the safety of your stove or the stability of your setup, stop immediately and use a simpler, faster cooking method.
Frequently asked questions
Can I use glass dishes in a camping oven?
No, you shouldn’t use glass dishes in most camping ovens because they’re prone to thermal shock and can shatter when exposed to the uneven heat of a camp stove. Use cast iron, heavy-duty aluminum, or steel pans that can withstand direct contact with heat and rapid temperature changes.
How long does a casserole take to bake?
A casserole typically takes 45 to 60 minutes in a camping oven, assuming you maintain a steady 350°F. This time varies based on the ingredients; a vegetable-based dish may cook faster, while one containing raw meat requires the full hour to ensure it reaches the safe internal temperature.
Is it safe to cook raw meat in a casserole?
Yes, it’s safe to cook raw meat in a casserole as long as you use a digital thermometer to verify that the internal temperature reaches 165°F. Never rely on the appearance of the meat or the time elapsed, as camping ovens don’t provide the consistent heat of a home oven.
What happens if the burner goes out?
If the burner goes out, your casserole will stop cooking and the internal temperature will begin to drop, creating a risk for bacterial growth.
Does it matter if I use a lid?
Yes, using a lid is essential for keeping the moisture inside the casserole so it doesn’t dry out during the long bake. If you don’t have a lid, cover the pan tightly with heavy-duty aluminum foil to trap the steam and ensure even cooking throughout the dish.
Can I bake bread in a camping oven?
Yes, you can bake bread in a camping oven, but you must be even more diligent about monitoring the temperature. Because bread requires a very consistent heat, you should use a heavy cast iron Dutch oven inside the camping oven to provide the necessary thermal mass for a good crust.
Casseroles camping, in short
Start by setting up your stove on a level, fire-safe surface and ensuring your windscreen is secure. Once you reach the target temperature, keep a close watch on your thermometer to ensure the heat remains steady. If the temperature spikes or drops, adjust your flame in small increments, and stop if you encounter any signs of fuel leaks or equipment instability.