
To clear an lg washer not draining, you must first check the drain pump filter for debris and ensure the drain hose isn’t kinked or blocked. This issue most often stems from a clogged pump filter, which catches small items like coins or lint that prevent water from exiting the machine. If the filter is clean, the problem could involve a faulty pump motor or a collapsed internal hose that requires further inspection.
Why your washer isn’t draining
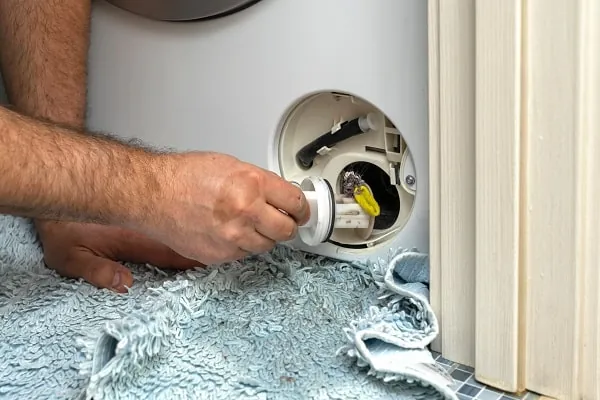
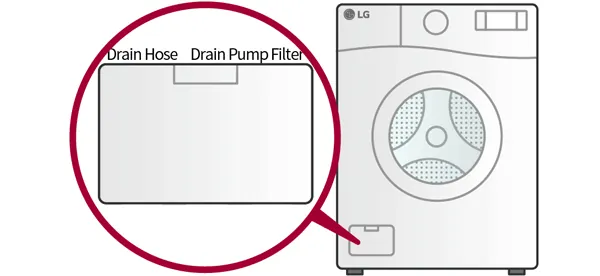
A machine that holds water usually suffers from a physical blockage in the drainage path. The most frequent culprit is the debris filter, which sits behind a small access door at the bottom front of the unit. When this screen fills with lint, hair, or small objects like hairpins, the water can’t reach the pump.
Another common cause is an improperly installed or damaged drain hose. If the hose is pushed too far into the standpipe, it can create a siphon effect that causes the washer to drain prematurely. Additionally, the hose might be kinked behind the washer if the unit was recently moved or pushed too close to the wall, which restricts the water flow from the drum.
Finally, the drain pump itself may reach the end of its life. Like any mechanical part, it can fail due to wear or electrical issues. If you hear a loud humming or grinding noise when the cycle should be draining, the pump motor is likely struggling or seized. You can verify the status of your specific model by checking the LG support troubleshooting guides for error codes, which often indicate if the drainage system is experiencing a communication failure.
Clear the drain pump filter
You should start by cleaning the filter, as this is the most common fix for drainage issues. Before you begin, place a shallow pan and several towels on the floor to catch the water that will spill out once you open the filter housing.
Open the small access door at the bottom right or left of the front panel. Pull out the small black drain tube, remove its cap, and let the water drain into your pan. This can take several minutes if the tub is full. Once the flow stops, turn the large filter cap counter-clockwise to unscrew it.
Remove the filter, clear away any lint or debris, and rinse it under warm water. Check the empty cavity for any loose items like coins or buttons that might be blocking the pump impeller. Reinsert the filter, tighten it firmly, and replace the drain tube cap.
If you find a buildup of slimy, gray residue inside the housing, scrub the area with a soft brush and vinegar. This buildup often causes the pump to struggle during the final spin cycle. If the pump impeller doesn’t spin freely when you touch it with your finger, the pump likely needs a full replacement.
Most people make the mistake of failing to tighten the filter cap until it clicks. A loose cap will cause a slow leak that ruins your flooring over time. If you see water pooling after your first test load, you must tighten the cap another quarter turn. If you aren’t comfortable working with water near electrical components, contact a professional technician to perform this repair safely.
Check the drain hose path
If the filter is clean but the washer still holds water, inspect the hose for external blockages. A kinked hose is a frequent mistake people make when they push their machines back into a tight space, which effectively pinches the pipe shut and prevents drainage. This error often forces the pump to work against a closed system, which can lead to premature motor burnout or seal failure.
Pull the washer away from the wall to get a clear view of the back. Check the entire length of the gray corrugated hose for any sharp bends or heavy objects resting on it. If you find a kink, straighten the hose and ensure it has a gentle curve leading to the drain.
Verify the height of the hose. The end of the drain hose must be between 30 and 96 inches above the floor. If the hose is too low, the water may siphon out of the drum during the wash cycle. If it’s too high, the pump can’t push the water up against the weight of the column.
If the hose is inserted into a standpipe, ensure there’s an air gap around the hose so it doesn’t create a vacuum. If you seal the connection airtight with tape, the machine will struggle to siphon correctly, leading to standing water in the drum. Always use a loose-fitting bracket to hold the hose in place rather than sealing the pipe opening entirely.
Replace the drain pump
When the filter is clean and the hose is clear, the drain pump motor may be the issue. This fix is for those who are confident with basic tool use, as it requires opening the machine cabinet.
If the pump makes a grinding noise or doesn’t activate at all, it likely needs to be swapped for a new unit. To reach the pump, you’ll need to unplug the power cord and potentially tilt the machine or remove the front panel. Because the pump is an electrical component, it’s vital to ensure the power is completely disconnected before you touch any wiring.
Test the pump for continuity using a multimeter to check if the internal coil is broken. Because this involves electrical testing, this task should be performed by a qualified technician.
Many novices fail to secure the internal hose clamps tightly enough during reassembly. This oversight leads to slow, persistent leaks that can rot your subfloor over several months. Always use pliers to slide the clamp past the ridge on the pump nozzle to ensure a watertight seal.
If you have never repaired an appliance before, this is a job best left to a qualified service technician. A professional can quickly confirm the pump is dead before ordering a replacement. They also have the correct tools to handle internal clamps without risking damage to the plastic housing.
Common mistakes to avoid
Never use pliers to force a stuck filter cap. If the cap resists, the plastic housing is likely seized by mineral buildup rather than mechanical tension. Pliers will almost certainly crack the housing, turning a simple cleaning task into a costly replacement of the entire drain assembly.
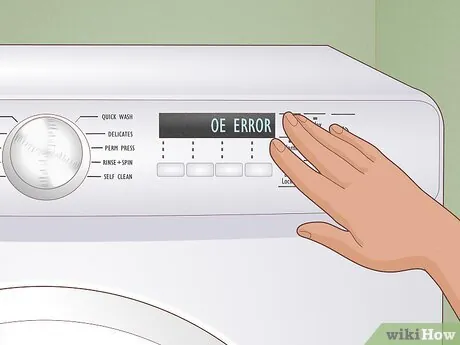
Many users clear the standing water but ignore the “OE” error code. This code indicates a persistent blockage in the drain hose or a failing pump impeller. If you clear the water without inspecting the hose for kinks or debris, the error will return within three cycles, eventually burning out the pump motor.
Avoid pouring drain cleaners into the washer. These caustic agents are designed for rigid metal pipes, not the delicate rubber gaskets and internal pump seals found in appliances. One application can cause the seals to brittle and crack, leading to slow, hidden leaks that rot your subfloor.
Limit your loads to three-quarters capacity. Overloading forces the pump to work against excessive weight, causing premature motor failure.
Preventing future drainage issues
A simple change in your laundry routine can stop these issues from returning. By checking pockets for loose change and small items before every wash, you stop debris from reaching the filter in the first place.
If you’re washing items with loose coins, empty all pockets before loading. Coins often bypass the drum and physically block the pump impeller, which causes a total drainage failure.
Push your machine at least 4 inches away from the wall. A tight fit forces the drain hose into a sharp, restricted angle that traps lint and slows water exit speed. If the hose feels warm to the touch, it’s likely kinked and struggling against backpressure.
Clean the drain filter regularly based on your usage patterns. Waiting for a slow drain means the blockage is already severe enough to strain the pump motor, so consult your owner’s manual for the recommended maintenance frequency.
Finally, use only the detergent amount specified by the manufacturer. Excess suds create a thick foam that confuses water-level sensors, leading the machine to stall mid-cycle. If you see bubbles in the drum after the wash finishes, you have used too much soap and must run an extra rinse cycle immediately.
Related guides
- Toilet Auger vs Drain Snake: Which Tool Clears Your Clog Best in 2026
- Best Enzyme Based Drain Cleaners: How to Clear Pipes Safely in 2026
Frequently asked questions
How long does it take to drain an lg washer manually?
Draining the water through the small tube typically takes 5 to 10 minutes. The narrow tube relies on gravity to empty the drum slowly. If the water doesn’t flow, a blockage in the filter housing may require manual removal.
Is it safe to run a wash cycle with a clogged filter?
You should never run a cycle if the filter is clogged because the pump will overheat and fail. A stalled pump can burn out the motor windings, causing the pump to fail. Always address the blockage first to protect the machine.
Why does my washer show an OE error code?
The OE error code indicates the washer failed to drain within the allotted time. The machine’s sensors detect that the drum remains heavy with water after the drain command. Check the drain hose for kinks and clean the debris filter to resolve the error.
Can I fix a broken drain pump myself?
You can replace a drain pump if you’re comfortable using basic hand tools and have experience with appliance repairs. You must unplug the washer and disconnect the electrical and hose connections. If you aren’t confident handling these components, hire a professional to avoid damage.
What happens if I ignore a slow draining washer?
Ignoring a slow drain will lead to total drainage failure and potential water leaks. A blocked filter causes the pump to generate excess heat, which can warp the plastic housing. Standing water also causes clothes to develop musty odors and mold.
Conclusion
If the water still won’t leave the drum after you’ve checked these areas, it’s time to reach out to a professional technician. They’ll have the right tools to test the internal components safely. Don’t hesitate to call for help if you’re feeling unsure, as it’s better to be safe than sorry.
