
The process joins two metal parts by melting a filler material while the base metals remain solid, and how the laser brazing process works is by using a high-energy beam to heat the joint area precisely. This method creates a strong, clean connection without distorting the surrounding material. It’s a common technique in automotive manufacturing where speed and high surface quality are necessary for thin metal sheets.
Essential components for laser brazing
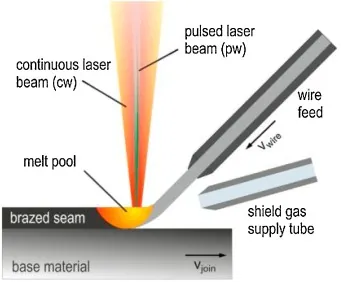
The system relies on specific hardware to focus the light and control the heat input. When these parts don’t align, you might see weak joints or excessive heat marks on the metal surface. You can check your machine’s manual for the specific requirements of your equipment type.
| Part or input | What it does | What you notice when it goes wrong |
|---|---|---|
| Laser source | Generates the light beam | No heat at the joint |
| Focusing optics | Directs energy to the gap | Wide or uneven weld bead |
| Filler wire | Fills the joint gap | Porosity or weak bond |
| Shielding gas | Protects against oxidation | Dark or dirty joint surface |
| Feed unit | Moves wire into place | Inconsistent bead size or shape |
| Control system | Manages speed and power | Burn-through or incomplete fusion |
Steps in the laser brazing process
-
The system positions the laser head and the wire feeder at the start of the joint, typically within 1 to 2 millimeters of the metal surface. Proper calibration here is vital; if the gap exceeds 3 millimeters, the beam loses focus and fails to melt the filler wire consistently.
-
The controller activates the laser beam, which creates a concentrated heat spot that reaches the melting temperature of the filler wire within milliseconds. This rapid thermal cycle prevents the base metal from warping, a common defect that ruins structural integrity in thin-gauge steel.
-
The filler wire is fed into the molten pool at a constant rate, usually between 2 and 6 meters per minute depending on the material thickness. If the wire feed is too fast for the travel speed, you’ll see unsightly humps; if too slow, the joint will lack sufficient bead volume.
-
The laser head moves along the joint path at a steady speed, which ensures that the filler material flows evenly into the gap between the parts.
-
The shielding gas flows over the cooling metal to prevent oxidation, which keeps the joint surface clean and ready for painting.
-
The system turns off the laser and stops the wire feed once the end of the seam is reached, usually taking less than one second.
Why precision matters for joint quality

The quality of the final joint depends on how well the laser beam interacts with the filler material and the gap geometry. Laser brazing works differently than welding because it doesn’t melt the base metal, which preserves the structural integrity and surface finish of the parts.
If the beam is too wide, the heat spreads into the base metal, causing warping that’s difficult to correct later. If the beam is too narrow, the filler material may not flow properly, leading to gaps or weak points in the connection.
A common mistake is failing to maintain the correct gap width between the two pieces of metal. If the gap is too large, the filler material can’t bridge the space, resulting in a failed joint that lacks structural strength. Conversely, if the gap is too small, the wire can’t enter the joint properly, causing the filler to bunch up on the surface. This mistake often costs time because the entire part must be stripped and re-processed.
The speed of the process is a vital determinant of success. If the laser moves too slowly, the heat builds up excessively, which can damage coatings or cause the base material to thin out. If the laser moves too quickly, the filler doesn’t have enough time to wet the surface of the base metal, creating a cold joint that may snap under pressure.
Variables in the laser brazing workflow
Things you control
- The feed speed of the filler wire.
- The travel speed of the laser head.
- The flow rate of the shielding gas.
- The position of the laser focal point.
Things fixed by design
- The wavelength of the laser source.
- The chemical composition of the filler wire.
- The physical thickness of the base metal.
You can’t change the fundamental physics of how light absorbs into the metal; if the surface is too reflective, you must use specialized optics or surface treatments to prevent damage to the equipment. If you need to change the beam geometry or power output beyond the machine’s factory settings, consult a professional engineer to avoid voiding your warranty.
Habits for consistent results

Consistent results come from keeping the equipment clean and monitoring the wear on the delivery nozzle. You should inspect the nozzle for debris buildup every 8 hours of operation, as even small amounts of dust can deflect the beam. If you notice the beam striking the side of the nozzle tip, replace the part immediately to prevent permanent damage to the internal optics.
Ensure that the wire feed rollers are set to the manufacturer’s recommended tension, which prevents the wire from slipping or deforming during the feed cycle. If the wire shows visible grooves or shavings on its surface, your tension is too high, which will cause erratic feeding and inconsistent weld penetration.
Check the alignment of your laser beam against the wire entry point at the start of every shift. A misalignment of just 0.5 millimeters can cause the wire to hit the side of the joint instead of the center. Use a scrap piece of metal to test the alignment before you begin production.
Finally, always verify that your shielding gas pressure matches the specifications for your specific metal type. Using the wrong gas pressure can lead to porous joints that fail safety inspections, so verify these levels on the gas regulator gauge before starting your work.
Related guides
Frequently asked questions
How long does a laser brazing cycle take?
A single cycle typically takes between 1 and 5 seconds for a standard 100-millimeter joint, though the exact time depends on the thickness of your metal. You can calculate the time by dividing your seam length by the laser travel speed, which is usually set between 2 and 6 meters per minute.
Is laser brazing safe for thin metal?
Yes, it’s safe because the process avoids melting the base metal, which prevents the distortion common in traditional welding. You must ensure the laser power is calibrated to the specific thickness of your material, as using too much power on very thin sheets can still cause heat damage.
Does the filler wire choice matter?
Yes, the filler wire must have a lower melting point than the base metals to ensure the joint forms without damaging the surrounding structure. You should check the material compatibility chart provided by your filler wire manufacturer to ensure the alloy matches your specific metal grades for the best results.
What happens if the shielding gas runs out?
The joint will likely develop oxidation and surface contamination, which weakens the bond and makes the metal look dark or discolored. If your gas flow stops, you must stop the process immediately and clean the affected area before attempting to re-braze the joint, or the new material won’t stick.
How often should I clean the optics?
You should clean the protective glass of your focusing optics at least once per shift to prevent laser power loss. If you notice a drop in penetration depth or a change in bead shape, check the optics for signs of smoke residue or dust immediately, as this is a common sign of a dirty lens.
Can I use laser brazing on non-metal parts?
No, the process requires a conductive material to handle the heat transfer and a filler wire that can bridge the joint. The process is designed for joining metals using a filler material with a lower melting point than the base metals; it isn’t applicable to non-metal materials.
Conclusion
Choosing this method helps manufacturers improve their production efficiency while keeping parts looking flawless. As technology advances, you’ll likely see even more industries adopting these precise beams for complex assemblies. If you’re considering this for your own projects, it’s worth testing a few samples to see how well they hold up.
