
The most reliable method for long-term plumbing repairs is the use of crimp fittings, while push to connect vs crimp fittings often favors push-style connectors for quick, temporary, or emergency fixes. If you’re working in a tight, hard-to-reach space where tools can’t fit, push-to-connect is the superior choice. If you’re installing a permanent system behind a wall or under a floor, you should choose crimp fittings for their higher durability and lower cost per joint.
Comparing plumbing connection methods
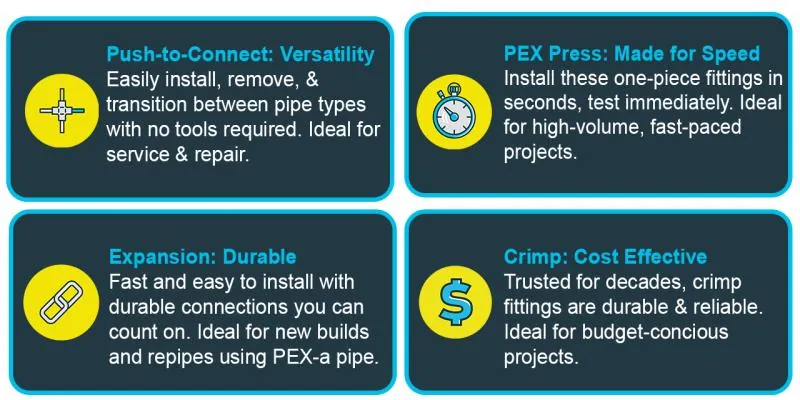
Choosing between these systems depends on your budget, your access to the pipes, and your comfort level with specialized hand tools. While push-style connectors offer unmatched speed, they rely on internal O-rings that can degrade over time. Crimp fittings form a permanent mechanical bond that doesn’t rely on rubber seals, making them the industry standard for new construction and whole-home repiping projects.
| Method | How long | Effort | Cost | Best for |
|---|---|---|---|---|
| Push-to-connect | Seconds | Minimal | High | Emergencies |
| Copper crimp | Minutes | Moderate | Low | Permanent walls |
| PEX crimp | Minutes | Moderate | Low | New systems |
If you have a large project, the cost of the tool for crimping is quickly offset by the lower price of the fittings themselves. If you have only one or two leaks to fix, the high price of a single push-to-connect fitting is often cheaper than buying a specialized crimping tool.
Use push-to-connect fittings only in accessible areas like under a sink or in a basement ceiling. Never bury these behind drywall or tile, as a failed O-ring will cause hidden water damage that costs thousands to remediate. If the pipe is going inside a wall, use a crimp or expansion fitting to ensure a permanent, leak-proof seal.
Most beginners fail by failing to deburr the pipe end before inserting it into a push-style fitting. Sharp edges or copper burrs will slice the internal rubber seal immediately, leading to a slow drip that may not appear for weeks. Always use a deburring tool or fine sandpaper to smooth the pipe end until it feels like glass. If you feel resistance when inserting the pipe, stop and check for debris.
Using push-to-connect fittings
Push-to-connect fittings use a simple internal grip ring and an O-ring to create a seal. They’re ideal for DIYers who don’t own professional plumbing tools.
Cut the pipe squarely using a dedicated pipe cutter to ensure the end is smooth. A jagged edge acts like a saw blade against the internal seal.
Deburr the pipe edge with a tool or fine sandpaper to remove sharp bits that could damage the O-ring. If you skip this, a microscopic burr will slice the rubber, causing a slow, hidden leak behind your wall.
Mark the pipe at the required insertion depth, which is usually one inch for half-inch pipe. Use a permanent marker to draw a ring around the circumference. If you can’t see that line after pushing the pipe in, the connection isn’t fully seated.
Push the pipe firmly into the fitting until you feel it hit the internal stop. Pull back slightly to ensure the teeth have locked.
These fittings are excellent for repairs where you can’t shut off the water perfectly, as they can often seal on damp pipe surfaces. However, their weakness is the rubber O-ring inside. If the pipe is scratched or inserted at an angle, the O-ring will leak, and the entire fitting must be replaced.
If you’re working with PEX, ensure you use a stiffening insert. Without this support, the pipe will eventually deform under pressure, leading to a catastrophic failure. Always test the joint under full pressure for ten minutes before closing up the wall.
Installing crimp fittings
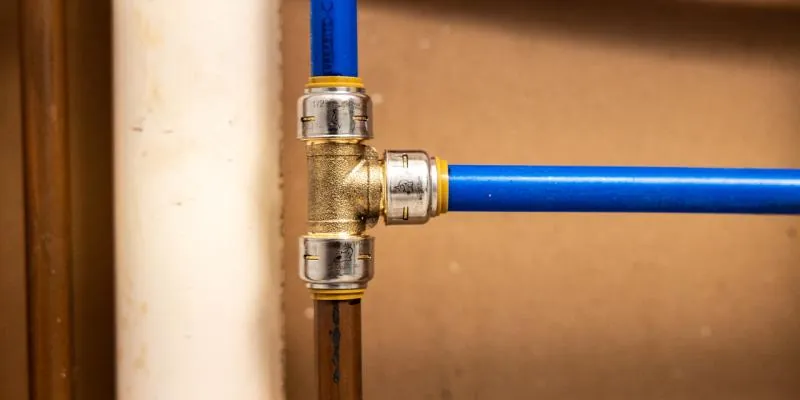
Crimp fittings require a specialized tool to compress a copper or plastic ring onto the pipe. This method creates a permanent, tamper-resistant connection.
Use a PEX cutter to create a clean, square end on your tubing. If the cut is jagged or angled, the ring won’t compress evenly, leading to a slow, invisible leak behind your walls.
Slide the crimp ring over the pipe, leaving it about one-eighth of an inch from the end. Insert the barbed fitting fully into the pipe until it seats against the shoulder. Position the crimp ring centered over the barbs and use your ASTM International standard F1807 crimping tool to squeeze the ring.
Always verify the compression with a go/no-go gauge. If the gauge slides over the ring, the connection is too loose and will fail under pressure; if it doesn’t fit, the ring is over-compressed and may crack.
This method is highly reliable for long-term use because it doesn’t rely on seals that perish. The main disadvantage is that you must have enough room to fit the bulky crimping tool around the pipe.
If you’re working in a space where you can’t fully close the crimping tool handles, you won’t be able to generate the necessary force. In these tight spots, switch to push-to-connect fittings instead. They cost more per unit, but they eliminate the risk of an incomplete crimp in areas where your tool simply can’t reach.
Choosing the right connection method
When you’re in a hurry, such as during a pipe burst at night, push-to-connect is the clear winner. You don’t need to wait for glue to dry or find specialized tools, and you can restore water flow in under a minute.
If you’re doing this for the first time, crimp fittings are often safer for your wallet. Because the fittings are much cheaper, a beginner can afford to make a few mistakes and cut off bad joints without spending a fortune on parts. Expect to pay significantly less for a crimp fitting compared to a push-to-connect equivalent.
If you want the best possible result, use crimp fittings for all hidden areas. Professional plumbers prefer them for behind-the-wall installations because the mechanical connection is permanent. If you bury a push-to-connect fitting in a wall, you risk a slow leak that could rot your subfloor before you notice the dampness.
Use this rule: if the pipe remains accessible, use push-to-connect to save time. If the pipe will be sealed behind drywall or under floorboards, choose crimp fittings to ensure longevity. Many novices mistakenly use push-style fittings to save time on a remodel, only to pay thousands in water damage repairs two years later. Always prioritize the permanence of the connection over the speed of the installation when the pipe will be out of sight.
Safety and standards for plumbing joints
Regardless of the method you choose, you must ensure your materials meet the local plumbing code. Most residential areas follow standards set by the International Association of Plumbing and Mechanical Officials. Before you start, check your local building department’s website to see if your chosen fittings are approved for use inside walls or underground.
Always prepare your workspace by turning off the main water supply and draining the lines. If you’re soldering copper near these plastic-based fittings, you must maintain a safe distance of at least 18 inches to prevent melting the components or the pipe itself. Use a heat shield or a wet rag to protect nearby joints if space is tight.
If you’re uncomfortable working with pressurized lines, or if your local law requires a licensed plumber for permanent installations, contact a professional to avoid property damage or insurance claim denials. Many homeowners mistakenly assume that a simple repair is covered under standard policies, but DIY work on main supply lines often voids your coverage if a leak occurs later.
If you see a stamp on the fitting reading “NSF-61,” it’s certified for potable water. If it lacks this marking, don’t use it for drinking water lines. Always prioritize visible, accessible joints over concealed ones when trying a new material for the first time.
Related guides
Frequently asked questions
Can I reuse push-to-connect fittings?
No, you shouldn’t reuse these fittings once they have been installed. The internal teeth bite into the pipe to hold it in place, which damages the outer surface of the tubing. If you remove and reinstall them, the teeth won’t grip the pipe as securely, and the internal O-ring may no longer form a perfect seal, leading to leaks that are difficult to detect behind walls.
How long do push-to-connect fittings last?
They’re typically rated for the life of the pipe system, but this assumes they’re installed in a dry, accessible location. If you place them in a wall, you risk a leak caused by the degradation of the rubber O-ring over many years. For long-term reliability in hidden areas, most professionals prefer permanent crimped or soldered joints over push-style connectors.
Is it safe to use push-to-connect behind a wall?
It’s generally discouraged to hide these fittings behind finished walls. While some brands are certified for behind-the-wall use, a small defect in the O-ring or a slightly scratched pipe can cause a slow leak that rots wood and grows mold for months. If you must use them in a wall, ensure they’re easily accessible through an inspection panel for future maintenance.
How much do crimping tools cost?
Basic manual crimp tools for PEX are generally affordable, depending on the model and included jaw sizes. If you have many joints to complete, the cost is small compared to the savings on the fittings themselves. If you only have one repair, you can often rent these tools from local hardware stores for a fraction of the purchase price.
What happens if I don’t use a gauge on a crimp?
You risk an improper connection that may hold water pressure initially but fail later under thermal stress. The gauge verifies that the ring was compressed to the correct diameter; if the tool doesn’t fully close or the ring is misaligned, the joint might be loose. Always use the provided gauge to ensure every crimp meets the manufacturer’s specifications for safety and performance.
How often do crimp fittings leak?
They rarely leak if the installation is performed correctly and the ring is crimped to the proper dimension. Most failures occur because the pipe wasn’t cut squarely or the ring was placed too far from the fitting shoulder. If you follow the steps and verify your work with the gauge, a crimped joint is effectively as strong as the pipe itself.
Conclusion
If you’re unsure about your ability to complete a repair, check with your local municipality to see if a permit or a licensed professional is required for the work you’re performing. Many jurisdictions have specific rules about what materials are allowed for potable water systems, and using the wrong type can cause long-term health risks or void your home insurance. Always verify your local codes before buying your materials.