
Ceramic disc, ball, cartridge, and compression valves are the main components that control water flow, and selecting the best faucet cartridges depends on your specific brand and model. You must match the physical dimensions and the number of ports exactly to your current faucet body to ensure a proper seal and leak-free operation.
Comparison of standard valve types
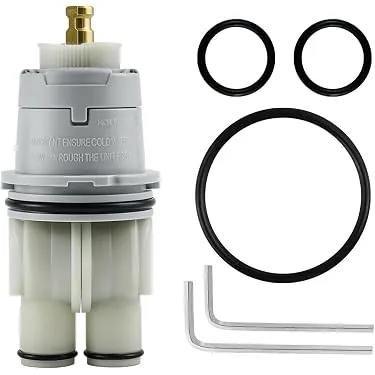
| Valve Type | Best Used For | Common Example |
|---|---|---|
| Ceramic Disc | High durability | Modern single-handle faucets |
| Ball Valve | Kitchen sinks | Traditional ball-style faucets |
| Cartridge | Ease of repair | Two-handle bathroom faucets |
| Compression | Low-cost fixes | Older laundry room faucets |
Ceramic disc valves rely on two polished, diamond-hard plates that slide against one another. They’re nearly immune to mineral buildup, making them the superior choice for homes with hard water.
Ball valves utilize a single metal or plastic sphere with holes drilled through the center. They provide excellent flow control but contain many small internal parts that wear out simultaneously. Expect to replace the springs and rubber seats periodically to prevent persistent drips.
Cartridge valves offer the most consistent feel when turning handles. Because the internal mechanism is a self-contained unit, repair is a simple matter of pulling the old cartridge and snapping in a replacement. Don’t waste time trying to clean the internal seals; the cost of a new cartridge is almost always lower than the value of your labor.
Compression valves are the oldest technology on this list, relying on a rubber washer pressed against a metal seat. They’re cheap to fix with a simple washer swap, but they require significant physical force to tighten. If you have arthritis or limited grip strength, avoid these entirely. They’re prone to leaks if the handle isn’t turned with precise, firm pressure every single time.
Ceramic disc valves
Ceramic disc valves use two highly polished, hardened ceramic plates that slide against each other to control water flow. These are ideal for homes with hard water because the ceramic material is resistant to mineral buildup and scratching. They offer a smooth, consistent handle feel that doesn’t degrade significantly over many years of daily use.
If you live in an area with high sediment levels, install a whole-house water filter before your plumbing lines. Even though ceramic is durable, grit caught between the plates can cause a hairline crack, which ruins the watertight seal and forces a full cartridge replacement.
Most homeowners mistake a stiff handle for a broken valve. If the handle feels stuck, don’t force it. Instead, remove the handle and apply a small amount of heat-proof silicone grease to the internal O-rings. This restores the movement without requiring a trip to the hardware store.
Use this simple rule: If the leak is a steady drip, the issue is usually a failing O-ring or a mineral-clogged aerator. If the handle itself is loose or the water flow is inconsistent, the ceramic discs have likely shifted or cracked.
- Provides a precise, quarter-turn operation for quick water shutoff.
- Lasts longer than rubber-seat valves because the material doesn’t compress.
- Requires fewer internal repairs since the discs don’t wear down.
If you have a modern single-handle faucet, you’re likely using a ceramic disc system. To verify, look for a “quarter-turn” label on your faucet packaging or the manufacturer’s installation guide.
Replacing a disc in a standard single-handle kitchen faucet often involves removing the handle set screw with a 3/32-inch hex key, lifting the cap, and unscrewing the retaining nut to access the disc assembly. Always shut off the water supply lines under the sink before starting this process. If you skip this step, you’ll face an immediate, pressurized spray the moment the retaining nut loosens.
Ball valves
Ball valves feature a rotating metal or plastic ball with slots that align with the inlet and outlet ports to manage water flow. These are best suited for kitchen faucets where you need a wide range of motion to control both temperature and volume with one hand. Because they contain several small springs and seals, they’re more complex to rebuild than simple cartridge-based systems.
- Controls both volume and temperature in a single motion.
- Allows for easy adjustment of handle tension using a small nut.
- Features a simple, reliable design that has been standard for decades.
If your faucet handle feels loose or leaks at the base, the internal springs or rubber seats often require replacement. You can usually find a repair kit that includes new rubber seats and springs specific to your model. For instance, in a common ball-style kitchen faucet, you would use a dedicated adjustment tool to tighten the bonnet nut until the handle moves smoothly without wobbling.
Most beginners make the mistake of overtightening the bonnet nut, which creates enough friction to snap the internal plastic cam or bend the brass stem. If the handle resists your movement, back the nut off a quarter turn. If the handle still drifts downward on its own, tighten it in increments of just one-eighth of a turn.
You can distinguish a ball valve from a cartridge unit by the range of the handle movement. A ball valve moves in a spherical, orbital path, while a cartridge valve typically moves in a strict vertical or horizontal arc. If you find your faucet is leaking from the spout itself rather than the base, the issue is almost always a worn-out rubber seat rather than the ball mechanism.
If the ball surface shows deep scratches or mineral pitting, don’t attempt to sand it down. The precision of the seal depends on a perfectly smooth surface. Always apply a thin layer of heat-proof plumber’s grease to the new seals before installation to ensure the valve cycles without catching.
Cartridge valves

Cartridge valves are self-contained units that insert into the faucet body, making them the most convenient option for quick home repairs. These are perfect for two-handle faucets where you want to stop a drip without replacing the entire fixture. They’re available in plastic or brass housings, and the internal components are permanently sealed inside the sleeve.
- Simplifies maintenance by replacing the entire unit rather than individual seals.
- Eliminates the need to grind down valve seats inside the faucet body.
- Fits a wide range of brands, provided you match the stem shape and length.
One major limit is that cartridges are rarely universal; if you buy the wrong size, the handle won’t align properly with the faucet deck. Always take your old cartridge to the store to compare the stem length and the number of splines on the handle attachment point. For example, a standard two-handle bathroom faucet cartridge is usually held in place by a brass clip that you must pull out with needle-nose pliers before the unit will slide upward.
Compression valves
Compression valves rely on a rubber washer forced against a metal seat to halt water flow. These are the oldest type of faucet valve and remain ideal for low-pressure applications like utility sinks. They require significant physical force to close, which accelerates wear on the rubber components compared to modern ceramic disc systems.
If your faucet drips, resist the urge to overtighten the handle. Overtightening crushes the washer and gouges the metal seat. This mistake costs you dearly because a scored seat often requires a specialized reseating tool to grind the brass back to a smooth finish. If you can’t resurface the seat, you must replace the entire valve body, a task that often involves cutting into the wall.
When you notice a leak, replace the washer immediately rather than forcing the handle shut. You can tell if the seat is damaged by running a fingertip over the metal rim after removing the stem. In that case, use a seat-dressing tool to smooth the surface before installing a new washer.
These valves function reliably in older plumbing systems where pressure fluctuates, as the rubber provides a forgiving seal against irregular surfaces. If you live in a home built before 1970, these valves are likely the standard throughout your property. They’re inexpensive to maintain, as individual rubber washers cost pennies and are available at any hardware store.
Apply this rule to determine your next move: if the leak persists after a washer replacement, inspect the seat for pitting. If the seat is smooth but the leak continues, the stem threads are likely worn, and you should replace the entire stem assembly. If the seat is pitted, you must either dress it or replace the seat insert.
Always ensure your replacement washers are rated for potable water. The National Sanitation Foundation provides guidance on materials to ensure your components meet safety standards for drinking water. Avoid generic rubber washers if the packaging doesn’t explicitly state they’re lead-free and safe for plumbing use. Using the wrong material can lead to chemical leaching or premature degradation in hot water lines.
Other common valve components
Diverter valves redirect water from the tub spout to the showerhead. If you notice water trickling from the spout while the shower is running, the internal seal or the spring-loaded mechanism has likely failed.
A common mistake is replacing the entire faucet assembly when only the diverter cartridge needs a swap. You can verify this by checking if the pressure drop occurs only when the diverter is engaged; if the pressure is low everywhere, the issue lies in the main valve, not the diverter.
Stem extensions bridge the gap between a recessed valve and the handle when installing tile over existing walls. If your handle feels loose or hits the escutcheon plate before the valve fully closes, your extension is likely the wrong length. Measure the depth from the finished wall surface to the valve stem precisely. If the gap exceeds one inch, a standard extension won’t suffice, and you must use a deep-wall kit to ensure the handle seats firmly.
O-ring kits provide the essential seal between the faucet cartridge and the valve body. A leak appearing at the base of the handle usually signals that these rubber gaskets have hardened or cracked. Before purchasing a kit, inspect the cartridge for mineral buildup. In that case, the cost of the O-ring kit is wasted, and you should replace the entire cartridge.
Always apply a thin coat of heat-resistant silicone grease to the new rings during installation. This prevents the rubber from pinching or tearing as you slide the cartridge back into the valve housing. Without this lubrication, the friction of the tight fit often destroys the new seal before you even turn the water back on.
How to choose the best faucet cartridges
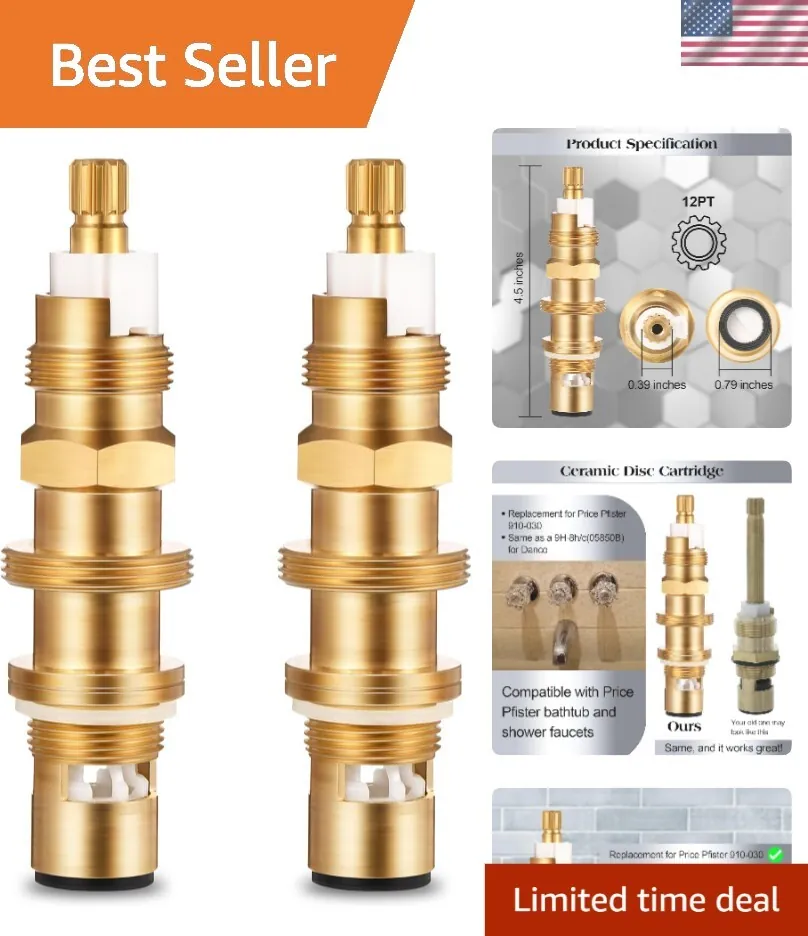
Selecting the correct replacement starts with identifying your faucet brand and the specific model number. Most manufacturers hide this information on a small sticker under the sink or etched into the back of the faucet base. If you can’t find a model number, you must remove the old component and compare it physically against the items at the supply store.
- Check the stem length: A cartridge that’s too long will stick out, preventing the handle from sitting flush against the faucet base.
- Count the handle splines: The number of teeth on the stem must match your handle exactly, or the handle will slip when you try to turn the water on.
- Verify port alignment: The bottom of the cartridge must have the same number of water holes as the original to prevent cross-contamination of hot and cold lines.
These parts can’t be combined across brands because every manufacturer uses proprietary dimensions for their valve housings. If you try to force a different brand’s cartridge into your faucet, you’ll crack the internal brass housing, which creates a much larger, more expensive plumbing issue.
Related guides
Frequently asked questions
Can I fix a dripping faucet without turning off the main water?
You can’t safely repair any faucet without turning off the water supply first. Most faucets have dedicated shutoff valves under the sink that you can turn clockwise to stop the flow. If you don’t have these valves, you must shut off the main water supply to your house before you start, or you’ll cause significant flooding in your bathroom or kitchen.
How long do faucet cartridges typically last?
Most high-quality cartridges eventually wear out, depending on the mineral content of your local water supply. If you live in an area with very hard water, the minerals can build up inside the cartridge and cause the seals to fail. You’ll know it’s time for a change when the handle becomes difficult to turn or you notice a persistent drip from the spout.
Is it safe to use generic replacement cartridges?
It’s safe to use generic cartridges only if they’re explicitly certified as compatible with your specific faucet model number. Many generic parts are manufactured to lower tolerances than original equipment, which can lead to leaks shortly after installation. If you want to avoid repeated repairs, check the manufacturer’s website for the part number and buy the original brand-name replacement whenever it’s available.
What happens if I use the wrong size cartridge?
Using the wrong size cartridge will prevent the valve from seating properly, which results in a constant leak or a handle that won’t attach. Even a difference of one millimeter in height can stop the retaining nut from threading onto the valve body. If you feel resistance while tightening the nut, stop immediately, as you’re likely crushing the internal seals or damaging the threads of the faucet body.
Does it matter if my cartridge is plastic or brass?
It matters because brass cartridges are generally more durable and resistant to heat than plastic versions, but they must be compatible with your faucet’s internal housing. Manufacturers choose the material based on the design of the valve, and you should always replace like with like. If your original unit was plastic, upgrading to brass might not be possible because the threads or seating surfaces may not match the existing faucet structure.
How do I know if the valve seat is damaged?
A damaged valve seat is indicated if your faucet continues to drip after replacing the cartridge or washer. The seat is the metal surface inside the faucet body that creates a seal; if it becomes pitted or scratched, you’ll need a seat-dressing tool or a professional plumber to repair it.
Conclusion
Once you’ve identified the correct replacement, don’t forget to turn off the water supply under your sink before you start. It’s a simple project that’ll save you a plumber’s fee and keep your kitchen running smoothly. You’ll be glad you took the time to fix that annoying drip yourself.