
To know if you need a repair or a full replacement, you must first understand that a toilet flapper vs fill valve diagnosis depends entirely on where the water is leaking from or why the tank is failing to refill. A flapper controls the water leaving the tank into the bowl, while a fill valve controls the water entering the tank from your home supply. If your toilet runs constantly, check the flapper first; if the tank is slow to fill or overflows, the fill valve is almost always the culprit.
Comparing toilet repair components
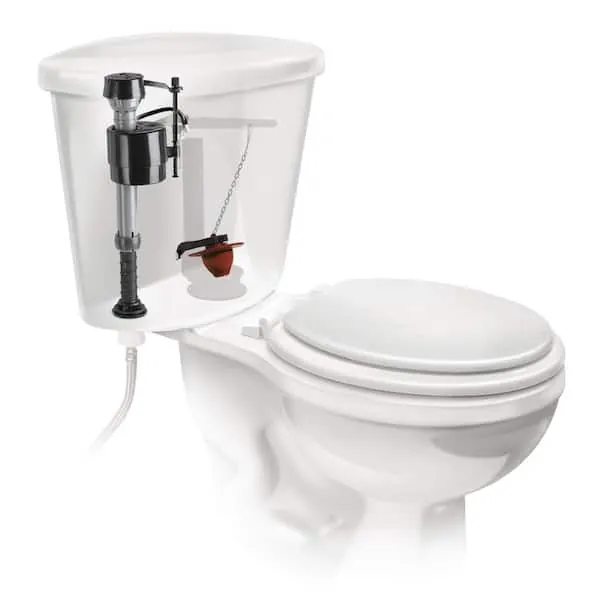
Choosing the right part depends on identifying the specific symptom your toilet is showing. The following table highlights the differences between these primary components and how they function within your plumbing system.
| Method | How long | Effort | Cost | Best for |
|---|---|---|---|---|
| Flapper replacement | 10 minutes | Low | Low | Constant running water |
| Fill valve replacement | 30 minutes | Medium | Medium | Slow fill or overflow |
| Complete kit overhaul | 60 minutes | High | Medium | Old, worn-out internal parts |
If your toilet runs intermittently, add a drop of food coloring to the tank and wait twenty minutes. If the color appears in the bowl without flushing, the flapper seal is failing and needs immediate replacement. Don’t waste time adjusting the float if the flapper is warped; it will never hold a seal.
If the water level in the tank never hits the fill line or creates a constant hissing sound, the fill valve diaphragm is likely calcified. Replace the entire valve assembly rather than attempting to clean the internal seal. Most universal valves take less than thirty minutes to install, but you must measure your tank depth first. A valve that’s too tall will prevent the lid from seating, while one too short will leave the tank underfilled.
This table assumes a standard gravity-fed toilet. If you have a pressure-assisted toilet, the internal components are specialized. Consult the manufacturer’s official technical documentation for the correct replacement parts before starting.
Replacing the toilet flapper
The flapper is a rubber seal at the bottom of the tank that lifts when you push the handle. Over time, this rubber degrades, cracks, or loses its shape, which prevents a watertight seal.
Turn off the water supply valve behind the toilet. Flush the toilet to drain the tank completely. Reach inside and unhook the old flapper from the pins on the overflow tube. Disconnect the chain from the flush lever and remove the old unit. Attach the new flapper, reconnect the chain, and ensure it sits flat over the drain hole.
This repair is excellent for fixing phantom flushes where the toilet cycles on its own. However, if the handle itself is loose or the chain is too short, replacing the flapper won’t stop the leak. You should always ensure the chain has about half an inch of slack to avoid holding the flapper slightly open.
If the tank continues to run after installation, perform the dye test. Place a few drops of food coloring into the tank and wait fifteen minutes without flushing. If color appears in the bowl, the new flapper isn’t seating correctly.
You likely have a warped flush valve seat. In this case, you must sand the plastic rim smooth with fine-grit sandpaper or install a universal flapper repair kit that includes a new adhesive seat. Ignoring a misaligned seat wastes hundreds of gallons monthly.
Replacing the toilet fill valve
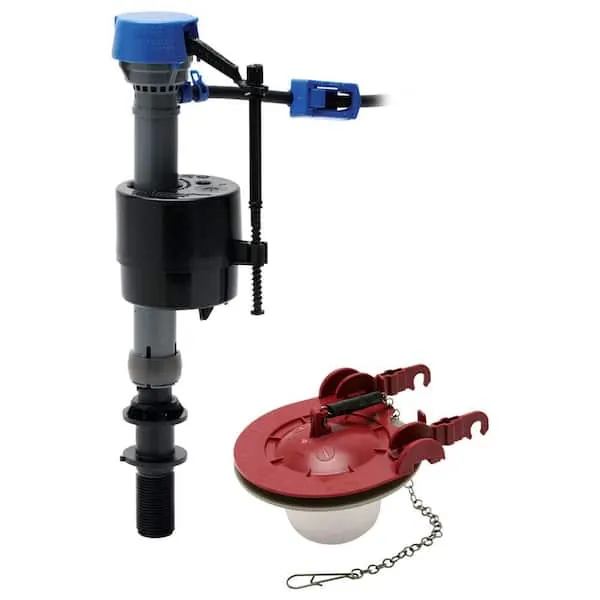
The fill valve is the tall component on the left side of the tank. It detects the water level via a float and shuts off the supply once the tank is full.
Shut off the water supply and drain the tank completely. Place a bucket under the tank to catch excess water when you disconnect the supply line. Unscrew the lock nut holding the fill valve to the bottom of the tank. Remove the old valve and insert the new one, ensuring the gasket is seated properly. Tighten the lock nut by hand and reconnect your water supply line.
This method is the only way to fix a tank that refuses to stop filling or one that takes an exceptionally long time to recover after a flush. If you hear a constant hissing sound, the internal diaphragm has likely failed, and a full replacement is required.
If you overtighten the plastic nuts, you risk cracking the porcelain tank, which is a costly mistake that requires a full toilet replacement. Use only hand pressure to secure the nut; if it still leaks, give it an additional quarter-turn with pliers. Never exceed this, as the brittle ceramic can’t withstand the torque.
If your tank has a metal shank, use a basin wrench to reach the tight space behind the bowl. If the shank is plastic, avoid tools entirely to prevent stripping the threads.
When to use each method
Replacing the flapper is the fastest fix because it requires no tools and minimal disassembly, making it a low-risk introduction to basic plumbing maintenance for beginners.
For the best possible result, replace both if the toilet is aging. The rubber seals in both components suffer from similar levels of wear, and a failing seal in one often signals the imminent collapse of the other. Replacing both at once saves you from draining the tank twice.
Remember the trade-off: a simple flapper change is quick but ineffective if the fill valve is the true source of the noise or overflow. If your toilet is still running after a new flapper is installed, the fill valve is likely the culprit.
You can verify this by adding a few drops of food coloring to the tank. If color appears in the bowl without flushing, the flapper is leaking. If the tank continues to hiss or overflow, the fill valve is the failure point; a dye test won’t help diagnose this issue.
The specific water level, which varies by model, is usually marked on the inside of your tank. Always adjust your new fill valve float to sit exactly at that line for maximum efficiency. Setting the float too high wastes gallons of water daily, while setting it too low prevents a proper flush, forcing you to hold the handle down repeatedly.
Standard maintenance for toilet components
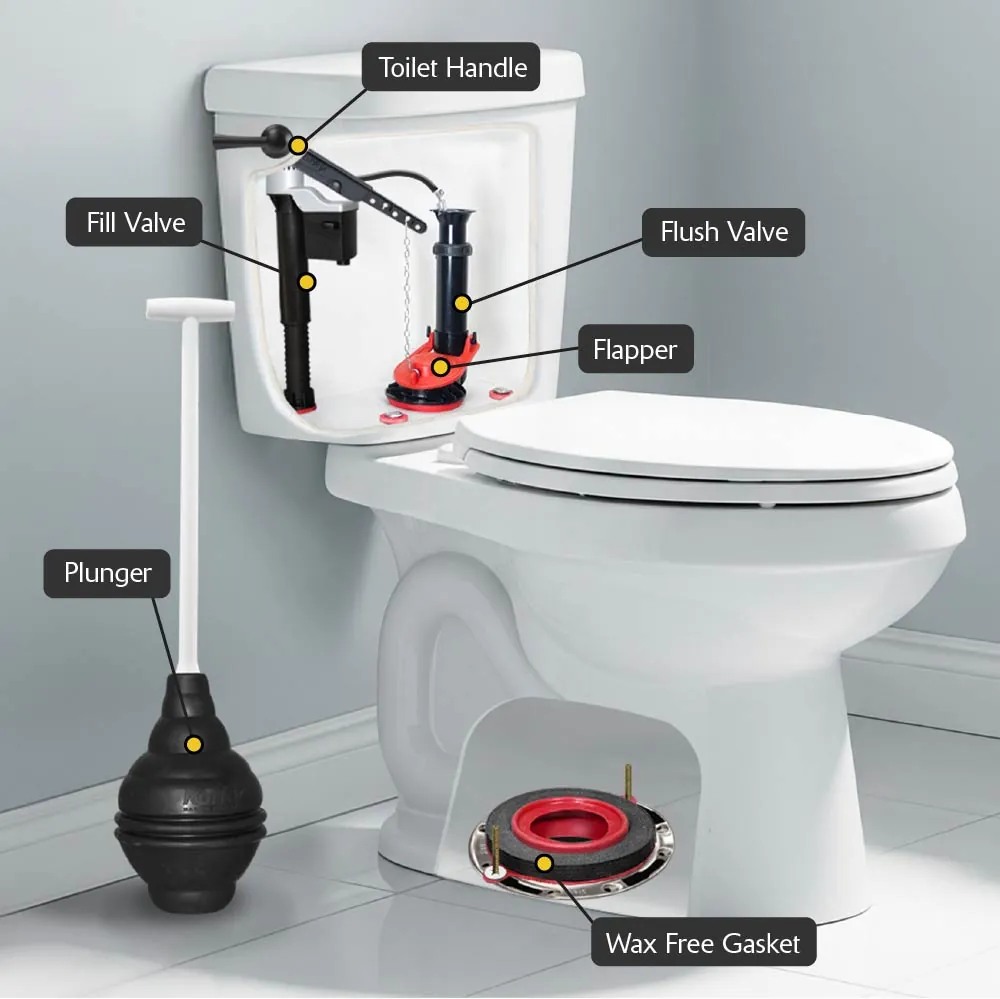
Regardless of which part you replace, a few universal rules apply to all toilet tank repairs. Always clean the flush valve seat—the hole the flapper covers—with a scouring pad to remove mineral deposits before installing a new seal. If you don’t create a smooth surface, the new flapper won’t create a tight seal, and the toilet will continue to run.
Check the water pressure in your home before you begin. If your gauge reads above 80 PSI, the force can overcome the fill valve’s shut-off mechanism, causing the tank to overflow into the overflow tube constantly. In this case, installing a pressure-reducing valve is the only way to stop the phantom running.
If the tank still leaks after you replace the flapper and verify the pressure, inspect the flush valve assembly itself for hairline cracks. These often develop near the base gasket due to overtightening. If you see a crack, you must remove the entire tank to replace the assembly.
If you lack a basin wrench or are uncomfortable disconnecting the tank bolts, contact a professional. A mistake here often leads to a cracked porcelain tank, which can’t be repaired and requires a full toilet replacement. Always check the tank-to-bowl gasket for signs of decay while you’re inside the tank; if it’s brittle or crumbling, replace it now to prevent a catastrophic floor leak later.
Related guides
- Best Toilet Seat With Price in 2026
- Best Self Cleaning Bidet Toilet Seats in 2026
- 10 Best Bidet Toilet Seats for Comfort and Hygiene in 2026
Frequently asked questions
How do I know if it’s the flapper or the fill valve?
If the water level in the tank is rising above the overflow pipe, the fill valve is the problem. If the water level is normal but you hear the toilet running periodically, the flapper isn’t sealing properly. You can test the flapper by putting a few drops of food coloring in the tank; if the color appears in the bowl after 15 to 20 minutes without flushing, the flapper is leaking.
Can I replace the fill valve without turning off the water?
No, you must always turn off the water supply at the wall valve before starting any work. If you fail to do this, you’ll have high-pressure water spraying into your bathroom as soon as you disconnect the supply line from the tank. Always keep a small bucket and a towel nearby to catch the water that remains in the bottom of the tank after flushing.
How long does a toilet flapper last?
A standard rubber flapper eventually degrades depending on the quality of your water. Hard water causes mineral buildup that makes the rubber brittle, leading to leaks much faster than in homes with soft water. If you notice your flapper is becoming soft or sticky to the touch, it’s time to replace it before it starts leaking.
Is it safe to use a universal fill valve?
Yes, most modern fill valves are designed to be universal and will fit almost any standard toilet tank. They’re height-adjustable to accommodate different tank sizes and shapes. When you install a new one, simply measure the distance from the bottom of the tank to the top of the overflow pipe and adjust the new valve to be about an inch lower than the pipe opening.
What happens if I use the wrong size flapper?
If you use the wrong size, the flapper won’t cover the drain hole completely or it may get stuck on the sides of the valve seat. This creates a constant leak that wastes water and prevents the tank from filling to the correct level. Always check the brand of your toilet or the size of your flush valve opening before purchasing a replacement at the store.
How much water does a leaking flapper waste?
A leaking flapper can waste hundreds of gallons of water every day if the toilet runs constantly. This not only increases your monthly water bill but also puts unnecessary strain on your home’s plumbing system. Replacing a faulty flapper is one of the most cost-effective repairs you can perform to keep your water usage within normal limits.
Conclusion
Proper maintenance of your toilet tank ensures your home stays dry and your water bills remain manageable. Whether you start with the flapper or the fill valve, always take your time to ensure all seals are tight and the water level is set according to the manufacturer’s mark inside the tank.