
Your butcher block countertop adds warmth and character to your kitchen, but the area around the sink is vulnerable to water damage. If you don’t seal it properly, moisture can seep in, causing warping, stains, and costly repairs.
You might be wondering how to protect this valuable surface without hiring a pro or spending hours on complicated steps. This guide will show you exactly how to seal butcher block countertops around your sink, using simple methods that anyone can follow.
Keep reading to learn the easy, effective ways to keep your countertop looking beautiful and lasting longer.
Credit: abeautifulmess.com
Choosing The Right Sealant
Choosing the right sealant is key to protecting butcher block countertops. The area around the sink faces water and spills often. A good sealant prevents damage and keeps wood looking fresh. Picking the best product depends on the type of sealant, water protection level, and safety for food contact. Understanding these factors helps maintain your countertop for years.
Types Of Sealants For Butcher Block
Sealants come in oils, varnishes, and polyurethane. Oils soak into the wood and keep it nourished. Varnishes form a hard layer on top. Polyurethane creates a strong, clear shield. Each type offers different durability and finish. Choose based on how much wear and tear your countertop sees.
Waterproof Vs Water-resistant Options
Waterproof sealants block all water from reaching the wood. Water-resistant options slow water absorption but allow some moisture. Around sinks, waterproof sealants offer better protection. They stop water from causing stains and warping. Water-resistant sealants may need more frequent reapplication.
Food-safe Sealants For Kitchen Use
Sealants must be safe for food contact in kitchens. Look for products labeled food-safe or FDA approved. Natural oils like mineral oil and beeswax are safe choices. Avoid sealants with harmful chemicals or strong odors. Safe sealants keep your countertop healthy and your food safe.
Preparing The Countertop Surface
Preparing the countertop surface is the first step in sealing butcher block around the sink. A clean, smooth surface helps the sealant stick properly. This prevents water from damaging the wood and keeps your countertop looking great. Follow these steps carefully to get the best results.
Cleaning And Drying The Area
Start by removing any dirt, grease, or food particles. Use a mild soap and warm water. Wipe the surface with a soft cloth. Avoid soaking the wood to prevent swelling. Let the countertop dry completely. A dry surface helps the sealant bond better.
Sanding For Better Adhesion
Lightly sand the area around the sink using fine-grit sandpaper. This creates a rough texture for the sealant to grip. Sand in the direction of the wood grain. Clean off the dust with a damp cloth. Wait until the wood is dry before sealing.
Removing Old Sealant And Residue
Check for any old sealant or residue near the sink. Use a scraper or putty knife to remove it gently. Avoid damaging the wood surface. Clean the area with rubbing alcohol or a wood-safe cleaner. Make sure the surface is smooth and residue-free before applying new sealant.
Sealing Techniques Around The Sink
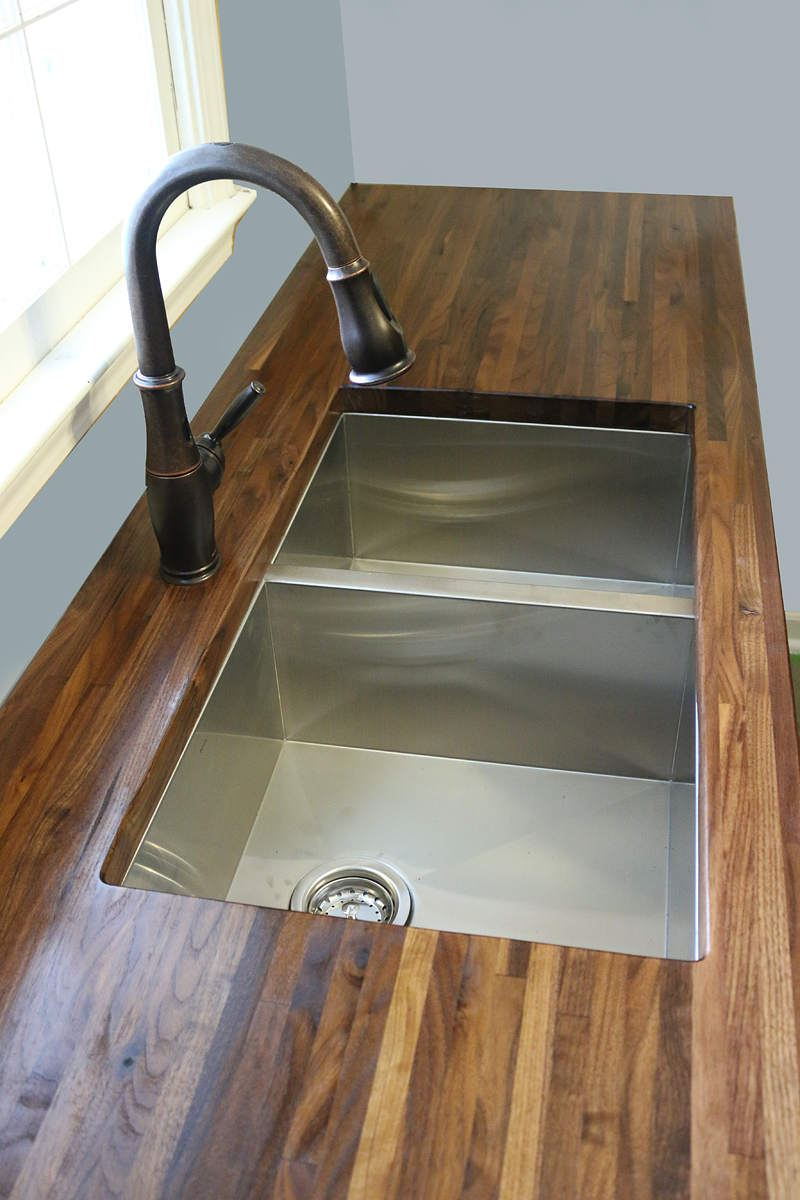
Sealing butcher block countertops around the sink protects the wood from water damage. Water can cause swelling, warping, and stains if it seeps into the wood. Proper sealing creates a waterproof barrier that keeps moisture out. This section explains key sealing techniques to use around the sink area. Follow these steps for a long-lasting, clean finish.
Applying Sealant To Joints And Edges
Start by cleaning the joints and edges near the sink thoroughly. Apply a high-quality wood sealant directly to these areas. Use a small brush or applicator to spread the sealant evenly. Focus on seams where the countertop meets the sink or backsplash. Let the sealant soak into the wood for full protection. Multiple thin coats work better than one thick layer. Allow each coat to dry completely before applying the next.
Using Caulk For Gaps And Cracks
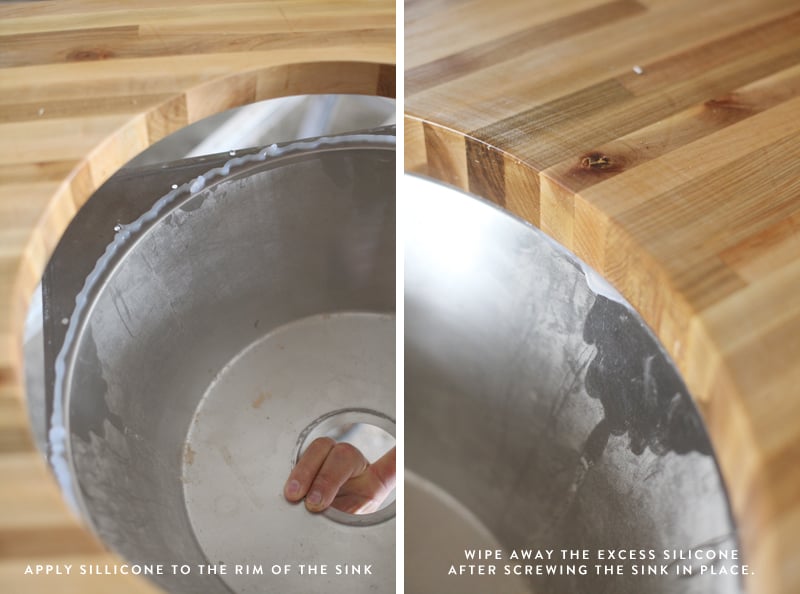
Check for gaps or cracks around the sink and countertop edges. Use a waterproof, flexible caulk designed for kitchen use. Apply the caulk carefully into gaps to block water entry. Smooth it out with a wet finger or a caulk tool for a tight seal. Caulk fills small spaces that sealant alone cannot reach. Replace old or cracked caulk regularly to maintain protection.
Ensuring A Smooth, Even Finish
After sealing and caulking, inspect the surface for any rough spots. Sand lightly with fine-grit sandpaper to smooth the finish. Wipe away dust with a clean cloth. Apply a final sealant coat to blend all areas evenly. This step enhances water resistance and improves appearance. A smooth finish makes cleaning easier and extends countertop life.
Credit: www.bowerpowerblog.com
Drying And Curing Times
Sealing butcher block countertops around the sink requires patience. The drying and curing times are crucial for a strong, lasting seal. Rushing this process can cause water damage and wear on the wood. Understanding the right times to wait helps protect your investment.
Recommended Drying Periods
Most sealants need at least 24 hours to dry. Some types require up to 48 hours. Check the product label for exact drying times. Avoid touching or using the countertop during this period. Proper drying ensures the sealant sets firmly on the wood surface.
Avoiding Water Exposure During Curing
Water can ruin the seal if it touches the surface too soon. Keep the area dry for at least 3 to 7 days, depending on the sealant. Use plastic covers or towels to protect the sink area. Prevent spills and splashes to maintain a strong, waterproof barrier.
Signs Of Proper Sealant Cure
The sealant feels hard and smooth to the touch. It no longer smells strongly of chemicals. Water beads up on the surface without soaking in. These signs show the seal is fully cured and ready for daily use. Patience pays off with a durable, beautiful countertop.
Maintenance Tips For Longevity
Maintaining butcher block countertops around the sink ensures they last longer and look great. Proper care prevents damage and keeps the wood sealed. Following simple steps helps protect your investment and keeps your kitchen clean.
Regular Cleaning Practices
Clean the countertop daily with a soft cloth and mild soap. Avoid harsh cleaners that can strip the sealant. Wipe spills immediately to stop stains and water damage. Use a damp cloth, not soaking wet, to clean the surface. Dry the area well after cleaning to prevent moisture buildup.
Reapplying Sealant When Needed
Check the sealant regularly for wear or dullness. Reapply a food-safe sealant every few months or as needed. Lightly sand the surface before applying new sealant for better adhesion. Follow the product instructions carefully for best results. Proper sealing keeps water and stains from penetrating the wood.
Preventing Water Damage And Stains
Keep water away from the edges and seams around the sink. Use a silicone sealant to fill gaps and stop water from seeping in. Avoid letting water sit on the wood for long periods. Use cutting boards and avoid placing hot pots directly on the surface. These habits prevent stains and water damage effectively.
Common Mistakes To Avoid
Sealing butcher block countertops around the sink requires care. Avoiding common mistakes helps protect your wood and keeps it looking great. Mistakes can cause water damage and shorten your countertop’s life. Focus on these key errors to get the best results.
Using The Wrong Sealant Type
Not all sealants work well on butcher block wood. Some sealants can peel or crack easily. Choose a sealant made for wood and water protection. Avoid using oil-based or indoor paints. These do not provide a strong water barrier.
Skipping Surface Preparation
Sealing without cleaning and sanding the surface is a big mistake. Dirt and old finishes stop the sealant from sticking. Lightly sand the wood to open its pores. Clean off dust and grease before sealing. This ensures the sealant soaks in evenly.
Overapplying Sealant
Applying too much sealant creates problems. Thick layers can stay sticky or dry unevenly. Apply thin, even coats and let each dry fully. Multiple thin coats protect better than one thick coat. Excess sealant can drip into cracks and cause damage.
Credit: www.thriftydecorchick.com
Frequently Asked Questions
How Do I Prepare A Butcher Block Around The Sink?
Clean the surface thoroughly and let it dry before sealing. Remove any old sealant or stains for better adhesion.
What Type Of Sealer Is Best For Butcher Block Sinks?
Use a waterproof, food-safe oil or varnish designed for wood countertops. These protect the wood from water and stains.
How Often Should I Reseal My Butcher Block Countertop?
Reseal every 6 to 12 months depending on use and exposure to water. Regular sealing keeps the wood protected and looking new.
Can I Use Silicone To Seal The Sink Edges?
Silicone works well to seal gaps between the sink and wood. It prevents water from leaking under the countertop.
How Long Should I Wait Between Sealing Coats?
Wait about 4 to 6 hours between coats for good drying. This helps each layer bond properly to the wood.
Should I Sand The Butcher Block Before Sealing?
Light sanding smooths the surface and helps the sealer stick better. Use fine-grit sandpaper and clean dust before applying sealer.
Is Sealing Necessary If I Use A Sink Mat On Butcher Block?
Yes, sealing protects the wood from moisture and stains even with a sink mat. Sealing adds a strong protective layer to the wood.
Conclusion
Sealing butcher block countertops around the sink protects the wood from water damage. A good seal keeps the surface strong and looking nice. Regular maintenance helps the countertop last longer. Use safe, easy-to-find products for sealing. Take your time to apply the sealant evenly.
This simple step saves you money on repairs later. A well-sealed sink area keeps your kitchen clean and fresh. Try sealing soon to enjoy a beautiful, durable countertop.