
A standard single wall oven costs between $800 and $3,500, while double wall ovens typically range from $2,000 to $6,000 depending on features and fuel type. This total depends on the size of the unit, the specific brand, and whether you’re replacing an existing appliance or cutting a new space into your cabinetry.
If you’re replacing an older unit, your main cost is the appliance itself plus minor electrical adjustments. If you’re creating a new space, you must factor in the cost of professional cabinet modification and potentially upgrading your home’s electrical circuit to handle the power requirements of a high-end model.
Appliance buyers and remodelers
This information serves homeowners who are currently in the market for a new cooking appliance and need to plan their budget. It’s aimed at two types of buyers: those replacing a broken unit and those planning a kitchen renovation. If you’re replacing an existing wall oven, your primary concern is finding a model that matches your current cutout dimensions.
This guide assumes you’re looking for standard residential appliances. It doesn’t cover commercial-grade restaurant equipment, which carries different safety certifications and utility demands. If you’re unsure about your home’s electrical capacity, you should consult an electrician before purchasing a unit, as many modern ovens require a dedicated 240-volt circuit. This page isn’t for those seeking repair advice for a malfunctioning unit; if your oven isn’t heating, you should contact a certified technician rather than attempting internal repairs yourself. We focus on the purchase price and installation factors that move your final budget up or down.
Choosing your oven configuration
The total price of your project changes based on several specific factors. Understanding these will help you prioritize your spending and avoid unnecessary costs during the installation process.
Fuel type is the first major factor. Electric wall ovens are the most common and generally offer more consistent heat, while gas models are less common in wall-mounted configurations and often require specific venting. You can check your existing gas line or electrical outlet to see which type your home is already equipped to support.
Size is the second factor. Standard wall ovens are 24, 27, or 30 inches wide. A 30-inch model is the most popular, and choosing an unusual size can significantly increase the price of the unit or require expensive custom cabinet work. Always measure your current cutout height, width, and depth before shopping.
Features move the price significantly. Basic mechanical dials are the most affordable, while units with Wi-Fi connectivity, convection fans, steam-cleaning cycles, and touchscreen interfaces sit at the higher end of the price spectrum. If you prioritize reliability over smart features, look for models with fewer electronic components.
Installation complexity is the final factor. The ENERGY STAR appliance requirements provide guidance on efficiency standards that can influence long-term operating costs. If your cabinet opening is smaller than the new oven, you’ll need a carpenter to modify the wood; if it’s larger, you may need a trim kit to fill the gaps.
Installing a wall oven
- Turn off the power to the oven circuit at your main electrical breaker box.
- Remove the old oven by unscrewing the mounting screws located on the sides of the metal frame.
- Pull the unit out slowly to expose the electrical junction box behind the oven.
- Disconnect the wires and remove the old unit from the kitchen; this usually requires two people.
- Measure the existing cutout dimensions to ensure your new model will fit the opening.
- Install the new junction box if the old one is damaged or doesn’t meet current code requirements.
- Connect the new oven’s power cable to the junction box according to the manufacturer’s wiring diagram.
- Slide the new unit into the cabinet opening until the front frame is flush with the wall.
- Secure the unit to the cabinet using the provided mounting screws and test the power.
The single judgement call that separates a professional job from a amateur one is the leveling of the unit. If the oven isn’t perfectly level, the door may not seal correctly, leading to uneven cooking and heat loss. Use a spirit level on the oven’s internal floor or the bottom frame of the chassis to ensure the unit is level before tightening the mounting screws. If you aren’t comfortable working with high-voltage electrical connections, hire a licensed electrician to perform the final wiring, as a poor connection can create a fire hazard.
Pricing and configuration breakdown
| Situation | What to do | Estimated cost | What to watch for |
|---|---|---|---|
| Basic replacement | Match dimensions | $800 – $1,500 | Cutout fit |
| Mid-range upgrade | Check features | $1,600 – $3,000 | Convection options |
| Double oven unit | Confirm clearance | $2,000 – $6,000 | Electrical load |
| Custom cabinetry | Hire carpenter | $500 – $1,200 | Trim finish |
| Professional install | Hire electrician | $200 – $500 | Permit requirements |
When measuring for a basic replacement, verify the cabinet cutout depth to within an eighth of an inch. If your new unit is deeper than the existing space, you’ll face an expensive cabinet modification.
For double ovens, check your home’s electrical panel capacity before purchasing. A standard 240-volt circuit often requires a 40-amp breaker, but high-end models may demand 50 amps. If your panel lacks the headroom, you’ll need to pay an electrician to upgrade your service, adding $1,000 or more to the project.
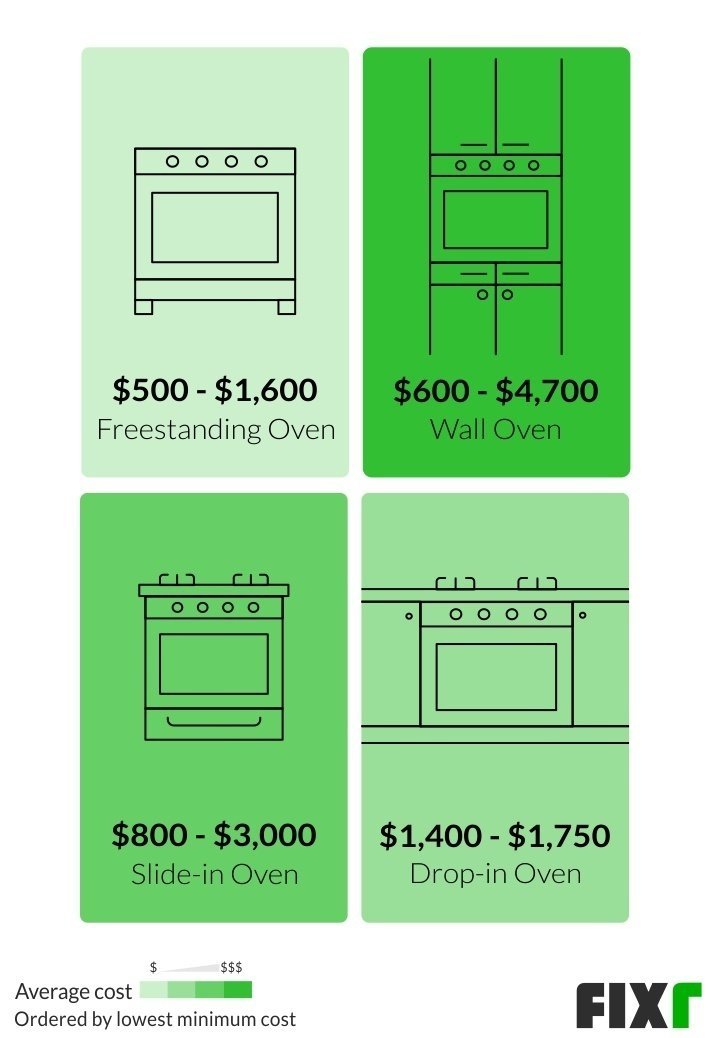
Distinguish between “drop-in” and “slide-in” units by checking the front lip. Slide-in models overlap the countertop, which hides gaps but requires precise granite cuts. Drop-in models sit flush, meaning any measurement error will remain visible.
Most homeowners mistakenly assume that professional installation includes gas line verification. If you’re switching from electric to gas, you must hire a licensed plumber separately. Neglecting this step leads to failed inspections and potential safety hazards. Always confirm if your quote covers the disposal of the old appliance, as haul-away fees can add $100 to your final bill.
Ensuring a high-quality result
Proper site preparation
The most successful installations begin with accurate measurements. Experienced installers measure the cutout at three different points—the top, middle, and bottom—because cabinets can sag or warp over time. If you ignore these slight variations, you may find that the oven slides into the top of the hole but gets stuck at the bottom. Always verify the depth of the cabinet as well; many modern ovens are deeper than older models and may hit the back wall if you don’t account for the extra space.
Managing electrical requirements
Never assume your current circuit is sufficient for a new, high-powered unit. If you’re moving from a simple single oven to a double oven with convection, your total power draw will increase. Check the “KW rating” or “Amperage” listed on the new oven’s nameplate and compare it to the breaker currently installed in your home. If the new oven requires a 40-amp circuit but you only have a 30-amp breaker, you must have the wire and breaker upgraded by a professional before use.
Common installation issues
| What you notice | What it means | What to do first | How to stop it |
|---|---|---|---|
| Oven won’t slide in | Cutout is too small | Measure opening again | Sand cabinet edges |
| Door rubs frame | Unit isn’t level | Adjust mounting screws | Use spirit level |
| Breaker trips often | Circuit is overloaded | Check amp rating | Call an electrician |
| Unit rattles loudly | Loose mounting | Tighten all screws | Use rubber shims |
| Digital display dark | No power | Check the breaker | Reset the switch |
Most installers fail by neglecting the cabinet’s internal squareness. If your oven slides in but the door binds, your cutout is likely skewed rather than small. Measure the diagonal distance from corner to corner; if the numbers differ by more than 1/8 inch, the frame is racked.
Many users assume a tripped breaker means a faulty unit. In reality, modern ovens often require a dedicated 40-amp circuit. Your wall oven must be on a dedicated branch circuit; it should never share a line with other appliances. You must verify the wire gauge matches the breaker rating before calling for service.
Finally, don’t ignore a rattling noise. It’s rarely a mechanical defect. It usually indicates that the chassis is vibrating against the cabinetry. If tightening the mounting screws fails, insert high-heat rubber shims between the oven flange and the cabinet face. This simple buffer prevents the metal-on-wood vibration that eventually loosens your hardware.
Regulatory and safety standards
All residential ovens in the United States must meet standards established by the American National Standards Institute (ANSI) regarding fire safety and electrical insulation. When you purchase a unit, look for a badge from a testing laboratory like UL (Underwriters Laboratories) to ensure the device has been tested for safety.
If your local building code requires a permit for electrical modifications, you must obtain this through your municipal building department before starting the work. Failure to follow local codes can void your home insurance policy in the event of an electrical fire. Insurance adjusters typically deny claims if they discover the installation lacked the mandatory municipal inspection sign-off.
Never attempt to bypass a fuse or modify the internal wiring of an oven; these components are designed for specific loads and tampering with them creates a significant risk of shock or fire. If the oven draws more current than the circuit can safely handle, the breaker must trip. If you find the internal wiring is frayed or the insulation is cracked, stop the installation immediately and contact the manufacturer for a replacement unit.
Ensure your circuit breaker and wire gauge meet the specific amperage requirements listed on the oven’s nameplate and in the manufacturer’s installation manual. Ignoring this threshold leads to overheating, which melts wire insulation and triggers silent, smoldering fires behind your kitchen walls. Always verify the gauge of your existing supply wire matches the manufacturer’s minimum requirement listed in the manual.
The real cost of ownership
The purchase price is only the beginning of your investment. You must also consider the cost of delivery, which can range from $50 to $150 depending on whether you require professional haul-away of your old unit.
If you’re replacing a gas unit, you may also need a certified plumber to disconnect and reconnect the gas supply line, adding $150 to $300 to your total. Avoid the common mistake of ignoring local building codes; if your current gas line lacks a modern shut-off valve, the plumber must install one to meet safety standards. This can add an extra hour of labor to your bill.
Maintenance costs are generally low, but you should budget for the occasional replacement of heating elements or control boards, which typically cost between $100 and $300 for parts.
The most effective way to lower your costs is to match the dimensions of your existing cutout exactly. This eliminates the need for expensive cabinet modifications, which can cost upwards of $500 if a carpenter must resize the opening.
Always compare the total cost, including shipping and installation, across at least three retailers before finalizing your purchase. Prices fluctuate based on seasonal promotions and inventory levels. If a retailer offers free shipping, check if they offset that cost by inflating the installation fee. Always calculate the “all-in” price before clicking buy.
Maintaining your new appliance
After the installation is complete, keep your oven clean to extend its lifespan. Wipe down the interior surfaces with a damp cloth after each use to prevent grease buildup, which can cause smoke during high-temperature cooking.
If your model features a self-cleaning cycle, use it sparingly. The extreme heat can stress electrical components and shorten the life of the heating elements. Limit this cycle to once every six months to avoid premature sensor failure.
If the door seal becomes cracked or brittle, replace it immediately to prevent heat leakage. This forces the oven to work harder and consumes more energy. You can check the seal by closing the door on a piece of paper. If the paper pulls out with no resistance, the seal is failing.
A common mistake is using abrasive steel wool on stainless steel interiors. This creates micro-scratches that trap food particles and make the surface harder to clean. Instead, use a non-abrasive nylon scrub pad and a mild degreaser.
Keep your user manual in a safe place. It contains specific instructions for your model’s maintenance schedule and error codes. If the oven displays an “F” code, consult the manual before calling a technician. Often, these codes indicate a simple sensor reset is required rather than a hardware replacement.
When to hire a professional
There are situations where attempting the installation yourself is the wrong choice. If your kitchen requires significant electrical rewiring to meet the power requirements of a new, high-output double oven, you should hire a licensed electrician. Electrical work involving 240-volt circuits carries a risk of severe shock, and improper connections can lead to hidden fire hazards inside your wall. Additionally, if you’re moving the oven to a new location, you’ll need a contractor to handle the structural changes to your cabinetry and potentially the relocation of gas or electrical lines. These tasks require specialized tools and local permits that an average homeowner doesn’t possess. Being honest about your skill level ensures the job is done safely and correctly the first time.
How much does a new wall oven cost to install?
Professional installation typically costs between $200 and $500. This price assumes that your existing electrical circuit and cabinet cutout already meet the requirements of the new unit. If the installer needs to modify your cabinets or upgrade your electrical wiring, the cost will increase based on the labor hours required.
Is it safe to install a wall oven by myself?
Yes, you can install a wall oven yourself if you have basic DIY experience and the correct tools. You must be comfortable working with electrical wiring and ensure that the power is fully disconnected at the breaker box. If you lack experience with electrical systems, hire a professional to ensure your safety.
How long does a wall oven usually last?
A high-quality wall oven generally lasts between 10 and 15 years with regular use. Proper maintenance, such as keeping the interior clean and replacing worn door seals, helps reach the upper end of this range. If you notice frequent mechanical failures or heating issues, it may indicate the unit is nearing the end of its life.
What happens if the new oven doesn’t fit the cutout?
If the oven is too large, you must hire a carpenter to enlarge the cabinet opening, which adds to your project cost. If the oven is too small, you can use a trim kit to cover the gaps, though this may require custom fabrication if your model doesn’t offer a matching kit.
Do I need a permit to replace my wall oven?
Most municipalities don’t require a permit for a simple “like-for-like” replacement of an existing appliance. However, if you’re modifying electrical circuits or gas lines, you almost always need a permit. Check your local city or county building department website to confirm the specific requirements for your area.
Does the price include the haul-away of my old oven?
No, haul-away is typically an additional service that costs between $30 and $100. Some retailers include this as part of a premium delivery package, while others charge for it separately. Always confirm whether the removal of your old appliance is included in your checkout total before paying.
The first step in your project is to measure your current cutout dimensions and check your existing electrical supply. Once you have confirmed these numbers, you can confidently shop for a model that fits your space and budget. If you encounter any wiring that appears damaged or if the breaker box doesn’t support the new oven’s power needs, stop immediately and contact a licensed electrician for assistance.
Related guides