
An optical pyrometer determines temperature by matching the brightness of an internal filament to the color of a target object. By adjusting the current to change the filament’s glow until it blends into the background of the source, the device functions through a simple act of visual comparison. This process relies on the fact that hot objects emit light at specific wavelengths and intensities based on their thermal energy.
Parts of the optical pyrometer
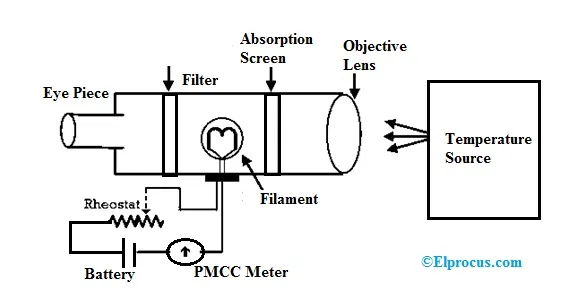
The device uses a specific set of components to isolate the target’s light and compare it against a known reference. If the image is blurry or the light is too dim, the measurement will be inaccurate. Always check the user manual for your specific model to understand where these parts are located, as layout varies by manufacturer.
| Part or input | What it does | What you notice when it goes wrong |
|---|---|---|
| Objective lens | Focuses light onto the internal filament | Target appears blurry or out of focus |
| Internal filament | Glows to match the target’s brightness | Filament color doesn’t match target |
| Red filter | Limits light to a specific wavelength | Colors look strange or hard to match |
| Eyepiece | Magnifies the image for the user | Eye strain or difficulty seeing filament |
| Current control | Adjusts the filament brightness level | Filament never matches the target brightness |
Focus on the internal filament’s position relative to the target image. If the filament appears to float in front of or behind the target, your depth of field is off. You must adjust the objective lens until both the target and the filament sit on the exact same focal plane.
A common mistake is failing to clean the objective lens before starting. Even a thin layer of dust or oil scatters incoming light, which artificially lowers the perceived brightness of the target. If your readings are consistently lower than expected, wipe the lens with a lint-free cloth.
If the current control knob feels gritty or skips, the internal rheostat is likely oxidized. This prevents you from achieving a precise brightness match, as the filament will jump in intensity rather than dim smoothly. In this case, replace the control unit immediately to ensure your temperature data remains reliable.
Steps for how an optical pyrometer measures temperature
To get an accurate reading, you must follow a steady process of alignment and adjustment. This cycle typically takes 30 to 60 seconds depending on how quickly you can stabilize the filament glow.
Point the objective lens at the hot object from a safe distance, ensuring the target fills the center of your view. If the object occupies less than 20% of your field of view, the surrounding ambient temperature will skew your reading downward.
Look through the eyepiece and adjust the focus knob until the object appears sharp; this usually takes about 5 to 10 seconds. If the edges remain blurry, your distance from the target is likely outside the lens’s focal range.
Turn the current control knob to change the brightness of the internal filament until it matches the intensity of the target object. Observe the filament until it seems to disappear against the background of the target, indicating the two are at the same temperature.
Read the temperature value shown on the device’s calibrated scale or digital display once the match is perfect. Verify the reading by slightly adjusting the brightness up and down to ensure you found the exact point of visual blending.
Why precision matters for accuracy
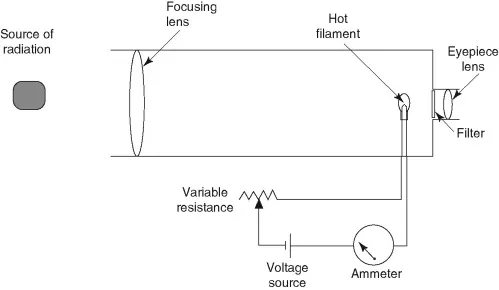
The accuracy of this method depends on the “emissivity” of the material you’re measuring. Emissivity is a measure of how well a surface radiates heat compared to a perfect blackbody, and NIST technical guidelines on radiation thermometry explain that surfaces with low emissivity will reflect surrounding light, causing the pyrometer to show a false, lower temperature. If you measure a shiny metal surface, the device might report the temperature of the reflection rather than the object itself.
When the filament matches the background, you’re effectively performing a visual calibration. If the target isn’t a “blackbody”—meaning it reflects light—the reading will be off by a margin that depends on the material’s surface finish. A mistake many people make is assuming the device works perfectly on all surfaces; this costs them accuracy, as metallic surfaces often require a correction factor or a special viewing hole to trap heat radiation.
This tool isn’t for people who need to measure low-temperature objects, as the target must be hot enough to glow visibly. If the object is below 700 degrees Celsius, the filament won’t have enough contrast to provide a reliable reading. Always ensure your target is in a stable, high-heat state before starting your measurement.
Controls and design limits
What you control
- The focus of the objective lens for clarity.
- The current adjustment to match filament brightness.
- The distance between the device and the target.
- The selection of the correct emissivity setting if available.
Fixed by design
- The wavelength range defined by the internal filter.
- The temperature range limits set by the manufacturer.
- The physical size of the internal reference filament.
If the internal hardware fails or the lens becomes damaged, don’t attempt to repair it yourself. These devices are precision instruments; opening the casing can destroy the calibration, making the device useless for scientific or industrial work. If the unit gives erratic readings, contact the manufacturer’s authorized service center for professional recalibration.
Getting more out of it
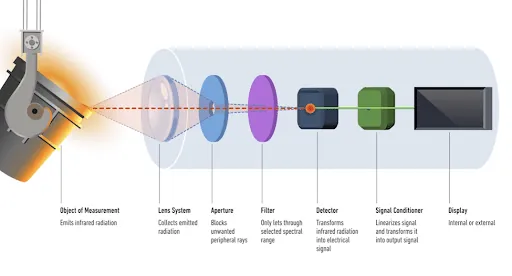
Consistent results require you to keep your environment stable. For the best accuracy, ensure the target object is in a dark or shaded area, as bright sunlight can wash out the filament and make matching nearly impossible. If you’re working in a bright room, use a shield or a hood to block external light from hitting the target surface.
Check your battery levels before every session, as a dying power source will cause the filament to dim inconsistently. Most professional models require a steady voltage to maintain the filament’s color temperature; if the battery is low, the device can’t reach the higher end of its temperature range. Finally, always document the distance and angle of your measurement to ensure you can repeat the test under the exact same conditions later.
Related guides
- Foosball Table Room Size Calculator: How to Measure Space in 2026
- How to Measure Density Using a Pycnometer: Step-by-Step Method
Frequently Asked Questions
Can I use an optical pyrometer on plastic?
No, you can’t use this device on plastic because it doesn’t emit enough visible light. Optical pyrometers are designed for high-heat industrial processes, usually starting at 700 degrees Celsius, where materials glow with enough intensity to be compared against the internal filament.
How long does a calibration last?
You can verify your device’s accuracy by checking it against a known heat source or blackbody furnace; if the readings drift by more than the manufacturer’s stated tolerance, send it for service.
Is it safe to look at the sun?
No, it’s never safe to point an optical pyrometer at the sun or any extremely bright light source. Doing so can cause permanent damage to your eyes and may melt the internal optical components of the device, rendering it permanently inaccurate or broken.
What happens if the target moves?
If the target moves, you’ll find it difficult to keep the filament aligned, leading to an inaccurate match. Ensure the target is stationary during the 30 to 60 seconds required to adjust the current, as even a small movement changes the light intensity reaching your eye.
Does it matter if the room is dusty?
Yes, dust in the air or on the lens scatters light and makes the filament harder to see. For the best results, use the device in a clean environment and keep the lens cap on when you aren’t actively taking a temperature reading to prevent debris buildup.
How many times can I reuse the filament?
The filament is designed to last for several thousand hours of operation, but its lifespan depends on the intensity of the current you use. If you notice the filament looks uneven or has dark spots, it’s reaching the end of its life and needs a factory replacement.
Conclusion
Modern digital sensors have largely replaced manual adjustments, but the core principle remains vital for high-heat industries. You shouldn’t hesitate to explore how infrared cameras build on this foundation if you’re interested in thermal imaging. It’s a fascinating field, and you’ll find that understanding these basics makes the advanced technology much clearer.
