
You can reset your keypad by pressing the learn button on the motor unit and then entering your new four-digit code within thirty seconds. These chamberlain garage door codes are stored directly on the motor unit’s logic board, meaning you don’t need a secondary device to program them. This method works for most residential openers manufactured after 1993 that feature a “Learn” button. If you have an older system or a specific wall-mounted keypad, check your owner’s manual for model-specific sequences.
Items needed for Chamberlain door codes
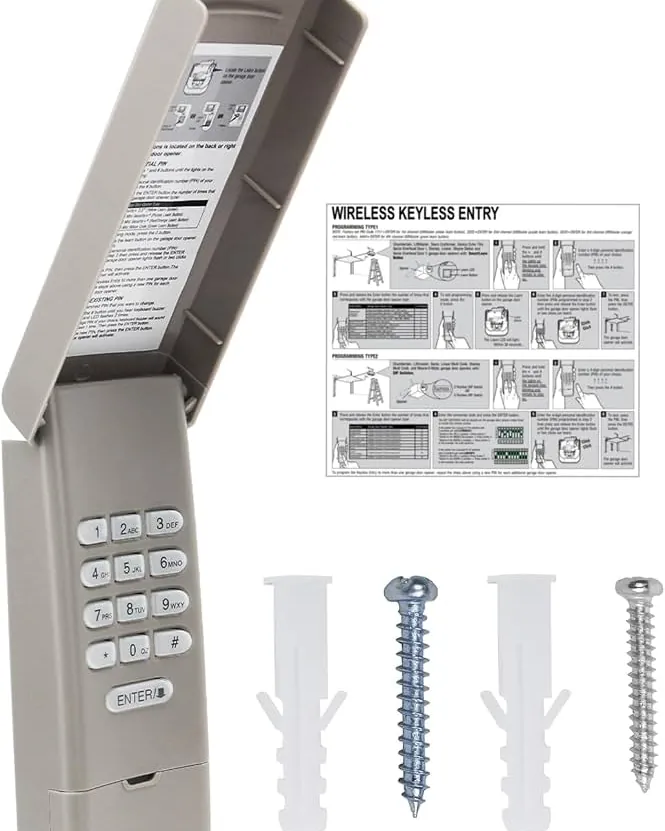
To successfully update your access credentials, you’ll need to gather a few specific items. Having these ready prevents unnecessary trips up and down the ladder during the setup process.
A sturdy, reliable stepladder that reaches your motor unit comfortably. Ensure the top step remains at least two feet below the ceiling to provide enough clearance for your hands.
The original remote control or the keypad unit you intend to program. Fresh batteries are essential; low power often causes the signal to fail during the critical handshake phase.
A flat-head screwdriver if your battery compartment has a small locking screw. Keep a small magnetic tray or a piece of tape nearby to secure this screw, as losing it in a dark garage floor gap is a common mistake that turns a five-minute job into an hour of frustration.
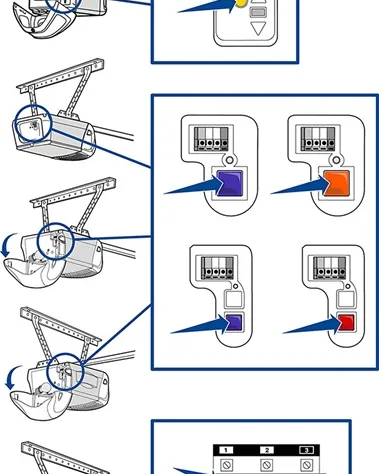
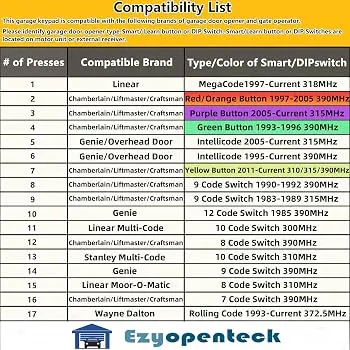
A flashlight to clearly see the color of the “Learn” button on the motor housing. If the button is yellow, you’re working with a Security+ 2.0 system; if it’s purple or red, you’re likely on an older frequency.
Your owner’s manual, which contains the specific sequence for your model number. If you’re missing your manual, you can find the official product support documentation on the manufacturer’s website by searching for your opener’s model number.
If you have a commercial-grade unit, the programming steps differ significantly from residential models. Always ensure your ladder is on level ground to avoid slips or falls while working near the ceiling.
Steps to Program Your Keypad
Follow these steps to link your keypad to your garage door opener. If you have a multi-button remote, keep it close by to test the signal immediately after the keypad is linked.
- Locate the “Learn” button on the motor unit of your garage door opener. This is usually found under the light cover or on the side of the unit.
- Press and release the “Learn” button once. You’ll see a small LED light turn on and stay steady for 30 seconds.
- Enter your new four-digit personal identification number (PIN) on the external keypad within that 30-second window.
- Press and hold the “Enter” button until the garage door opener lights blink or you hear two audible clicks.
- Test the code by entering your new four-digit PIN and pressing the “Enter” button again to see if the door moves.
- Repeat this process if the door doesn’t respond, ensuring you complete the entry before the 30-second light turns off.
Tip: If the light on your motor doesn’t blink, check that your keypad batteries are installed correctly. Careful: Don’t hold the “Learn” button for more than 10 seconds, as this will erase all existing remotes and codes from the memory.
Adjusting for Different Models
The time and effort required to program your system depend heavily on the age and security type of your specific opener. Modern units with Security+ 2.0 technology often require fewer steps than older systems.
| Opener Type | Setup Difficulty | Typical Time | What to Monitor |
|---|---|---|---|
| Security+ 2.0 | Low | 2 minutes | LED light flashes |
| Standard Rolling Code | Low | 3 minutes | Audible clicks |
| Older DIP Switch | Moderate | 5 minutes | Switch positions |
| Commercial Grade | High | 10 minutes | Manual override |
If you encounter issues, start with a single remote before adding multiple keypads to verify the system is responding correctly. Overloading the logic board with more than five rapid attempts in one session often triggers a lockout, forcing you to wait ten minutes for the receiver to reset.
Check your motor unit’s learn button color to identify your model’s frequency. A yellow button indicates Security+ 2.0, while purple or red buttons signify older rolling code systems. If your unit lacks a learn button entirely, you must manually match the physical toggles inside the remote to the sequence found on the main logic board.
Avoid the common mistake of holding the remote button down too long during pairing. A quick, one-second pulse is usually sufficient to register the signal. Constant pressure can confuse the receiver into misinterpreting the code, resulting in intermittent operation later.
Confirming a Successful Setup
A successful programming session is confirmed when the garage door opener lights flash in response to your keypad entry. If the light doesn’t flash, the motor unit hasn’t received the signal, and you must restart the process.
The most common quality problem occurs when the user waits too long between pressing the “Learn” button and typing the code. The receiver typically stays in “listening” mode for only 30 seconds. If you exceed this window, the unit exits pairing mode to prevent unauthorized access.
To prevent this, have your code written down so you can enter it immediately. If you’re working alone, place the keypad within arm’s reach of the motor unit for the initial sync. Once the lights flash, you can move the keypad to its permanent location.
Ensure your keypad is mounted at a height where the signal isn’t blocked by metal siding or thick door frames. If the keypad lights up but the door doesn’t move, verify that the “Lock” feature on your wall-mounted control panel isn’t engaged. This setting disables all external radio signals, effectively rendering the keypad useless until you toggle it off.
Standards and System Maintenance
All Chamberlain systems must comply with the Underwriters Laboratories (UL) 325 standard for safety, which requires automatic reversal if an obstruction is detected. Once you have set your code, ensure you clear any temporary tools or ladders from the garage floor. Your code will remain stored on the logic board even during a power outage, thanks to the non-volatile memory chips used in the units.
If you notice the keypad requires multiple presses to function, replace the batteries immediately. Weak batteries often trigger intermittent signal loss before total failure, leading users to incorrectly assume a logic board malfunction. Use only high-quality alkaline batteries; lithium alternatives can cause voltage spikes that damage sensitive internal circuitry.
If the system stops responding entirely despite fresh batteries, you may need to perform a full factory reset. Note that resetting the unit clears all previously saved remotes and vehicles, requiring you to re-pair every device from scratch. If the door reverses before hitting the floor, adjust the down-travel limit screw by a quarter turn. If you’re uncomfortable working on the motor unit or if the casing appears damaged, consult a professional technician to avoid risks to your home security.
Alternative Programming Methods
Using an Existing Remote
If you already have a working remote, some models allow you to program a new keypad by pressing a specific button combination on the remote itself. This bypasses the need to climb a ladder, but it only works if your unit supports “Remote-to-Remote” programming. Check your manual to see if your specific model supports this, as it saves significant time during setup.
Wall-Mounted Control Panel
Many modern wall controls have a “Learn” button built directly into the panel. This allows you to program keypads and remotes without touching the ceiling-mounted motor unit. This is the preferred method if your ceiling is high or if you have limited ladder space, but it requires you to have a compatible wall-mounted smart control installed.
Professional Technician Assistance
If your system is part of a complex home automation network or a commercial garage, you may need a technician to sync the devices. A professional can handle issues with rolling code synchronization that simple keypad resets can’t fix. This is the best route if you’re managing a large number of access codes for multiple users or residential units.
Related guides
- Frigidaire Refrigerator Control Panel Board Reset Procedure
- Minka Aire Wall Control Not Working: How to Reset and Fix It
- How to Reset Dyson Air Purifier: Step-by-Step Guide
Frequently asked questions
How long does a keypad battery last?
A high-quality 9-volt or lithium battery typically lasts 12 to 24 months, depending on the frequency of use and the local temperature. Extreme cold can reduce the lifespan of the battery, leading to sluggish response times or signal failure. If you notice the keypad lights becoming dim or the door failing to respond on the first press, replace the battery immediately to maintain a reliable connection.
Is it safe to share my garage door code?
Don’t share your primary PIN with anyone outside your household. Use a temporary code or a “Guest” account via the myQ app for neighbors or service workers. Change your PIN immediately if you suspect it has been compromised or if someone no longer requires access.
Why is my garage door code not working?
Code failures usually result from a loss of sync between the keypad and motor unit due to power surges or dead batteries. Check the battery level first, then re-pair the keypad using the “Learn” button. Ensure the “Lock” mode on your wall console is off, as it disables external inputs.
Can I use one keypad for two doors?
Yes, you can program a single keypad to operate two different garage door openers if the keypad model supports multi-door functionality. You’ll need to program each door separately by repeating the “Learn” button sequence for the second motor unit. Refer to your keypad’s manual to see if it has a button for “Door 1” and “Door 2,” as the programming sequence varies by device layout.
How many codes can I store in one keypad?
Most residential keypads are designed to store one primary PIN, though some high-end or smart-enabled models allow for multiple unique user codes. If you need to track who is entering your garage, check the specifications for your specific model to see if it supports multiple user profiles. If your unit only supports one code, you must share that single PIN with all authorized users.
How do I reset a forgotten garage door code?
You reset a forgotten code by clearing the motor unit’s memory using the “Learn” button and then pairing the keypad as if it were brand new. Press and hold the “Learn” button on the motor unit for about 6 to 10 seconds until the LED light turns off. This erases all existing codes, allowing you to establish a new four-digit PIN using the standard programming steps.
Conclusion
Once you’ve successfully updated your access settings, it’s a good idea to test the keypad from outside before heading in. If you run into any trouble or the door doesn’t respond, don’t worry. You can always reach out to the manufacturer’s support team for help, as they’re happy to assist with any technical issues.
