
Stainless steel hardware is the most reliable option for long-term durability, so choose kits that include corrosion-resistant bolts and universal covers. These kits prevent water damage and keep your toilet secure to avoid leaks. This guide covers how to select the right size, install them safely, and maintain your hardware over time.
Choosing durable bathroom hardware

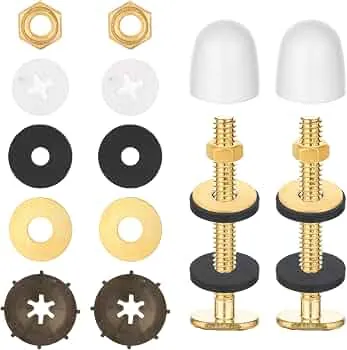
The primary purpose of these kits is to anchor your toilet to the floor flange and cover the exposed bolts for a clean look. Most people mistakenly buy the cheapest plastic bolts available, which often snap under pressure or degrade when cleaned with harsh chemicals. If you want a secure fit that lasts, you should look for kits that explicitly state they’re made of 304 or 316-grade stainless steel.
These materials are highly resistant to the moisture found in every bathroom. If you live in a home with hard water, the minerals can build up around the base of the bolt; stainless steel hardware is much easier to scrub clean without the risk of the bolt head stripping or rusting away. The caps themselves serve as a simple barrier against debris and moisture, preventing the bolt base from corroding over time.
A common misconception is that all toilet bolts are the same size. In reality, you must choose between 1/4-inch or 5/16-inch diameters to match your existing floor flange. If you try to force a larger bolt into a small flange slot, you risk cracking the porcelain base of your toilet, which is an expensive mistake to fix. Always check your flange size before you purchase a kit to ensure a perfect fit.
Installing your hardware correctly
Installing a new set of hardware is a task you can handle in about 30 to 45 minutes if you have the right tools. You’ll need an adjustable wrench, a hacksaw for trimming excess bolt length, and a screwdriver.
- Turn off the water supply valve behind the toilet and flush the tank to drain it.
- Remove the old caps by prying them off with a flathead screwdriver, then unscrew the nuts using your wrench.
- Lift the toilet carefully from the flange; if it’s sealed with wax, you’ll need to scrape away the old wax ring.
- Insert the new T-bolts into the floor flange slots, ensuring they stand straight and perpendicular to the floor.
- Place a new wax ring onto the flange, then carefully lower the toilet back onto the bolts.
- Hand-tighten the nuts onto the bolts, then use your wrench to give them an extra quarter-turn; don’t overtighten, or you might crack the toilet base.
- Snap the new caps over the bolt heads to finish the installation.
The most important judgement call is how much pressure to apply when tightening the nuts. If you tighten them too far, you can easily crack the ceramic base of the toilet. If you’re unsure about the condition of your floor flange or if you notice the flange is damaged, it’s best to consult a licensed plumber rather than attempting a DIY repair, as a faulty flange can lead to significant water damage under your flooring.
Comparing the best toilet bolt caps and hardware kits
| Situation | What to use | How long | What to watch for |
|---|---|---|---|
| Standard bathroom | Stainless steel bolts | 5-10 years | Signs of rust or loose nuts |
| Hard water area | Brass-plated steel | 3-5 years | Mineral buildup on threads |
| High-traffic home | Heavy-duty steel | 10+ years | Loose base or rocking toilet |
| DIY renovation | Universal plastic caps | 2-4 years | Faded color or cracked plastic |
| Coastal regions | 316-grade stainless | 10+ years | Salt air corrosion |
Choose stainless steel bolts for standard bathrooms. These resist moisture well, but check for surface oxidation every six months. If you find orange streaks, replace them immediately to prevent the bolt from seizing to the flange.
In hard water areas, mineral deposits act like sandpaper on metal threads. Use brass-plated steel to resist this buildup. If you notice white, chalky residue, scrub the threads with a mild vinegar solution. Neglecting this buildup will make future removal nearly impossible without cutting the bolt.
For high-traffic homes, prioritize heavy-duty steel. A toilet that rocks even slightly will snap standard hardware within a year. Test your installation by shifting your weight on the seat. If you feel movement, tighten the nuts immediately to prevent the flange from cracking.
Use universal plastic caps for quick DIY updates. These are purely aesthetic. If they crack, replace them to keep water from pooling around the bolt base.
Coastal regions require 316-grade stainless steel. Standard 304-grade stainless will pit and fail within two years due to airborne salt. If you live within five miles of the ocean, pay the premium for 316-grade. It’s the only material that prevents deep, structural corrosion in salt-heavy air. Always verify the grade stamped on the packaging before purchasing.
Achieving professional results
Experienced installers focus on the preparation of the floor surface before setting the toilet. They ensure the floor is perfectly level so the toilet doesn’t rock, which is the main cause of broken bolts and failing wax rings. If your floor is uneven, use plastic shims to stabilize the base before you tighten the nuts. Never use metal shims, as they can scratch the porcelain or cause stress points that lead to cracks.
If the toilet base remains wobbly after you apply pressure, don’t attempt to force the nuts tighter to stop the movement. This mistake creates a hairline fracture in the porcelain flange that remains invisible until the toilet eventually leaks. If the gap between the floor and the base exceeds 1/4 inch, use a grout or a specialized bathroom-grade caulk to fill the void rather than relying solely on shims.
Another detail professionals check is the length of the bolt. After you tighten the nuts, you should have no more than 1/2 inch of thread sticking out above the nut. If the bolt is too long, the plastic cap won’t snap on correctly and may pop off later. Use a hacksaw to trim the excess length, but be careful not to damage the threads on the part of the bolt you intend to keep.
If you find that the bolt is too short to reach the nut, don’t skip the washer to gain extra length. The washer distributes the pressure across the porcelain; without it, the nut will bite directly into the fixture and cause a crack under tension. If you encounter this, purchase a longer closet bolt set rather than compromising the hardware.
Finally, always hand-tighten the nuts until they’re snug, then add only a quarter-turn with a wrench. Over-tightening is the most common error in DIY installations. It strips the threads and creates immediate structural tension that leads to catastrophic failure within the first year of use.
Resolving common hardware issues
| What you notice | What it usually means | What to do first |
|---|---|---|
| Toilet rocks when sat on | Loose nuts or uneven floor | Check nut tension with wrench |
| Water leaking at base | Failed wax ring or loose bolt | Remove and replace wax ring |
| Bolt spinning in place | Damaged floor flange slot | Inspect flange for cracks |
| Cap won’t snap on | Bolt is too long | Trim bolt with a hacksaw |
If your toilet rocks, don’t simply tighten the nuts until they snap. First, slide plastic shims under the base until the movement stops. If you tighten bolts against a tilted porcelain base, you risk cracking the ceramic, which necessitates a full toilet replacement.
For leaks at the base, the culprit is often a dried-out wax ring. If you see water pooling, verify the source by drying the floor completely and dusting it with flour. A dark streak in the powder confirms a seal failure rather than condensation. Always buy a jumbo-wax ring with a plastic horn; it provides a better seal for rough-in pipes that sit slightly below the finished floor level.
When a bolt spins, the metal flange has likely rusted through. Don’t try to force it. Instead, install a stainless steel flange repair plate. These kits screw directly into the subfloor, bypassing the broken slot.
If you must trim a bolt, wrap a piece of masking tape around the threads just below your cut line. Once you finish sawing, unscrewing the nut through the tape will clean up any jagged threads.
If your bolt is too short to reach the nut after you install a new wax ring, swap the standard bolts for an extra-long closet bolt kit. Never use two nuts on one bolt to compensate for height; it creates a weak, unstable connection that will fail under pressure.
Hardware standards and compliance
When you buy hardware, look for products that meet local building codes. In the United States, plumbing hardware standards are often governed by the American National Standards Institute (ANSI) to ensure that materials like bolts and nuts can withstand the necessary torque without failing. If you’re working in a commercial building, you must ensure the hardware is rated for high-frequency use, which typically requires stronger, thicker-gauge metal compared to residential sets.
If you find that your floor flange is made of lead or thin plastic, you should avoid heavy-duty stainless bolts that require high torque, as these can pull the flange through the floor.
In these cases, use a flange repair kit that reinforces the area around the bolt slots. If you’re ever uncertain about the integrity of your drain connection, stop your work and contact a professional plumber, as a failed seal can lead to costly water damage to the subfloor.
Maintaining your toilet hardware
Once your new hardware is installed, it requires very little maintenance. You should wipe the caps down with a damp cloth once a month to prevent soap scum and dust from accumulating. If you notice the caps have become loose or aren’t staying in place, you can apply a tiny drop of silicone sealant to the underside of the cap to hold it firm.
If you ever need to remove the toilet for a floor renovation, don’t try to reuse the old bolts. Metal bolts often suffer from microscopic stress fractures after years of tightening, and reusing them is a common cause of bolt failure. Always replace the bolts and the wax ring whenever the toilet is lifted from the floor. This ensures that you have a watertight seal and a stable foundation for the years to come.
When choosing replacement bolts, prioritize stainless steel for its superior strength and corrosion resistance. Brass resists the corrosive environment of a bathroom floor, where moisture often pools beneath the porcelain base. Never force the nut with a wrench, as the bolt can easily snap off inside the flange, turning a simple maintenance task into a costly plumbing repair.
If your toilet rocks even slightly after you tighten the bolts, don’t compensate by over-tightening. This creates immense pressure on the porcelain, which can lead to a hairline crack in the base. Instead, use plastic shims to level the toilet before tightening the nuts by hand, followed by only a quarter-turn with a wrench. A stable, level base prevents the wax ring from breaking its seal, which is the primary cause of slow, hidden leaks that rot subfloors.
Situations requiring a different approach
This hardware approach works for most standard floor-mounted toilets, but it isn’t suitable for wall-hung models. Wall-hung toilets use a carrier system hidden inside the wall, which requires specific heavy-duty threaded rods rather than standard toilet bolts.
If you have a wall-hung unit, don’t attempt to use a floor-mount kit; you must purchase the specific hardware recommended by your toilet manufacturer. Using standard bolts here risks shearing the metal or damaging the internal carrier, leading to a catastrophic leak behind your finished drywall.
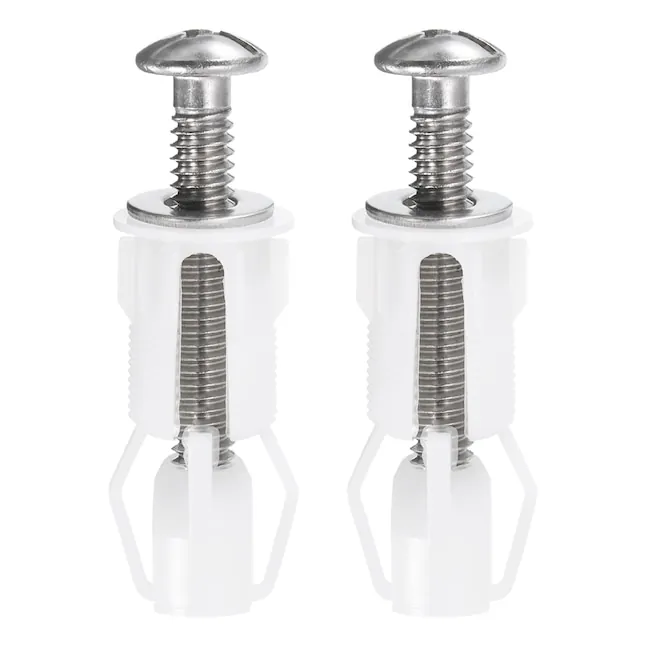
If your toilet features a skirted base, the smooth exterior hides the mounting points entirely. You can’t reach these bolts with a standard wrench or socket. In these cases, you need a top-mounting installation kit that allows you to secure the bolts from above the bowl using a specialized expansion anchor. If you feel the bolt spinning without tightening, stop immediately. You have likely stripped the anchor, which will require cutting the bolt to remove the toilet entirely.
Always check the side of your bowl for small plastic caps. If you see them, you have a top-mount system. If the sides are solid porcelain with no visible bolt covers, you’re dealing with a standard floor-mount.
If you encounter a situation where the floor flange sits more than a half-inch below the finished floor level, don’t rely on extra-long bolts. These will flex and eventually crack the porcelain base. Instead, install a flange extender to bring the connection flush with the floor. This simple addition saves you from a recurring seal failure that ruins subflooring over time.
Related guides
Frequently asked questions
Can I replace the toilet bolts without removing the toilet?
No, you can’t replace the bolts without lifting the toilet because they’re secured by the fixture’s weight. You must lift the toilet to slide the old bolts out of the floor flange and insert new ones. You only need to remove the toilet if you’re performing a full hardware replacement.
How long does a standard wax ring last?
A wax ring generally lasts for 10 to 20 years, provided the toilet base remains stable. If your toilet rocks when you sit on it, the seal will break prematurely and cause leaks. You should replace the ring and bolts immediately if you notice odors or water around the base.
Is it safe to use universal bolt caps?
Yes, universal caps are safe to use as long as they fit over the height of your installed bolts. Most kits come with “snap-on” or “push-fit” designs that accommodate the standard range of bolt lengths. Ensure the cap is made of a durable plastic that won’t crack under pressure. If the cap feels brittle when you press it on, it’s likely poor-quality plastic and may break during installation.
What happens if I overtighten the toilet bolts?
Overtightening the bolts will likely crack the porcelain base of your toilet, which is a permanent and non-repairable failure. You should tighten the nuts until they are “snug” by hand, then use a wrench to provide no more than a quarter-turn. If the toilet still rocks after this, your floor isn’t level, and you should use plastic shims to fill the gap rather than tightening the bolts further.
How do I know if my toilet flange is broken?
You can identify a broken flange if you see cracks in the plastic or metal ring where the bolt slots are located. If the bolt spins in place when you try to tighten the nut, the slot is likely stripped or the flange itself is loose from the subfloor. If the flange is damaged, you must install a repair plate or replace the flange entirely to ensure the toilet remains secure.
Conclusion
Upgrading your bathroom hardware is a simple project that makes a big difference in how your space looks and functions. Once you’ve tightened everything down, you won’t have to worry about loose fixtures for a long time. Take a look at your base today—it’s the perfect time to give your toilet that polished, finished feel.