
If you have an Old Style Old Moen Shower Valve, you know how important it is to keep it working smoothly. Maybe it’s starting to leak or feels hard to turn.
You might be wondering if you should fix it yourself or call a professional. This guide will help you understand what makes your old Moen valve special and show you simple steps to maintain or replace it. By the end, you’ll feel confident about handling your shower valve and keeping your bathroom running perfectly.
Keep reading to discover tips that save you time, money, and frustration.
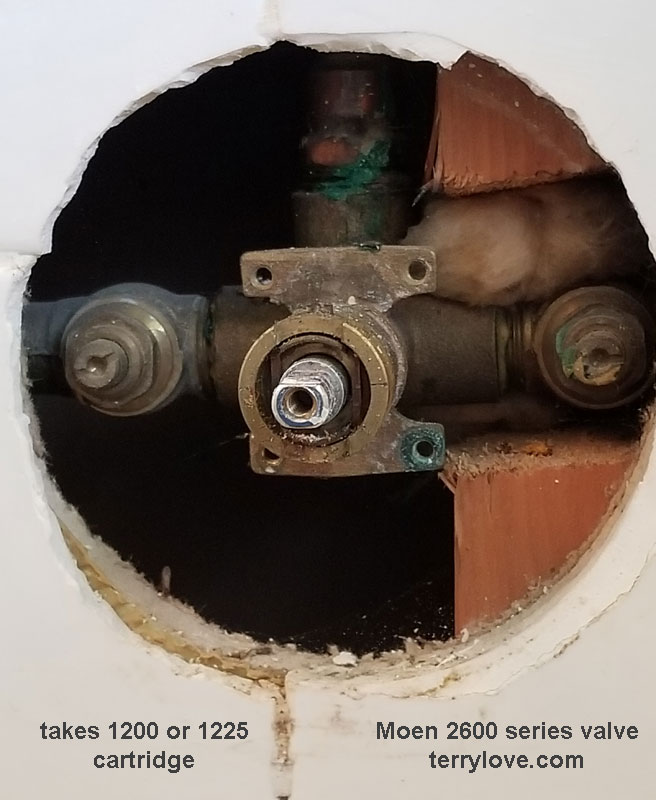
Identifying Old Style Moen Valves
Identifying old style Moen shower valves helps in repairs and replacements. These valves have distinct features that set them apart from newer models. Knowing these traits makes maintenance easier and ensures compatibility with parts.
Common Features And Designs
Old style Moen valves often have brass or metal bodies. They usually include a single handle for water control. The design is simple with fewer moving parts. Some models have a round or slightly oval trim plate. Handles often feature a small screw on top for removal.
How To Locate Model Numbers
Model numbers appear on the valve body or trim plate. Check behind the handle or under the escutcheon plate. Sometimes, numbers are stamped on the valve itself. The numbers help identify the exact valve type and year. Keep a flashlight and mirror handy for better visibility.
Differences From Modern Valves
Old valves lack plastic components common in newer ones. They tend to be heavier due to metal construction. The internal cartridge design is simpler and less efficient. Newer valves often have temperature limit stops, which old ones may miss. These differences affect repair parts and installation methods.
Credit: terrylove.com
Tools Needed For Repair
Repairing an Old Style Old Moen Shower Valve needs the right tools. Having these tools ready makes the task easier. It saves time and helps avoid damage. This section lists the tools needed for a smooth repair.
Basic Hand Tools
Start with common tools found in most toolboxes. A flathead screwdriver and a Phillips screwdriver are essential. You also need an adjustable wrench for nuts and bolts. Needle-nose pliers help grip small parts. A utility knife is useful for cutting old seals or caulk.
Specialized Moen Tools
Some repairs require tools made just for Moen valves. A Moen cartridge puller helps remove the valve cartridge safely. A Moen valve socket fits specific valve nuts. These tools prevent damage to the valve during repair. They ensure the valve works properly after repair.
Safety Equipment
Safety should never be ignored. Wear safety glasses to protect your eyes from debris. Use gloves to avoid cuts and skin irritation. Keep a clean, dry workspace to prevent slips. Turn off the water supply before starting any repair work.
Diagnosing Common Issues
Old Style Old Moen shower valves often last many years but can develop common issues. Knowing how to spot these problems helps you fix them early. Early diagnosis saves water, prevents damage, and keeps your shower working well. Below are common issues you might face with this valve type. Watch for symptoms and signs to know what needs repair.
Leaking Valve Symptoms
Leaks often start as small drips from the showerhead or valve. You may hear water running even when the shower is off. Water stains or puddles around the valve area can show a leak. A leaking valve wastes water and can cause mold or damage behind walls.
Temperature Control Problems
Difficulty setting the water temperature is common. Water may be too hot or too cold despite adjusting the handle. The temperature might change suddenly while showering. These problems suggest worn parts inside the valve or buildup blocking water flow.
Water Pressure Concerns
Low water pressure makes the shower weak and unsatisfying. Pressure may drop only from the shower or affect the whole bathroom. Clogged valve parts or mineral deposits often cause this issue. Sometimes, pipe problems outside the valve reduce pressure.
Step-by-step Repair Process
Repairing an old style Moen shower valve can save money and extend its life. The process is clear and easy to follow with the right steps. Each step focuses on careful handling to avoid damage and ensure the valve works well again.
Shutting Off Water Supply
Turn off the main water supply to the shower. This stops water flow and prevents leaks. Open the shower handle to drain any leftover water. Use a wrench or screwdriver to remove the access panel if needed.
Disassembling The Valve
Remove the handle by unscrewing the set screw. Take off the trim plate carefully. Use a cartridge puller or pliers to remove the cartridge inside the valve. Keep track of all parts for reassembly later.
Replacing Cartridges And Seals
Inspect the cartridge and seals for wear or damage. Replace them with new parts made for old style Moen valves. Apply plumber’s grease to seals before installing. Insert the new cartridge firmly into place.
Reassembling And Testing
Put the trim plate and handle back on. Tighten screws securely but gently. Turn on the water supply slowly. Check for leaks and make sure the shower temperature controls work smoothly.
Maintenance Tips For Longevity
Maintaining your Old Style Old Moen shower valve helps it last longer. Proper care keeps it working smoothly and stops problems early. Simple steps make a big difference in its lifespan. Follow these tips to keep your shower valve in great shape.
Regular Cleaning Practices
Clean the valve surface with a soft cloth and mild soap. Avoid harsh chemicals that can damage the finish. Wipe off water spots after each use to prevent stains. Regular cleaning stops dirt and grime from building up.
Preventing Mineral Buildup
Mineral deposits block water flow and damage parts. Use vinegar to dissolve minerals gently. Soak a cloth in vinegar and wrap it around the valve for 15 minutes. Rinse thoroughly with water afterward. Repeat this process monthly to keep minerals away.
When To Call A Professional
Leaks or low water pressure need expert attention. Strange noises or difficulty turning the valve are warning signs. Avoid forcing the handle to prevent damage. Contact a plumber if problems persist after cleaning. Professionals ensure safe and proper repairs.

Credit: www.reddit.com
Sourcing Replacement Parts
Finding the right replacement parts for an Old Style Old Moen shower valve can be a challenge. These valves are durable but may need repairs over time. Knowing where to get genuine parts helps keep your shower working smoothly. This section guides you through sourcing parts easily and safely.
Authorized Dealers And Websites
Authorized dealers offer original Moen parts. They ensure parts fit and work correctly. You can visit official Moen websites for parts lists. Some dealers have online stores with detailed product info. Buying from authorized sources protects your valve’s warranty. It also reduces the risk of wrong or poor-quality parts.
Aftermarket Alternatives
Aftermarket parts are made by other companies. They can be cheaper and easier to find. Some aftermarket parts match Moen originals closely. Quality varies between manufacturers. Choose reputable brands with good reviews. Avoid parts that look very different or cheap. Poor parts can cause leaks or damage your valve.
Evaluating Part Compatibility
Check model numbers before buying any part. Old Style Old Moen valves have specific designs. Make sure the part matches the valve’s year and type. Review product details and photos carefully. Ask sellers about return policies and warranties. Proper fit is key to avoid installation problems. Using the wrong part may cause your shower to leak or stop working.
Upgrading Vs. Repairing
Deciding between upgrading or repairing your old style Moen shower valve can be tough. Older valves often have a classic look and strong build. Repairing them keeps the original charm. Upgrading brings new features and better performance. Both choices have pros and cons. It is important to know what suits your needs and budget.
Benefits Of Keeping Original Valves
Original valves keep your bathroom’s vintage style. They fit well with old fixtures and tiles. Repairs usually cost less than full replacements. Old valves are made with durable materials. They can last many more years with proper care. Preserving the original valve can add value to your home.
Signs It’s Time To Upgrade
Leaks that won’t stop indicate valve trouble. Low water pressure or uneven temperature is a sign. Frequent repairs add up in cost and hassle. Rust or corrosion means the valve is weakening. Modern valves offer better water control and efficiency. Upgrading can save water and energy over time.
Choosing A Modern Replacement
Pick a valve that matches your shower style and needs. Look for easy-to-use controls and durable materials. Many new valves include anti-scald features for safety. Check compatibility with your existing plumbing system. A good modern valve improves your shower experience. Professional installation ensures proper fit and function.

Credit: www.reddit.com
Frequently Asked Questions
What Is An Old Style Moen Shower Valve?
An old style Moen shower valve controls water flow and temperature. It uses traditional parts and design. These valves are durable and common in older homes.
How Do I Identify My Moen Shower Valve Type?
Look inside your shower handle for model numbers or markings. Check the valve body behind the wall if possible. Older Moen valves usually have metal parts and a simple design.
Can Old Style Moen Valves Be Repaired Easily?
Yes, many old style Moen valves can be repaired with replacement parts. Common fixes include changing cartridges or washers. Repair kits are often available online or at hardware stores.
What Tools Do I Need For Old Moen Valve Repair?
Basic tools include a screwdriver, adjustable wrench, and pliers. You may also need plumber’s grease and replacement parts. Having a flashlight helps when working in tight spaces.
Are Old Moen Shower Valves Compatible With Modern Parts?
Some older Moen valves fit newer cartridges and handles. Check the model number to find compatible parts. Using the right parts ensures a proper fit and better performance.
Why Is My Old Moen Shower Valve Leaking?
Leaks often happen due to worn-out washers or cartridges. Mineral build-up can also cause leaks in old valves. Regular maintenance can prevent these issues.
How Long Do Old Style Moen Shower Valves Last?
These valves can last 20 to 40 years with good care. Frequent use and hard water may shorten their lifespan. Proper maintenance helps keep them working well longer.
Conclusion
Old Style Old Moen Shower Valves bring classic charm to any bathroom. They offer simple controls for water temperature and flow. These valves last long with proper care and maintenance. Easy to find parts make repairs straightforward. Their timeless design fits many home styles well.
Choose these valves for a reliable, familiar shower experience. They blend function and style without complexity. Enjoy steady water flow and simple use every day. A practical choice for those who value tradition and ease.