
Are you noticing strange odors or slow draining in your plumbing? Your air admittance valve (AAV) might be the culprit.
Knowing how to test an air admittance valve can save you from costly repairs and unexpected plumbing issues. You’ll discover simple, step-by-step methods to check if your AAV is working properly. By the end, you’ll have the confidence to spot problems early and keep your plumbing running smoothly.
Keep reading—you don’t want to miss these easy tips that can protect your home and your wallet.

Credit: www.youtube.com
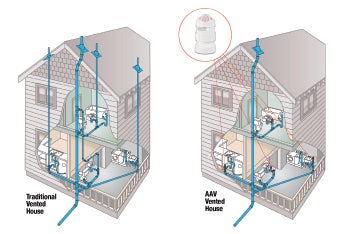
What Is An Air Admittance Valve
An air admittance valve (AAV) is a small device used in plumbing systems. It lets air enter the drainage system when water flows down the pipes. This helps to balance pressure and stops sewer gases from coming inside your home.
AAVs are often installed under sinks or in places where traditional vent pipes are hard to fit. They work silently and keep your plumbing working well.
How Does An Air Admittance Valve Work?
The valve opens when water drains and creates a vacuum in the pipes. Air flows in through the valve to equalize the pressure. After the water passes, the valve closes to block sewer smells.
Where Are Air Admittance Valves Used?
AAVs are common in kitchens, bathrooms, and laundry rooms. They are useful in tight spaces where roof vents are difficult to install. These valves help keep drainage systems safe and odor-free.
Benefits Of Using An Air Admittance Valve
AAVs save space and reduce installation costs. They prevent bad odors and protect your home from sewer gases. The valves require little maintenance and are easy to replace if needed.
Why Test An Air Admittance Valve
Testing an air admittance valve ensures it works properly and prevents bad smells. It helps avoid plumbing problems by checking air flow. Regular tests keep your drainage system safe and efficient.
Testing an air admittance valve (AAV) helps keep your plumbing working well. The valve allows air into the plumbing system to balance pressure. This stops bad smells and sewer gases from entering your home.
Over time, an AAV can get stuck or break. If it fails, water may drain slowly or make gurgling sounds. Testing finds these problems early. This avoids bigger plumbing issues and costly repairs.
Regular testing ensures the valve opens and closes correctly. It helps maintain good airflow and proper drainage. A working valve protects your home’s air quality and plumbing health.
Testing an AAV also confirms it meets building codes. This is important for safety and home inspections. It gives peace of mind that your plumbing is safe and efficient.
Tools Needed For Testing
Testing an air admittance valve (AAV) requires a few simple tools. These tools help check if the valve works properly. They ensure the valve allows air in and stops sewer gases from escaping. Gathering the right tools makes the test easier and more accurate.
Most tools are common and easy to find. Some are basic household items, while others might need a quick trip to a hardware store. Having everything ready saves time and avoids frustration during testing.
Flashlight
A flashlight helps see inside the valve and plumbing. Many AAVs are in dark or tight spaces. Bright light reveals dirt, damage, or blockages that affect performance. Choose a small, bright flashlight for better access.
Pressure Gauge
A pressure gauge measures air pressure in the pipe. It shows if the valve opens and closes at the right time. This tool confirms the valve reacts correctly to pressure changes. Digital gauges are easy to read and offer quick results.
Vacuum Pump
A vacuum pump creates suction to test the valve’s opening. It simulates airflow to check if the valve admits air properly. This tool helps detect leaks or stuck valves. Manual or electric pumps work well for this task.
Soap Solution
Soap solution detects leaks around the valve. Apply it to valve joints and watch for bubbles. Bubbles mean air is escaping, showing a problem. Mixing a simple soap and water solution works fine.
Gloves
Gloves protect hands from dirt and sharp parts. They keep the test cleaner and safer. Use disposable or work gloves for comfort and hygiene.
Credit: www.oatey.com
Preparing The Valve For Testing
Preparing an air admittance valve for testing is an important first step. It helps ensure accurate results and avoids mistakes. Careful preparation makes the testing process smooth and effective.
Start by checking the valve for visible damage or dirt. Any cracks or blockages can affect its function and test results.
Turn Off Water Supply
Stop water flow to the valve area. This prevents leaks or pressure changes during testing. Use the main shutoff valve or the local valve near the air admittance valve.
Remove Valve Cap
Take off the valve cap gently. This exposes the inside for inspection and testing. Handle the cap carefully to avoid damage or loss.
Clean The Valve
Wipe the valve with a clean cloth. Remove dust, dirt, and debris. Clean valves give more accurate testing outcomes.
Check Valve Position
Make sure the valve is upright and correctly installed. Incorrect positioning can cause false test results. The valve should sit straight on the pipe.
Step-by-step Testing Process
Testing an air admittance valve is simple. Follow a clear, step-by-step process to check if it works well. This helps avoid plumbing problems and keeps air flowing properly in your pipes. Each step focuses on a key part of the valve’s function.
Check For Visible Damage
Start by looking at the valve closely. Check for cracks, dirt, or any signs of wear. A damaged valve may not seal properly. Clean the valve gently if there is dirt. Replace the valve if you find any broken parts.
Perform The Suction Test
Cover the valve opening with your hand. Try to pull air out from the pipe below. You should feel a slight suction. If you do not, the valve might be stuck or blocked. This test shows if the valve opens correctly under pressure.
Listen For Proper Valve Operation
Flush a nearby drain or run water through the pipe. Listen carefully near the valve. You should hear a soft click or pop sound. This means the valve is opening and closing as it should. No sound might mean the valve is stuck or broken.
Test Under Different Conditions
Check the valve during different water flow times. Test it when water flows fast and slow. The valve should open quickly and close tightly in all cases. Testing under various conditions ensures the valve works well all day.
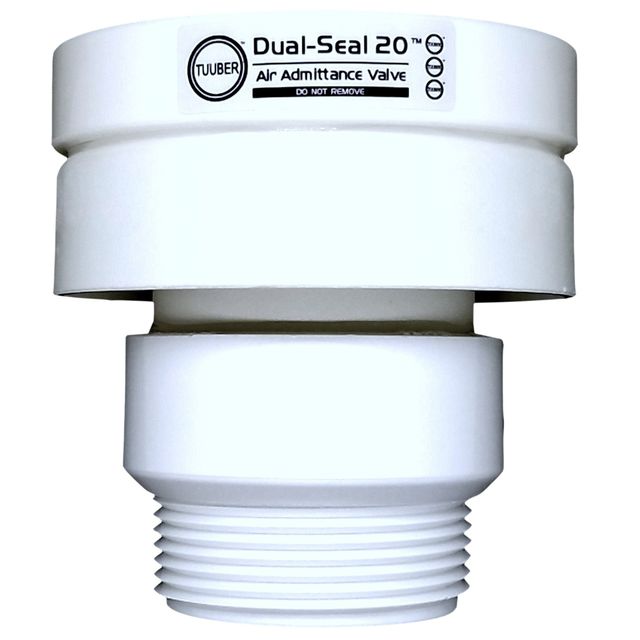
Credit: www.tuubervalves.com
Common Issues Found During Testing
Testing an air admittance valve (AAV) can reveal common issues that affect its function. These problems can cause bad odors, slow drainage, or water backup. Knowing what to look for helps fix the valve quickly. Here are some common issues found during testing.
Valve Not Opening Properly
The valve may fail to open when air pressure changes. This stops air from entering the plumbing system. It causes slow drainage and gurgling sounds. Dirt or debris often blocks the valve flap. Cleaning or replacing the flap can solve this problem.
Valve Stuck Open
Sometimes the valve stays open all the time. This lets sewer gases escape into the home. The cause is usually a worn or damaged seal inside the valve. Replacing the seal or the entire valve stops the smell.
Cracks Or Physical Damage
Cracks in the valve body let water leak out. Damage can happen from improper installation or aging parts. Even small cracks reduce the valve’s effectiveness. Inspect the valve carefully for any cracks or breaks.
Wrong Valve Size
A valve that is too small or too large may not work well. It can cause pressure problems in the plumbing system. Always check the valve size matches the pipe size during testing.
Improper Installation
Installing the valve upside down or at the wrong angle causes issues. Air may not flow correctly through the valve. Verify the valve is installed as per manufacturer instructions.
When To Replace The Valve
Knowing when to replace an air admittance valve is key to keeping your plumbing working well. The valve controls air flow and stops sewer gases from entering your home. Over time, the valve may wear out or get blocked. This can cause bad smells or slow drainage. Watch for signs that the valve is not working right. Early replacement can avoid bigger plumbing problems later.
Signs Of Valve Failure
Listen for gurgling sounds near drains. This often means the valve is stuck or clogged. Notice any bad odors coming from sinks or drains. These smells suggest the valve is letting sewer gases escape. Check for slow draining water. A faulty valve can cause water to drain poorly. These signs show the valve needs replacement.
Age Of The Valve
Most air admittance valves last about 5 to 7 years. Older valves may lose their ability to open and close properly. If the valve is beyond this age range, replacing it can prevent future issues. Regular checks help spot aging valves early.
Physical Damage Or Wear
Inspect the valve for cracks or visible damage. Dirt and debris can build up inside and block airflow. Any damage or heavy dirt means the valve should be replaced. Clean valves work best but damaged ones can cause problems.
Maintenance Tips For Longevity
Maintaining an air admittance valve (AAV) helps keep it working well for years. Regular care stops common problems like blockages and leaks. Simple checks and cleaning can save time and money later.
Follow these tips to make your valve last longer and work better.
Keep The Valve Clean
Remove dust and dirt from the valve surface often. Use a soft cloth to wipe it gently. Avoid using harsh chemicals that can damage the valve parts.
Check For Blockages
Look inside the valve for any debris or buildup. Clear away hair, dust, or any small items that might block airflow. A clear valve lets air flow smoothly.
Inspect The Seal
Check the rubber seal on the valve for cracks or damage. A worn seal can cause leaks and reduce valve efficiency. Replace the seal if it looks old or broken.
Test The Valve Regularly
Open and close the valve a few times to ensure it moves freely. A stuck valve may need cleaning or replacement. Testing helps catch problems early.
Protect From Moisture
Keep the valve dry to avoid rust and corrosion. Moisture can damage metal parts and affect performance. Use a cover if the valve is in a damp area.
Frequently Asked Questions
What Is An Air Admittance Valve Used For?
An air admittance valve allows air into plumbing drains. It helps prevent sewer gases from entering your home. It also balances air pressure in the pipes.
How Do I Know If My Air Admittance Valve Is Working?
Listen for gurgling sounds or slow drainage. A working valve opens to let air in and closes tightly. Check for bad smells near the valve as well.
Can I Test An Air Admittance Valve Myself?
Yes, you can test it by covering the valve opening. Run water through the drain and see if air flows properly. If water drains without noise, the valve works.
How Often Should I Test My Air Admittance Valve?
Test your valve once a year to ensure it functions well. Regular checks prevent plumbing problems and foul odors. Replace it if it shows signs of damage or wear.
What Tools Do I Need To Test An Air Admittance Valve?
You only need your ears and eyes for most tests. A flashlight helps to inspect inside the valve. A bucket or cloth can catch any water during testing.
Can A Faulty Air Admittance Valve Cause Plumbing Issues?
Yes, a bad valve can cause slow drains and bad smells. It may also let sewer gases enter your home. Fixing or replacing it can stop these problems.
Is It Safe To Test An Air Admittance Valve Myself?
Testing is safe if you follow simple steps carefully. Avoid using sharp tools near the valve to prevent damage. If unsure, call a professional plumber for help.
Conclusion
Testing an air admittance valve is simple and important. It helps keep your plumbing working well. Check the valve regularly for any blockages or leaks. Use basic tools and follow safety steps carefully. A well-tested valve stops bad smells and air problems.
Regular checks save you from costly repairs later. Keep your home’s plumbing fresh and clean. Testing takes little time but gives great peace of mind. Stay on top of maintenance to avoid surprises. Your air admittance valve protects your pipes and home’s air quality.