
Are you looking to give your kitchen a fresh, eye-catching makeover without spending a fortune? Painting a checkerboard pattern is a simple and stylish way to add personality and charm to your space.
Imagine stepping into your kitchen and seeing a bold, classic design that instantly brightens the room and impresses every guest. In this guide, you’ll discover easy, step-by-step instructions to create a perfect checkerboard pattern—even if you’ve never painted before. Ready to transform your kitchen floor or walls with a timeless look?
Let’s get started!
Choosing The Right Paint And Tools
Choosing the right paint and tools is a key step for a perfect checkerboard pattern. Good choices make the work easier and the finish better. The right paint ensures bright colors that last. The right tools help create sharp lines and clean edges. This section guides you through selecting colors, gathering supplies, and preparing the surface.
Selecting Paint Colors
Pick two contrasting colors for the checkerboard. Classic black and white always stand out. Bright colors like red and white add energy. Choose paint made for kitchens or high-traffic areas. These paints resist stains and moisture. Semi-gloss or satin finishes work best for easy cleaning.
Gathering Essential Supplies
Collect all needed tools before starting. You will need painter’s tape for sharp edges. Use a small roller for smooth coverage. A paintbrush helps with corners and edges. A level or ruler is necessary to mark squares. Have a pencil or chalk for drawing lines. Keep a drop cloth to protect floors and counters.
Preparing The Painting Surface
Clean the walls thoroughly to remove dirt and grease. Sand the surface lightly for better paint grip. Repair any holes or cracks with filler. Wipe away dust after sanding. Use painter’s tape to mark your checkerboard grid. Press the tape firmly to avoid paint bleeding. Smooth preparation leads to a neat, long-lasting pattern.
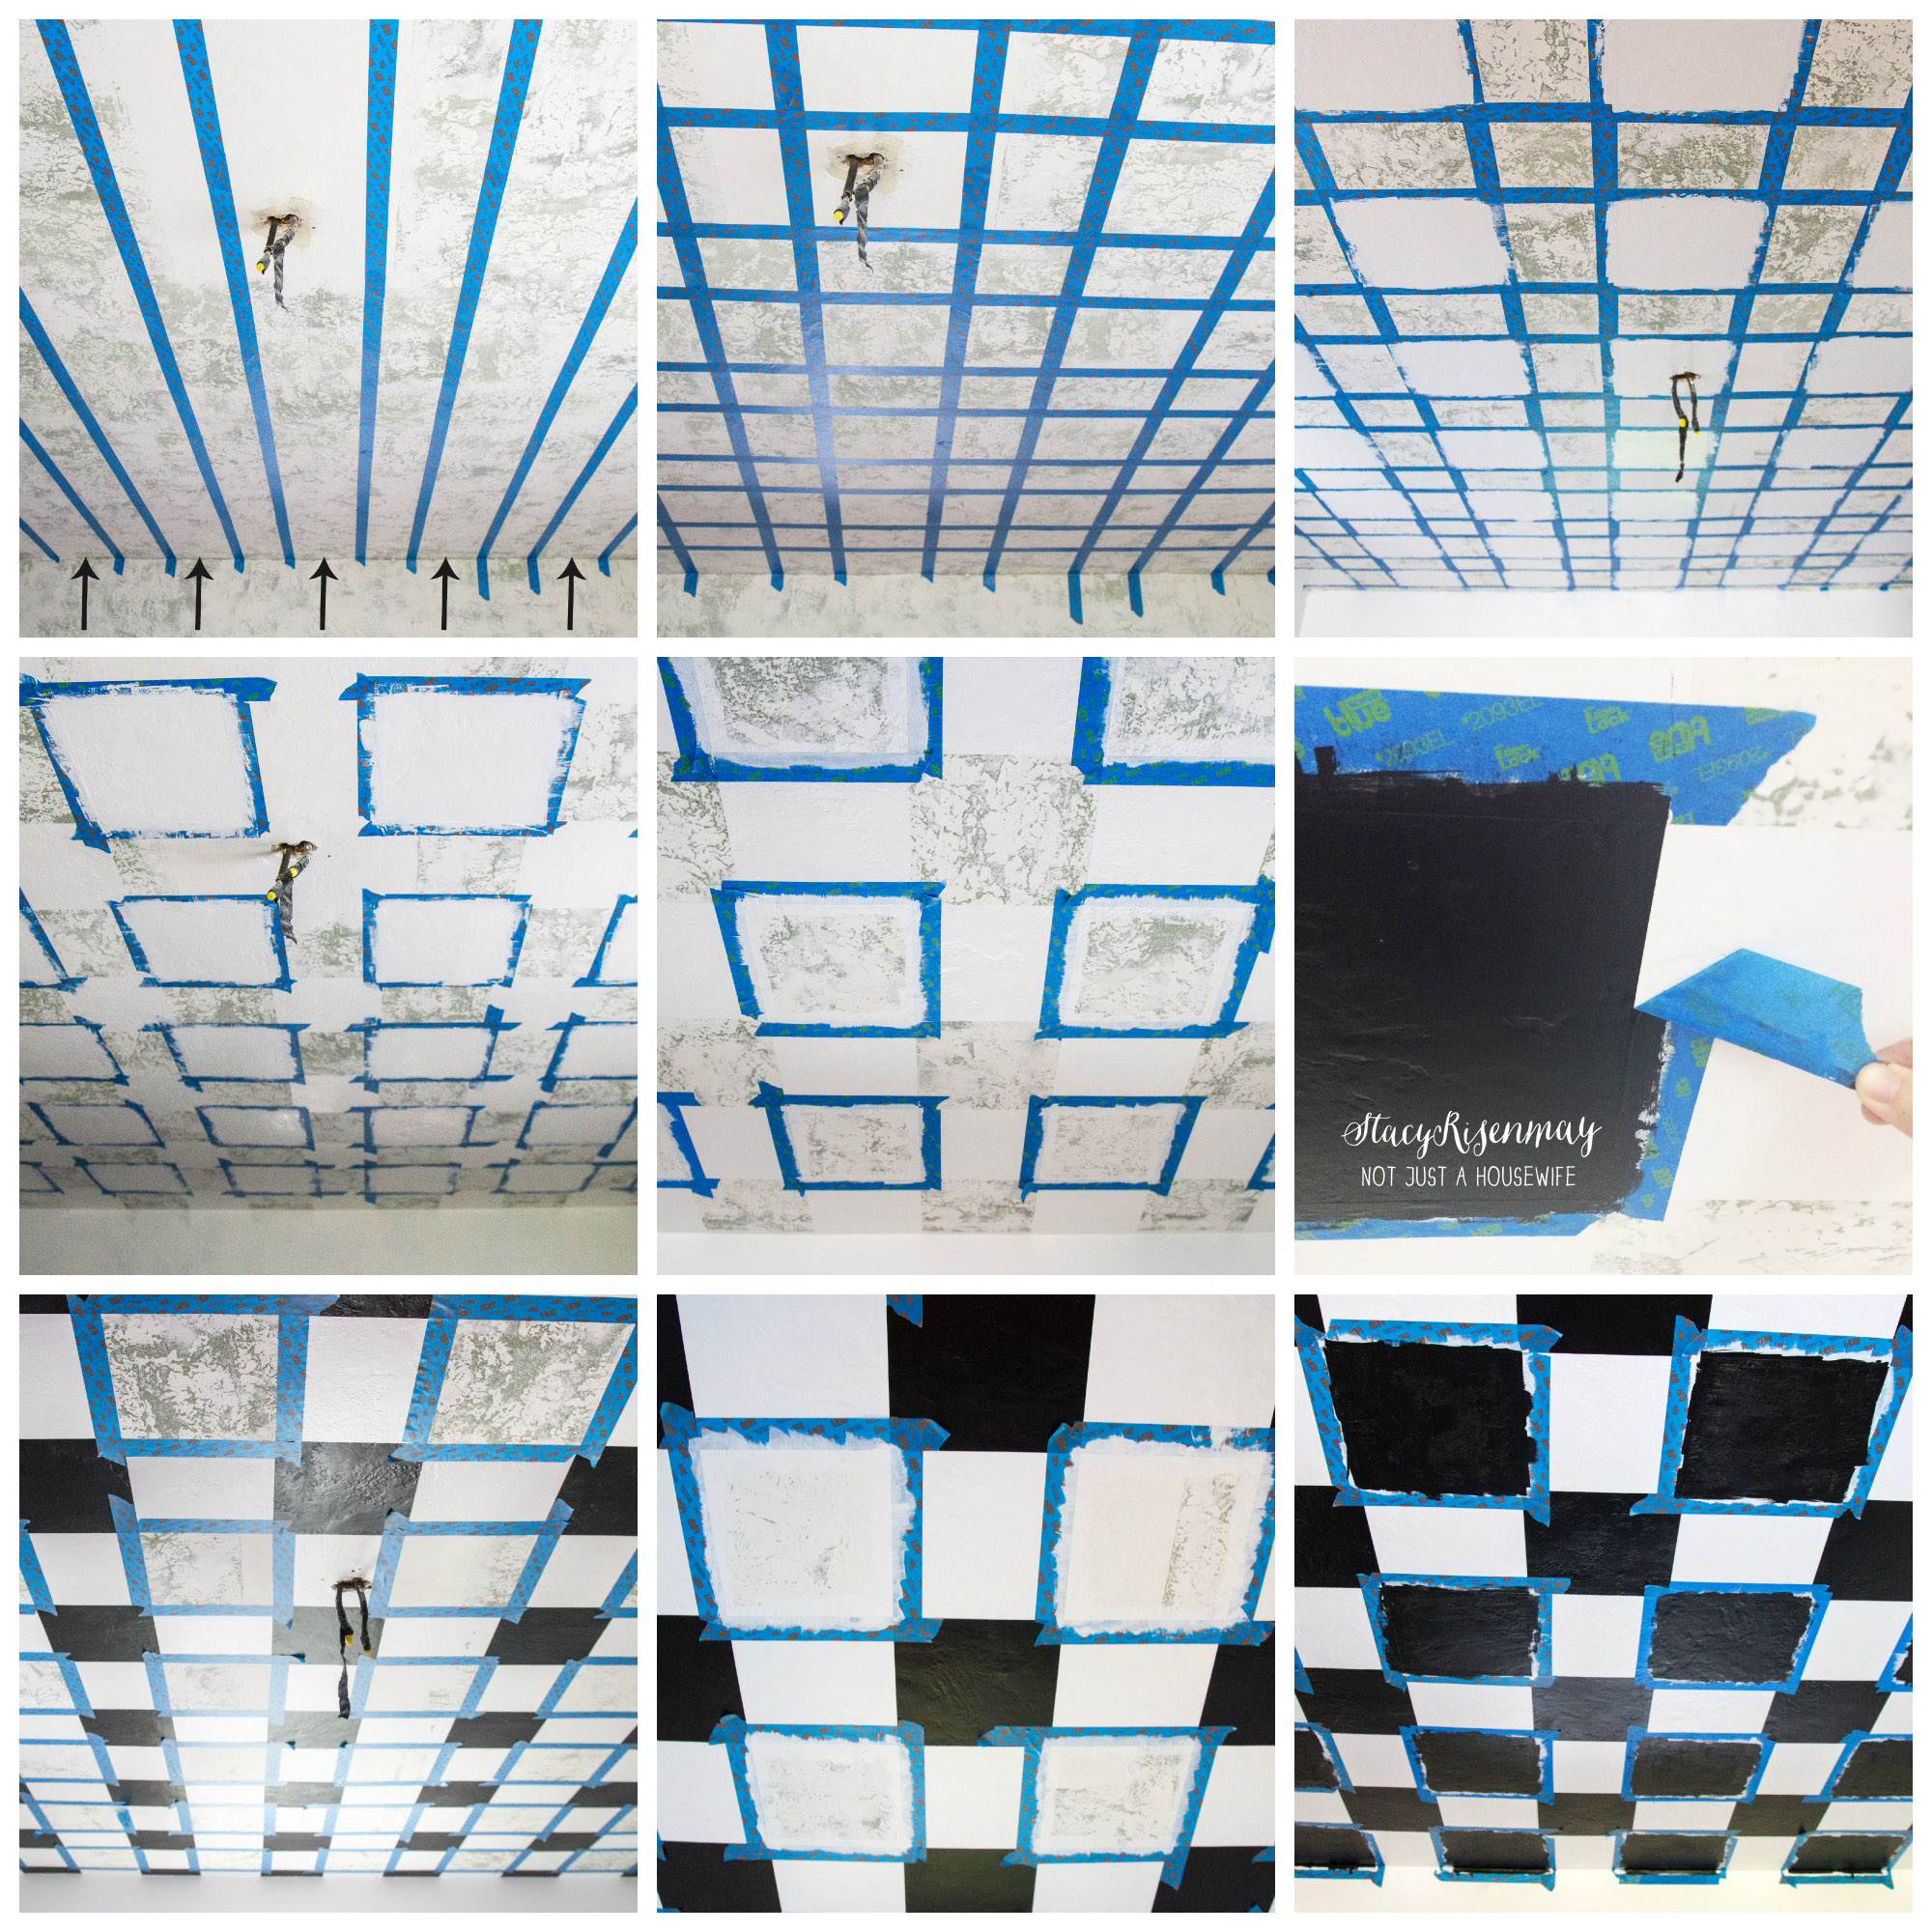
Credit: www.notjustahousewife.net
Preparing The Kitchen Wall
Preparing the kitchen wall is the first step to a perfect checkerboard pattern. A smooth, clean surface helps paint stick better and last longer. Skipping this step may cause uneven color or peeling later. Take your time to prepare well for the best results.
Cleaning And Sanding
Start by wiping the wall with a damp cloth to remove dust and grease. Use a mild soap solution if needed. Let the wall dry completely. Lightly sand the surface with fine-grit sandpaper. Sanding smooths rough spots and creates a better surface for paint. Wipe away sanding dust with a clean cloth.
Fixing Imperfections
Check the wall for holes, cracks, or dents. Use spackling paste or wall filler to fill these spots. Apply it with a putty knife and smooth it out. Let the filler dry as per instructions. Sand the patched areas until they are flush with the wall. Clean the dust after sanding.
Applying Primer
Choose a good quality primer suited for kitchen walls. Use a roller or brush to apply a thin, even coat. Primer seals the wall and improves paint adhesion. Allow the primer to dry fully before painting. Proper priming ensures your checkerboard pattern looks sharp and lasts longer.
Measuring And Marking The Checkerboard
Measuring and marking the checkerboard pattern is an important step before painting. It helps create even squares and keeps the design neat. Take your time to measure carefully. This will save you from mistakes later. Use the right tools to make straight lines and perfect squares.
Determining Square Size
Decide how big each square should be. Common sizes range from 6 to 12 inches per square. Consider the size of your kitchen wall or floor. Smaller squares fit better in tight spaces. Larger squares work well on big surfaces. Use a tape measure to mark the size on your wall or floor.
Using A Level And Pencil
Use a level to draw straight lines. It makes sure your lines are not crooked. Mark light lines with a pencil. These lines will guide your painting. Avoid pressing too hard to keep the pencil marks easy to erase later. Double-check the lines with the level before moving on.
Creating A Grid
Draw parallel lines across the surface. Space them evenly based on your square size. Then draw lines perpendicular to the first set. This creates a grid of squares. The grid helps keep the checkerboard pattern precise. Check each intersection to ensure the lines meet correctly. Adjust if needed before painting starts.

Credit: www.addicted2decorating.com
Taping The Pattern
Taping the checkerboard pattern is a key step for neat, sharp lines. It helps keep the squares even and the paint from bleeding. Proper taping makes the pattern look professional and clean. Take your time to tape carefully. This step sets the foundation for a beautiful kitchen floor or wall.
Choosing The Right Tape
Use painter’s tape designed for delicate surfaces. It peels off easily without damaging paint. Choose tape about 1 inch wide for better control. Avoid regular masking tape; it can leave residue. Pick tape with a clean edge for sharp lines.
Applying Tape For Clean Lines
Measure and mark your pattern lightly with a pencil. Place the tape along the marks slowly and straight. Press the tape down firmly to avoid gaps. Overlap the tape slightly at corners for full coverage. Smooth the tape with a flat tool or your finger.
Ensuring Tape Adhesion
Press the tape edges firmly to stop paint from seeping. Run a putty knife or credit card along the tape edge. Check for any loose spots and press again. Avoid stretching the tape, as it may lift when removed. Good adhesion means crisp, clean checkerboard squares.
Painting The Checkerboard Squares
Painting the checkerboard squares is a fun and creative part of your kitchen makeover. It requires careful steps to get clean, sharp lines and even colors. Follow the right order to make your pattern look professional and neat.
Start by applying the first color to the selected squares. Take your time and use good-quality paint for a smooth finish. After the first color dries, add the second color to the remaining squares. This method keeps the colors crisp and prevents smudging.
Applying The First Color
Begin by taping the edges of the squares you want to paint first. Use painter’s tape to create clean borders. Apply the first color with a small roller or brush. Paint evenly and avoid thick layers. Let the paint cover the surface fully. Allow the paint to dry before removing the tape.
Letting Paint Dry
Drying time is very important for a neat result. Wait at least two hours or follow the paint label instructions. Make sure the paint is completely dry to the touch. This step stops colors from mixing or bleeding. Do not rush. Patience helps achieve sharp lines.
Painting The Second Color
Once the first color is dry, tape the edges of the remaining squares. Use clean painter’s tape to protect the painted areas. Apply the second color carefully inside the taped squares. Use smooth strokes for even coverage. Allow this paint to dry fully before removing tape.
Finishing Touches
Finishing touches make your checkerboard pattern look neat and complete. These steps protect your work and improve its appearance. Handle this part with care for the best results.
Removing Tape Carefully
Peel off the painter’s tape slowly. Pull the tape back at a 45-degree angle. This helps avoid peeling off any paint. Remove the tape while the paint is still slightly wet. It keeps edges crisp and clean. Use a sharp blade if paint bleeds under the tape.
Touching Up Edges
Check all the edges for any paint mistakes. Use a small brush to fix thin or uneven lines. Dab gently to avoid smudging. Match your paint color exactly for a seamless look. Take your time; neat edges make a big difference.
Applying A Protective Sealant
Choose a clear sealant to protect your paint. Use a polyurethane or water-based varnish. Apply thin coats with a clean brush. Let each coat dry completely before adding another. Sealants prevent scratches and make cleaning easier. Your checkerboard will stay fresh for years.
Maintaining Your Checkerboard Wall
Maintaining your checkerboard wall keeps your kitchen bright and fresh. Regular care helps the paint last longer and look new. Small efforts prevent damage and keep the pattern sharp. Follow easy steps to care for your wall without stress.
Cleaning Tips
Use a soft cloth or sponge for cleaning. Avoid harsh scrubbers that can scratch the paint. Mix mild soap with water for gentle cleaning. Wipe the wall softly to remove dirt and stains. Dry the surface with a clean towel to stop water marks.
Handling Wear And Tear
Check your wall regularly for chips or scratches. Touch up small spots with matching paint. Keep extra paint handy for quick fixes. Use painter’s tape to protect edges during repairs. Repair damage early to keep your wall looking great.

Credit: mollyinmaine.com
Frequently Asked Questions
How Do I Prepare The Kitchen Floor For Painting?
Start by cleaning the floor thoroughly to remove dirt and grease. Sand the surface lightly for better paint adhesion. Use painter’s tape to mark the edges. Ensure the floor is dry before applying primer and paint.
What Paint Type Is Best For A Checkerboard Floor?
Use durable floor paint or porch and patio paint. These paints resist wear and are easy to clean. Choose a paint with a satin or semi-gloss finish for durability and shine.
How Do I Create Even Squares For The Checkerboard?
Measure and mark the floor with a ruler and chalk line. Use painter’s tape to outline each square precisely. Ensure the squares are equal in size for a neat pattern.
Can I Paint A Checkerboard On Kitchen Walls Instead?
Yes, you can paint a checkerboard pattern on kitchen walls. Use wall paint and painter’s tape for clean lines. This adds a bold, stylish accent to your kitchen decor.
Conclusion
Painting a checkerboard pattern in your kitchen adds charm and style. Careful measuring and clean lines make the design stand out. Take your time and follow each step with patience. Choose colors that match your kitchen’s mood. Enjoy the process and the fresh new look.
This simple project can brighten your space quickly. A little effort brings big visual change. Ready to paint? Your kitchen will thank you.