
A pool needs one skimmer for every 400 square feet of water surface, which is the industry standard most builders follow to determine how many units are required. A 400-square-foot pool gets one unit, while an 800-square-foot pool requires two to keep the surface clean.
The shape of your pool, where the wind pushes debris, and your pump’s flow rate all change what works in your own yard. The rest of this page explains how those three things shift the count so you don’t end up with dead spots on the water.
Who needs more than one pool skimmer
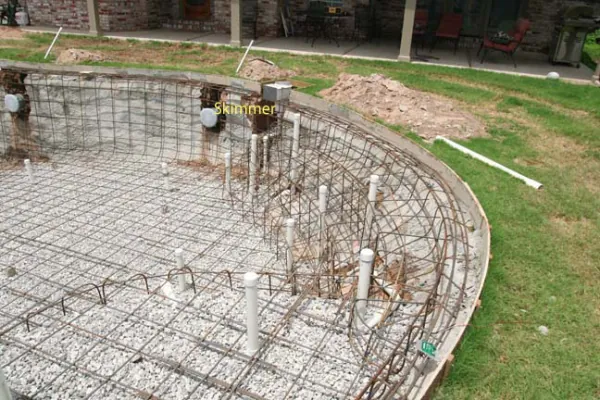
Three different people search for this answer, and they don’t all need the same advice. The first owns a small rectangular pool under 400 square feet and just wants to know if the single unit they already have is enough. They don’t need extra plumbing or another hole cut into the deck.
The second person is planning a new build or a major renovation. Their pool will be 600 to 1,000 square feet, maybe L-shaped or freeform. They need to know exactly where to place multiple units so the plumbing reaches each one without losing suction. This page serves them best, because it covers spacing, pipe sizing, and placement against the wind.
The third person has a pool that stays dirty no matter what they try. They’re searching because their current setup isn’t working. But adding hardware won’t fix a broken pump or a clogged main drain. If that’s your situation, you need a circulation diagnostic, not a guide on adding equipment. Read your pump’s manual or call a licensed pool technician instead.
Everything below assumes you’re building or replumbing a standard concrete or vinyl pool with a single-speed or variable-speed pump running through a shared suction line. If you have a pre-fabricated above-ground pool with a clip-on intake, the math here doesn’t apply to your setup.
What changes the number you actually need
Surface area is the starting point, but it isn’t the only thing that moves the count. The Association of Pool & Spa Professionals (APSP) sets the baseline at one unit per 400 square feet of water surface, and that’s where your calculation begins. Measure your pool’s length and width in feet, multiply them together, and divide by 400. Round up to the next whole number.
Wind direction matters almost as much as size. Debris drifts downwind and piles up against one wall. If your yard funnels wind across the long axis, put your units on the downwind side. A pool with perfect math but bad placement still collects leaves in the far corner. Stand in your yard on a breezy afternoon and watch which way the grass bends—that’s where your skimmers belong.
Pool shape breaks the simple math. A long, narrow lap pool might be 600 square feet but stretch 60 feet in length. One unit at the end can’t pull debris from 60 feet away. If your longest straight run exceeds 30 feet, split the count between both ends even if the total area only asks for one.
Pump flow rate is the factor people get wrong most often. Each skimmer handles about 30 to 50 gallons per minute (GPM). If your pump pushes 90 GPM and you only install one unit rated for 50 GPM, the excess suction pulls air through the weir door or strains the pipes.
Match your total pump output to the combined rating of your installed units. Check your pump’s spec plate for its rated GPM at your specific head height—if you can’t read the plate, your installer’s paperwork has it.
How to plan and place pool skimmers
Getting the count right only works if you install them correctly. Follow these steps in order, because each one relies on the measurement before it.
- Measure your pool’s surface area in square feet. Multiply the length by the width for rectangles; break freeform shapes into smaller rectangles, measure each one, and add the totals together.
- Divide that total area by 400. Round up to the nearest whole number. That’s your base count assuming average wind conditions.
- Walk around the pool area during a windy part of the day. Note which wall the wind blows toward. Assign at least half your total count to that downwind wall.
- Space the units evenly along their assigned walls. Keep them at least 10 feet apart so their suction zones don’t overlap and fight each other.
- Size the plumbing for the total flow. Two units sharing a line need 2-inch PVC pipe to handle up to 70 GPM without excessive friction loss. A single unit can use 1.5-inch pipe for flows under 45 GPM.
- Set the waterline mark. The opening should sit so the normal water level falls exactly halfway up the throat. Too high and it won’t skim; too low and it gulps air.
- Install isolation valves on each suction line before they merge at the pump. This lets you shut off one unit if it clogs without draining the whole system.
The judgment call that separates a working system from a frustrating one is balancing the valves. After everything is plumbed and filled, open all valves fully and watch the weir doors. If one flaps wildly while another barely moves, close the valve on the strong one by quarter-turns until both weirs hold a steady, gentle angle. You’re matching the draw, not maximizing it.
If cutting into existing concrete or rerouting underground plumbing feels beyond your tools, stop after step 3. Hand your layout sketch to a licensed pool contractor who carries the insurance to modify structural shells safely.
Situations that change the count
Different pool setups demand different approaches. Here’s how the common situations compare when you’re deciding what to install.
| Situation | What to do | Effort needed | Watch out for |
|---|---|---|---|
| Under 400 sq ft | Install one unit | Low plumbing work | Weir door sticking shut |
| 400–800 sq ft | Install two units | Moderate trenching | Unbalanced suction between lines |
| Over 800 sq ft | Three or more | High cost, pro help | Pump starving for water volume |
| Long lap pool | One at each end | Extra pipe runs | Dead zone in the middle section |
| Heavy tree cover | Add one extra unit | Basket cleaning daily | Clogged pipes from fine debris |
| Infinity edge | Use perimeter overflow | Complete redesign | Standard units won’t fit design |
| Above-ground pool | Use floating type | No plumbing required | Hose kinking near the intake |
Each row assumes a standard residential pump pushing 40 to 60 GPM total. If your pump runs higher, you’ll need larger pipes or additional units to split the load safely.
Details that keep pool skimmers working

Placement against the wind
Water doesn’t move debris randomly. Wind creates surface currents that push pollen, bugs, and leaves in one direction. Placing a unit on the upwind side means it fights the current instead of using it.
Face the opening directly into the prevailing breeze. If your yard has crosswinds that shift with the seasons, position two units on adjacent walls rather than opposite ones. This catches the drift no matter which way the weather turns.
Don’t hide them behind ladders or diving boards. Obstructions within 2 feet of the mouth create eddies that push debris back into the center of the pool. Keep the approach clear so water flows smoothly into the throat.
Matching flow to the pump
A unit that draws too fast creates a vortex that pulls air into the plumbing. Air in the pump basket causes cavitation, which sounds like gravel rattling inside the housing and wears out seals quickly.
Set the isolation valve so the weir door floats at roughly a 45-degree angle when the pump runs on its normal speed setting. If you have a variable-speed pump, balance the valves at the lowest RPM you use for daily filtration, not the high speed reserved for vacuuming.
Check the pipe diameter before you pour concrete. Running 60 GPM through a 1.5-inch pipe creates friction that starves the pump. Use 2-inch PVC for any shared line carrying more than 45 GPM. Your pump manufacturer publishes maximum flow rates for each pipe size—match your total unit count to those limits.
Pool skimmer problems and fixes
When something goes wrong at the waterline, the symptoms tell you exactly where to look. Here are the issues you’ll actually see and how to handle them.
| What you notice | What it usually means | What to do first | How to stop it happening again |
|---|---|---|---|
| Loud gurgling noise | Water level too low | Fill pool to mid-throat | Set autofill float correctly |
| Basket fills hourly | Heavy debris load nearby | Empty basket before pump run | Trim overhanging branches back |
| Weak surface pull | Clogged pipe or basket | Clear basket, check valve | Clean lines every season |
| Weir door stuck | Warped plastic or debris | Remove door, clear track | Replace warped door promptly |
| Air bubbles returning | Suction leak at lid | Lubricate O-ring with silicone | Check lid seal monthly |
| Only one works well | Valves unbalanced | Adjust isolation valves slowly | Mark balanced positions clearly |
| Debris blows back out | Wind stronger than suction | Close valve slightly to deepen draw | Install windbreak fencing nearby |
Don’t ignore the gurgling sound. Running a pump dry for even 15 minutes melts the mechanical seal inside the housing, turning a five-minute water top-off into a repair bill. If adjusting the water level and clearing the basket doesn’t restore quiet operation, turn the pump off and call a service technician.
Rules that govern pool skimmers
The APSP sets the standard used across the US: one skimmer per 400 square feet of surface area. Local building departments adopt this figure into their residential codes, but enforcement varies by county. Before you cut into a deck or pour a new shell, check your local building department’s swimming pool code page for the exact requirement in your jurisdiction.
Some states add rules about anti-entrapment covers. The Virginia Graeme Baker Pool and Spa Safety Act requires compliant drain covers on all public pools and spas, and while residential pools aren’t federally mandated to retrofit, many local inspectors apply similar safety logic to suction outlets. Never remove a grate to increase flow—that exposes the suction pipe directly, creating a hazard.
If you’re tying multiple units into a single pump, the plumbing must include isolation valves. Building codes in most US jurisdictions require a way to shut off individual suction lines without draining the system. Skipping these valves to save money fails inspection in areas that enforce the International Swimming Pool and Spa Code (ISPSC).
For commercial pools, hotels, or apartment complexes, the health department enforces stricter ratios, sometimes requiring one unit per 200 square feet depending on bather load. Don’t apply residential math to a commercial site. A licensed commercial pool engineer needs to stamp those plans.
What adding skimmers costs
The price depends entirely on whether you’re building new or cutting into an existing deck. During new construction, adding a second unit costs little relative to retrofitting because the trench is already open, covering only the body and the plumber’s time to run an extra 2-inch PVC line back to the equipment pad.
Retrofitting is where the money goes. Cutting a concrete deck, trenching new pipe, patching the shell, and restoring the coping is expensive relative to new construction depending on your region and how far the equipment pad sits from the pool wall. Distance is the biggest cost driver—every extra foot of trench adds labor and pipe.
Running costs stay low. The pump uses the same electricity whether it pulls through one throat or three, as long as the total flow rate matches the pump’s curve. You’re just splitting the existing suction across more points.
The trade-off is maintenance time. Each unit has a basket you need to empty. If you have heavy tree cover, going from one basket to three means tripling your daily cleanup effort during autumn. If you hate daily chores, a robotic surface cleaner might serve you better than adding more fixed plumbing. Prices for materials and labor shift constantly, so get three written quotes from local contractors before committing to a retrofit.
Keeping them clear after installation
Once the plumbing is set, maintenance comes down to the basket and the weir door. How often you pull the basket out depends on use, and the owner’s manual is the authority. Rinse it with a hose rather than banging it against the deck, which cracks the plastic rim over time.
The weir door—the flap that swings at the mouth—needs to move freely. Algae and calcium buildup stiffen the hinges. Wipe the hinge pins with a damp cloth once a month. If the door warps in the sun and sticks, replace it immediately; a stuck-open door lets collected debris wash back out when the pump shuts off.
In freezing climates, winterizing means pulling the baskets, plugging the throats with expansion plugs, and blowing the lines clear with compressed air. Leaving water in the pipe invites ice expansion that cracks the body from the inside. Your closing procedure should match the winterization steps printed in your pool builder’s manual or the unit manufacturer’s documentation.
Watch the waterline tile for scum rings. A thick ring right at the lip means the unit isn’t pulling hard enough, either because the basket is full or the valve is closed too far.
When adding skimmers won’t fix it

Adding hardware doesn’t solve every surface problem. If your water stays cloudy but the baskets are empty, the issue is filtration media, not surface collection. Backwash your sand filter or replace the DE grids before you spend money on new plumbing.
If you have an infinity-edge or negative-edge pool, traditional wall-mounted units fight the design. These pools rely on a perimeter overflow trough to catch debris. Forcing a standard box into that wall disrupts the hydraulic balance. Consult a specialist in perimeter-overflow systems instead.
If your pump is undersized for the pool’s total volume, adding another suction point just starves the existing one. Calculate your pool’s gallon capacity and verify your pump can turn it over in 8 hours. If it can’t, upgrade the pump motor or impeller first.
Installing more intakes on a weak pump risks damaging the impeller and seals from cavitation. If you hear grinding noises from the pump housing, turn it off and contact a licensed electrician or pool mechanic—don’t keep adjusting valves hoping the noise stops.
Related guides
Frequently asked questions
Can I add a skimmer to an existing pool?
Yes, but it requires cutting the pool shell and trenching new plumbing back to the pump. Concrete pools allow core drilling; vinyl pools need a faceplate kit matched to the liner thickness. Expect significant labor costs compared to installing during initial construction.
Why does my pool skimmer make a loud noise?
Loud gurgling means the water level dropped below the throat opening, letting air enter the suction line. Fill the pool until the water sits halfway up the opening. If the noise continues at the correct level, check the pump lid O-ring for leaks.
How long does a pool skimmer last?
Plastic bodies typically last 15 to 25 years before UV exposure makes them brittle. Concrete-integrated units last as long as the pool shell itself. Check the manufacturer’s warranty card for the specific lifespan rating of your model.
Is it safe to swim near a running skimmer?
Yes, modern units comply with anti-entrapment standards when fitted with proper grates. Never swim with the grate removed. The suction at the open pipe is strong enough to hold a person underwater, especially children.
What happens if I don’t have enough skimmers?
Debris stays on the surface longer, sinks, and stains the plaster or settles into the main drain. Your filter works harder catching material that should have been pulled off the top, shortening the time between backwashes.
Does pool shape change how many I need?
Yes. Long, narrow pools need units at both ends regardless of total square footage, because wind-driven surface currents can’t carry debris 50 feet to a single intake point. Freeform pools need them placed in the widest curves.
Do variable speed pumps affect the count?
No, the count depends on surface area, not pump type. However, variable speed pumps let you dial down the RPM so each unit draws gently without gulping air. Balance the valves at your lowest daily filtration speed.
Can two skimmers share one pipe?
They can, but the shared pipe must be sized for the combined flow. Two units drawing 40 GPM each need a 2-inch line minimum. Using 1.5-inch pipe for both creates friction that starves the pump and reduces cleaning power.
Start your pool skimmer setup
Measure your pool’s surface area today and divide by 400 to find your base count. Once you install them and balance the valves, you’ll see debris clearing within 30 minutes of the pump running, leaving glass-smooth water behind. If the pump starts making a grinding noise or you can’t get the weir doors to balance evenly, turn the system off and call a licensed pool professional.