
A globe valve controls flow by moving a plug or disc vertically against a seat, and this is how globe valves work the inner mechanism explained for anyone managing fluid systems. Inside the valve, the fluid changes direction as it passes through a S-shaped path. This design creates high resistance to flow, which makes it excellent for throttling or regulating the volume of liquid or gas moving through a pipe.
Understanding how globe valves work and their inner mechanism
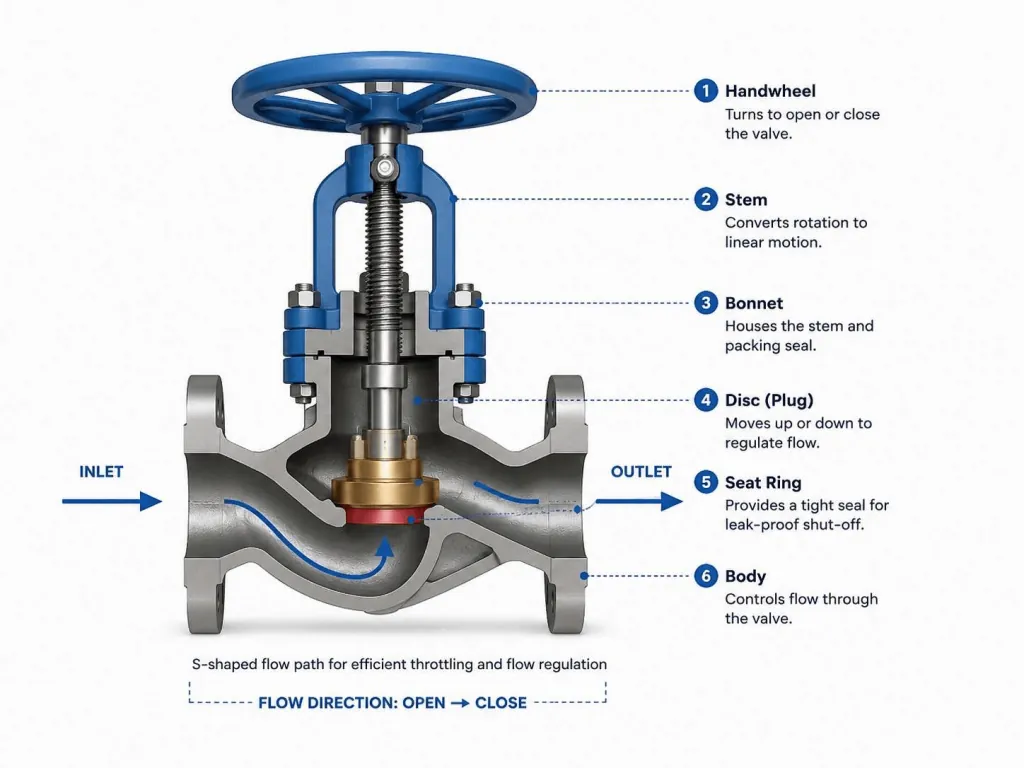
The performance of your valve depends on these specific parts. When you inspect the valve, check these areas for signs of wear or debris that might stop the plug from seating perfectly. A single grain of sand trapped between the plug and seat can prevent a tight seal, causing continuous dripping even when the handle feels fully closed.
| Part or input | What it does | What you notice when it goes wrong |
|---|---|---|
| Valve plug | Blocks or allows fluid | Incomplete shutoff or leaking |
| Valve seat | Provides a seal surface | Internal leaking when closed |
| Valve stem | Moves the plug up | Difficult turning or binding |
| Packing nut | Seals the stem area | Visible dripping around handle |
| Valve bonnet | Houses internal parts | External fluid leaks |
Many owners mistake a worn seat for a faulty plug, replacing the wrong component and wasting money while the leak persists. If the metal surface of the seat shows deep pitting or scratches, cleaning won’t fix it; you must resurface the seat or replace the entire valve body. Conversely, if the seat looks smooth but the plug is chipped, only the plug needs swapping.
Tightening a packing nut too much to stop a drip often crushes the internal ring, making the stem impossible to turn without tools. If you’re unsure of the specific part names for your unit, look for the manufacturer technical documentation provided with your equipment to identify the exact assembly.
Operating the valve mechanism
Understanding how a globe valve cycles helps you see why it reacts the way it does under pressure. This process takes only a few seconds when you turn the handle manually.
Rotate the handwheel clockwise to move the stem downward, which pushes the plug toward the seat. The plug enters the seat ring, which gradually restricts the flow area as the gap closes. Tighten the handwheel until the plug makes firm contact with the seat for a complete, leak-tight closure.
If you feel resistance before the valve is fully seated, stop immediately. Forcing the wheel can gall the threads or deform the seat, causing permanent leaks that require a full valve replacement.
Rotate the handwheel counter-clockwise to lift the plug away from the seat, allowing fluid to pass through. Watch the flow rate increase as the plug moves further away from the seat, creating a larger opening. Stop turning when you reach the desired flow rate, which you can verify by checking the downstream pressure gauge.
If your system uses high-viscosity fluids, open the valve in quarter-turn increments. This prevents pressure spikes that can damage sensitive downstream sensors or blow out gaskets during the initial surge.
Why valve mechanics impact performance
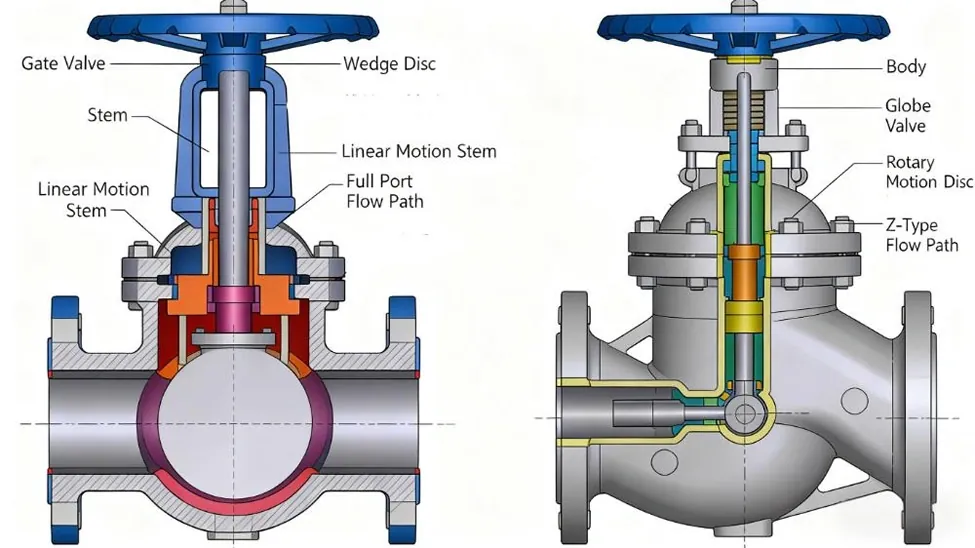
The primary reason these valves are chosen for regulation is the way the internal plug interacts with the seat. Because the fluid must navigate a sharp turn to pass through the valve, the pressure drop across the device is significant. This drop is a design feature, not a failure. It allows for precise control over the flow rate, which is a task where gate valves usually fail because they’re designed only for fully open or fully closed positions.
If you notice the valve is difficult to turn, the issue is often the packing material around the stem. If you overtighten the packing nut to stop a leak, you increase the friction on the stem, making the handle harder to operate. This is a common mistake that leads to damaged threads or a bent stem over time. Always tighten the nut just enough to stop the drip, not enough to lock the stem in place.
When you experience internal leakage, the plug or seat is likely damaged by debris or high-velocity fluid erosion. If you can’t achieve a tight seal even with firm pressure, the seat surface may be pitted. This isn’t a user-fixable issue for most standard models; it requires professional grinding or part replacement.
Control and design limits
What you control
- Handle position to set your flow rate.
- Packing nut tension to stop minor leaks.
- Regular cleaning of the exterior valve housing.
- Periodic inspection for signs of corrosion.
Fixed by design
- The internal S-shaped flow path geometry.
- The material grade of the valve seat.
- The maximum pressure rating of the body.
If the valve leaks from the body or the bonnet, don’t attempt to repair it under pressure. This work requires specialized training and equipment; contact a certified plumber or mechanical engineer to handle high-pressure systems safely.
Habits for better valve life
Operating your valve correctly ensures it lasts for the expected service life. Never use a wrench or “cheater bar” to force the handwheel if it feels stuck, as this often snaps the stem inside the bonnet. If the valve doesn’t close with normal hand force, the seat is likely blocked by debris or mineral buildup. Forcing it will only permanently deform the seating surface, necessitating a full replacement rather than a simple cleaning.
Flush the line before installing a new valve to prevent sediment from scoring the seat surface. If you operate the valve in a partially open position for long periods, check the stem packing regularly to ensure it remains pliable, following the intervals recommended in your owner’s manual. For valves in high-vibration areas, verify the packing nut tightness as specified by the manufacturer.
If the handle feels gritty, the stem threads need light lubrication. Use a lubricant compatible with your specific fluid type to avoid contamination. If the fluid is potable water, use only food-grade grease. If the fluid is a solvent, use a dry PTFE-based lubricant to prevent the chemical from dissolving the grease and causing a leak.
Frequently asked questions
Can a globe valve be used for full flow?
Globe valves aren’t ideal for full flow because the internal S-shaped path creates high resistance. You should use a gate or ball valve if your primary goal is to minimize pressure drop when the line is fully open, as the globe valve’s design intentionally restricts fluid movement.
How long do globe valve seats last?
The lifespan of a seat varies based on the fluid type and velocity, but industrial seals eventually require replacement. You can check the condition of your seat by performing a pressure test; if the valve leaks while closed, the seat surface is likely worn.
Is it safe to repair a leaking valve stem?
It’s safe to tighten the packing nut on a live system if you turn it slowly, but never loosen it or attempt to replace the packing while the pipe is pressurized. If the leak persists after a small adjustment, you must shut down the system and release all pressure before attempting any repairs.
What happens if I overtighten the handle?
Overtightening the handle can strip the threads on the stem or crack the valve seat, leading to permanent damage. You should only turn the handle until you feel a firm stop; if the flow doesn’t stop, the seat or plug is damaged and needs professional inspection or replacement.
Does it matter which way the fluid flows?
Yes, you must install the valve so the fluid enters under the seat, which is usually marked by an arrow on the valve body. Installing it backward makes the valve harder to operate and puts unnecessary stress on the stem and plug, which can lead to premature mechanical failure.
How much pressure can a globe valve hold?
The maximum pressure is determined by the valve’s class rating, which is stamped directly onto the metal body. You must check the manufacturer’s specification plate for your specific model, as this limit varies depending on the materials and the temperature of the fluid passing through the line.
Conclusion
Choosing the right valve ensures your system runs smoothly for years. If you’re planning a new installation, it’s a good idea to check your flow requirements first. Don’t hesitate to consult a professional if you’re unsure about the pressure ratings, as they’ll help you pick a model that won’t leak later on.
