
When your machine stops running unexpectedly, encountering a dyson vacuum no power issue can be incredibly frustrating, especially when you’re in the middle of cleaning your home. Whether the unit is completely dead or just intermittent, the root cause usually stems from a simple power interruption, a blockage, or a degraded battery component. Most modern cordless vacuums rely on a sophisticated system of sensors and battery management circuits that cut power immediately if they detect a fault, which is often a safety feature rather than a mechanical failure. By systematically checking the electrical path from the outlet to the motor, you can often identify the culprit and restore suction without needing professional repair services.
Key Takeaways
- Always verify the power supply and charging cable integrity before assuming the motor has failed.
- Check for airway obstructions, as thermal cutouts trigger if the motor overheats due to limited airflow.
- Inspect the battery contacts for debris or oxidation that might prevent a solid electrical connection.
- Clean or replace filters regularly, as clogged filters cause excessive strain on the internal battery.
- Consult the official Dyson support troubleshooting guide to identify specific error light codes for your model.
Why Is My Vacuum Not Turning On?
The most common reasons for a loss of power involve the energy source or the safety mechanisms designed to protect the motor. If your machine is cordless, the battery is the most frequent point of failure.
Over time, lithium-ion cells lose their capacity to hold a charge, and the internal circuitry may stop allowing the machine to power up if the voltage drops below a specific threshold. Conversely, if you have a corded model, the issue is usually found in the power cord, the wall outlet, or the fuse within the plug.
Mechanical blockages represent the second most common cause. If the suction path is clogged with hair, dust, or large debris, the motor works harder than it should. To prevent the motor from burning out, the vacuum’s computer will force a shutdown. This is why you should always clear the wand, the brush head, and the cyclone assembly when the machine refuses to start.
Troubleshooting Your Power Supply
Before performing any complex repairs, ensure your power delivery system is functional. If the vacuum is plugged in but showing no signs of life, the issue might be external.
| Component | Potential Issue | Recommended Action |
|---|---|---|
| Wall Outlet | No current flow | Test with a lamp or other device |
| Power Cord | Fraying or internal break | Inspect for physical damage |
| Charging Dock | Poor contact points | Clean pins with a dry cloth |
| Battery Pack | Depleted or dead cells | Attempt a full 4-hour charge |
Warning: Always unplug the vacuum from the wall or remove the battery pack before attempting to inspect or clean the internal components to avoid electrical shock.
Inspecting The Battery Pack
For cordless models, the battery is the heart of the system. If your battery is more than three years old, it’s likely reaching the end of its functional life. You can often tell if the battery is failing by observing the LED indicators on the handle. A rapidly flashing red light usually indicates a battery fault or a communication error between the battery and the motor.
Checking Battery Contacts
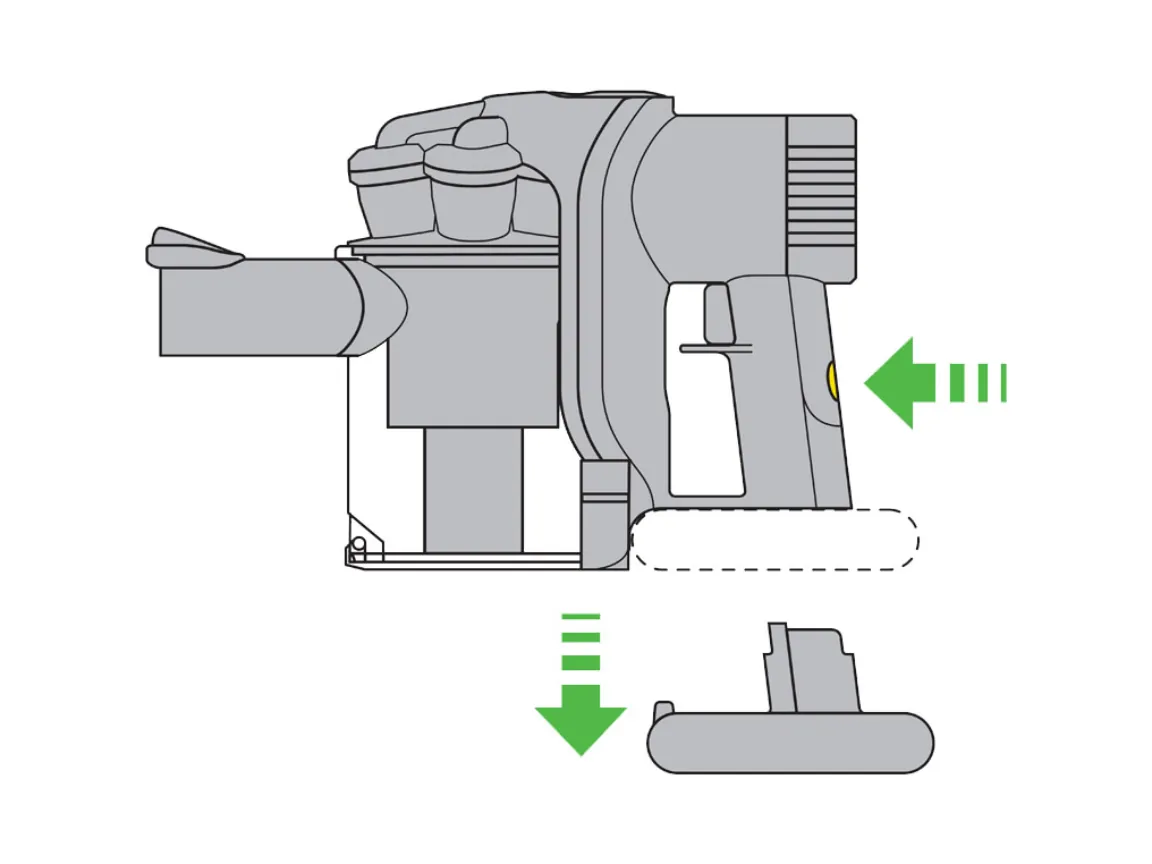
Over time, the metal contact points where the battery snaps into the vacuum body can accumulate dust or grime. This prevents the electricity from flowing correctly. Use a dry, lint-free cloth to wipe these contacts. If you see any signs of corrosion or burnt plastic, the battery pack must be replaced immediately. Never attempt to open the battery housing itself, as lithium-ion batteries are volatile and dangerous if punctured.
Dealing With Airway Blockages
Vacuums are designed to be airtight. When an object blocks the airflow, the motor creates a vacuum effect that increases heat. Sensors located near the motor detect this temperature spike and cut the power to prevent thermal damage to the internal wiring.
- Wand Inspection: Remove the wand and look through it; hold it up to a light source to see if anything is stuck inside.
- Cleaner Head: Check the brush bar for wrapped hair or carpet fibers that might be preventing rotation.
- Cyclone Assembly: Dust buildup inside the bin can sometimes migrate into the cyclone, causing a total blockage.
- Inlet Port: Check the area where the wand connects to the main body for trapped debris.
Are The Filters Clogged?
Filters are essential for maintaining suction, but they’re also a common cause of power issues. When a filter becomes saturated with fine dust, the vacuum has to work significantly harder to pull air through the system. This extra effort requires more power, which can trigger the thermal cutout safety mechanism.
To fix this, remove the filter and wash it under cold water. You must let it air dry for at least 24 hours before reinserting it. If you put a damp filter back into the machine, you risk damaging the motor or creating an electrical short. If the filter is gray, matted, or smells musty even after washing, it’s time to purchase a replacement.
How To Reset The Electronics
Sometimes the vacuum’s onboard computer simply needs a reset to clear a transient error. Most models allow for a “hard reset” by removing the battery and holding the trigger down for thirty seconds. This action drains any residual electricity stored in the capacitors and forces the motherboard to restart in a clean state.
- Remove the battery pack from the handheld unit.
- Press and hold the power trigger for 30 seconds.
- Release the trigger and wait for one minute.
- Reattach the battery and attempt to power the unit on.
Comparing Vacuum Power Issues
Different models exhibit different behaviors when they encounter a loss of power. Understanding these differences helps in diagnosing the specific fault.
| Model Type | Primary Power Symptom | Likely Cause |
|---|---|---|
| Cordless | Flashing red light | Battery or motor fault |
| Cordless | Intermittent pulsing | Blockage in the air path |
| Corded | No motor sound | Blown fuse or broken cord |
| Handheld | Sudden shutdown | Overheating or full dust bin |
Pro Tip: If you have recently vacuumed up fine powders like drywall dust or baking soda, these particles can bypass the main filter and coat the internal sensors, leading to persistent power failures.
Testing The Motor Assembly
If you have cleared all blockages, charged the battery, and cleaned the filters, yet the machine still shows no power, the motor itself may have failed. To test this, listen closely when you pull the trigger.
If you hear a faint clicking sound but no whirring, the motor is likely receiving a signal but can’t initiate rotation. This usually points to a mechanical seizure within the motor assembly or a failure of the internal control board. At this stage, professional service is often required unless you’re comfortable disassembling the housing to inspect the motor’s carbon brushes.
Identifying Damaged Power Cords
For those using corded Dyson models, the cord is the most vulnerable part of the appliance. Look for kinks, exposed copper wire, or areas where the plastic casing feels soft or melted.
If the cord was pinched in a door or rolled over by the vacuum head, the internal wires may have snapped. Never attempt to tape over a damaged cord; it’s a fire hazard. A professional technician should replace the entire cord assembly to ensure the machine remains safe for household use.
Cleaning The Dust Bin Mechanism
The dust bin is part of the electrical circuit on many models. There’s a small safety switch that prevents the vacuum from turning on if the bin isn’t fully closed or if the bin door is broken. If the bin does not “click” into place firmly, the motor won’t engage. Ensure that the rubber seals on the bin are clean and free of debris, as these seals are necessary to maintain the pressure required for the motor to function correctly.
Related guides
Frequently Asked Questions
Why is my Dyson flashing red?
A flashing red light typically indicates a battery fault or a motor blockage. First, check the airway for obstructions. If the path is clear, the battery may be nearing the end of its life cycle and failing to hold a charge. If the light continues to flash after a full charge, the battery pack likely needs a replacement from an authorized retailer.
Can I replace the battery myself?
Yes, replacing the battery is a straightforward process on most Dyson cordless models. You simply need to unscrew the release button or the mounting screws located at the base of the handle. Always ensure you purchase a genuine battery pack rather than a third-party generic version, as genuine batteries include the necessary thermal protection circuitry to prevent overheating and potential fire hazards.
How long should a battery last?
A standard battery typically lasts between 24 and 48 months depending on usage frequency and charging habits. If you use the “Max” mode constantly, the high discharge rate will significantly reduce the total lifespan of the battery compared to using the “Auto” or “Eco” modes. Keeping the battery cool and avoiding deep discharges can help extend its performance over time.
Does a blockage always stop the motor?
Yes, almost all modern vacuums are equipped with a thermal cutout switch. When an obstruction restricts airflow, the motor temperature rises rapidly. The internal computer detects this heat and cuts power to the motor to prevent permanent damage. Once you clear the blockage and allow the motor to cool down for 20 to 30 minutes, the vacuum should operate normally again.
Should I use a surge protector?
While not strictly required, plugging your charging dock into a high-quality surge protector is a good practice. It shields the sensitive charging circuitry from voltage spikes that can occur during power outages or electrical storms. If you suspect your charger was damaged by a power surge, check the light on the charger brick itself; if it isn’t illuminated, the charger is likely dead.
Conclusion
If you have completed all the steps above and your machine still fails to start, the final option is to contact the manufacturer’s support team or a local authorized appliance repair center. Be prepared to provide your vacuum’s serial number, which is usually found behind the dust bin or on the bottom of the battery pack, to determine if your unit is still covered under the original manufacturer’s warranty.
