
Making desk top surfaces requires edge-gluing solid wood boards together, clamping them flat, and sanding them smooth over about two days. The job takes medium effort and basic shop supplies, costing around $60 to $120 for standard pine or poplar. Solid hardwood costs twice as much, while reclaimed lumber needs extra milling time. You must have at least four sturdy bar clamps before you cut a single board.
What you need
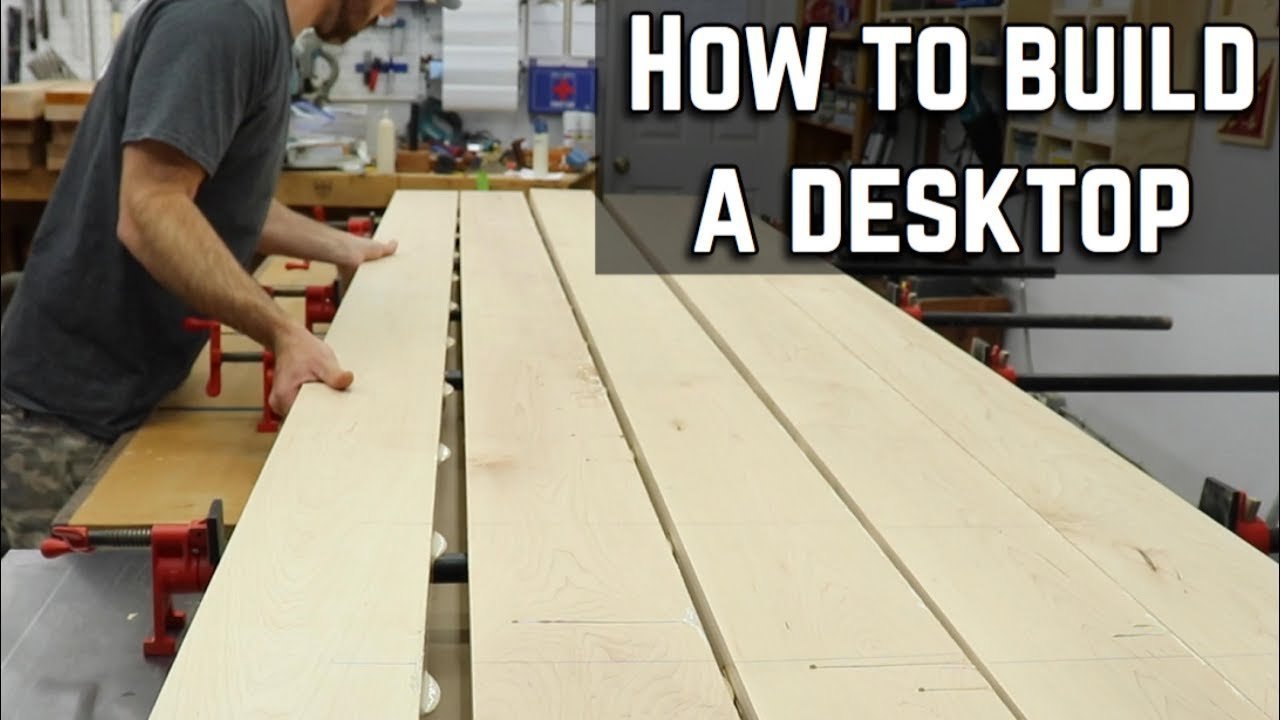 Photo: www.youtube.com on Google
| Item | How much | Why it’s needed | A substitute |
|---|---|---|---|
| Kiln-dried wood boards | 4 to 6 boards | Forms the solid work surface | Plywood with edge banding |
| PVA wood glue | 8 ounces | Bonds wood edges permanently | none — don’t swap this |
| Parallel or pipe clamps | 4 to 6 clamps | Keeps glued seams flat under pressure | none — don’t swap this |
| Random orbital sander | 1 tool | Levels joints and smooths grain | Sanding block with heavy pressure |
| Assorted sanding discs | 3 discs per grit (80/120/180) | Removes glue and refines surface | Sandpaper sheets cut to size |
| Polyurethane finish | 1 quart | Shields bare wood from spills | Hardwax wood finishing oil |
| Natural bristle brush | 1 brush | Applies even coats of liquid seal | Clean lint-free cotton cloth |
Before you start
- Unplug any power tools and clear a flat workspace of at least 6 feet by 4 feet.
- Cover your work table or floor with plastic sheeting to catch dripping glue.
- Wipe sawdust off all board faces with a dry towel so seams sit tight.
- Store your boards indoors for at least 48 hours to let them adjust to room humidity; skipping this step leads to warped joints later.
- This project isn’t for someone who wants an instant desk without waiting for glue and finish to cure. If your lumber is severely bowed or twisted, stop here and take the boards to a professional cabinet shop for jointing and planing.
Step by step
 Photo: support.apple.com on Google
- Arrange your boards side by side on a flat surface, alternating the end-grain curve directions so one curves up and the next curves down. The boards must lay flat with no gap wider than a sheet of paper.
- Mark a large pencil triangle across all boards so you can quickly return each piece to its correct position. You know it worked when the lines align continuously across every seam.
- Apply a continuous 1/8-inch bead of PVA wood glue along the mating edge of each board. Check that the bead covers the entire length without running off the sides before assembling.
- Press the edges together by hand and place your pipe clamps every 12 inches along the assembly. Alternate clamps over and under the top so clamping pressure stays balanced across both faces.
- Tighten each clamp until small, uniform glue beads squeeze out along every joint line. Check that the board ends remain flush against one another across the entire width.
- Leave the clamped panel undisturbed for at least 2 hours at room temperature. The joint is ready when the squeezed-out glue feels firm and rubbery to the touch.
- Scrape away the rubbery glue squeeze-out with a sharp carbide scraper or putty knife. The surface is ready when no raised ridges of dried glue remain above the wood grain.
- Sand the entire surface with an orbital sander using 80-grit paper, spending roughly 10 minutes per face. Move the tool slowly with the wood grain until all joint seams feel completely flush.
- Sand again across both faces using 120-grit paper for 8 minutes, followed by 180-grit paper for another 8 minutes. You know the step worked when the wood feels silky and shows no visible sanding swirls.
- Brush on an even layer of clear polyurethane following the grain, maintaining a wet edge to avoid overlap marks. You can review safety guidelines from the U.S. Consumer Product Safety Commission to handle solvent fumes properly in home workspaces.
How to know it worked
Place a 4-foot metal level on its edge across the finished desk surface in three spots: both ends and the middle. If light doesn’t shine under the level’s edge, the glue-up is flat. Run your bare palm across every seam; you shouldn’t feel a ridge or dip between adjacent boards. A good finish shows an even, satin sheen when viewed under direct light from a window or lamp, with no dry, dull patches. If you press a fingernail gently into the wood and leave an indent, the polyurethane hasn’t cured yet. Give it another 24 hours in a warm room before setting heavy monitors or laptops on top.
If something goes wrong
| What happened | Why | What to do |
|---|---|---|
| Panel bows in middle | Clamps pulled too hard on one side | Alternate clamps over and under next time |
| Boards slide unevenly | Wet glue acts like grease under pressure | Tap boards flush with rubber mallet immediately |
| White spots in finish | Moisture trapped under drying polyurethane coat | Sand spots down and apply fresh coat |
| Visible joint gaps | Board edges weren’t planed square | Fill gaps with tinted wood filler putty |
| Blotchy stain marks | End grain absorbed liquid faster than faces | Sand surface bare and use wood conditioner |
How often to do this
 Photo: askleo.com on Google
Build a desk top once per workstation setup. A solid wood top lasts decades indoors without rebuilding, but its protective topcoat requires regular maintenance. Clean the surface weekly with a damp microfiber cloth, and keep standing water off raw wood joints to prevent splitting along the seams.
Frequently asked questions
Can you make a desk top out of 2×4 lumber?
Yes, but you must trim the rounded edges off first with a table saw. Construction 2x4s contain high moisture levels, so let them dry indoors for several weeks before gluing. If you skip drying, the glued top will cup and crack as it shrinks.
Why did my glued desk top crack down the center?
Your wood dried out and shrank across its width while screwed tightly to the desk base. Solid wood expands and contracts with seasonal humidity changes. If you don’t use slotted screw holes or figure-eight desktop fasteners, the wood can’t move naturally and splits down the glue line.
How thick should a wood desk top be?
Aim for a thickness between 1 inch and 1.5 inches for standard computer use. Boards thinner than 3/4 inch will sag under the weight of monitor arms and books. If you build a long top over 60 inches, use 1.25-inch thick hardwood to stop center flex.
Is it safe to finish a desk top inside an apartment?
No, unless you use zero-VOC water-based finishes or pure hardwax oils. Oil-based polyurethanes release strong fumes that linger for days in poorly ventilated spaces. If you must work indoors, choose a water-based polycrylic, open two opposite windows, and run an exhaust fan continuously.
What happens if you forget to alternate clamp directions?
The panel curls into a wide U-shape from the uneven pressure. Clamping entirely from the top side pulls the board faces inward while pushing the undersides outward. Alternating half your clamps above the panel and half below it keeps the joint forces neutral and flat.
Does it matter which way the wood grain faces?
Yes, wood boards warp along the direction of their annual growth rings as they age. Look at the board ends and alternate the ring curves up and down across the desk. This design trade-off creates small waves rather than one massive bow across the entire finished panel.
How long does wood glue take to fully cure?
About 24 hours at standard room temperature. While clamps can safely come off after two to three hours, the adhesive bond hasn’t reached its maximum shear strength yet. Avoid aggressive sanding, cutting, or mounting heavy legs until the full day passes.
Related guides