
If you’ve ever wondered how to vent a kitchen sink under a window, you’re not alone. It’s a common challenge that can leave many homeowners scratching their heads.
But getting the vent right is crucial—it helps prevent bad smells, keeps your water flowing smoothly, and stops your pipes from making those annoying gurgling sounds. You’ll discover simple, step-by-step tips to tackle this tricky setup. By the end, you’ll feel confident handling your kitchen sink vent like a pro, saving yourself time, money, and frustration.
Keep reading to learn exactly what you need to do.
Credit: www.plbg.com
Why Venting Matters
Venting a kitchen sink under a window is not just a building rule. It plays an important role in your home’s plumbing. Proper venting keeps water flowing smoothly and prevents bad smells. It helps maintain a safe and clean kitchen environment.
Preventing Drainage Issues
Vents stop air pressure from building up in the pipes. Without vents, water drains slowly or gets stuck. This can cause clogs and backups. Proper venting ensures water flows freely down the drain.
Avoiding Sewer Gas
Sewer gases can enter your home if vents are missing. These gases smell bad and can be harmful. Vents block these gases by allowing air to escape outside. This keeps your kitchen air fresh and safe.
Maintaining Proper Airflow
Good airflow in the plumbing system is key. Vents allow air to flow in and out of the pipes. This balance prevents vacuum pressure that can stop water from draining. Proper airflow also protects your pipes and fixtures.
Choosing The Right Vent Type
Choosing the right vent type is important for your kitchen sink under a window. The vent helps air flow in and out of the plumbing system. This stops bad smells and keeps water moving smoothly. Different vent types work better in different spaces. You need to know their features before picking one.
Air Admittance Valves
Air admittance valves (AAVs) let air enter the drain pipe. They close to stop sewer gases from coming out. AAVs are small and fit inside cabinets. They do not need a pipe going outside. This makes them good for tight spaces or tricky spots.
They are easy to install and cost less than traditional vents. AAVs need to be placed where they can get fresh air. They must stay dry to work well. Not all local codes allow AAVs, so check rules first.
Traditional Vent Pipes
Traditional vent pipes go through the roof or wall. They allow air to flow freely in and out. These vents are reliable and long-lasting. They help keep water in traps and stop sewer gases.
Installing these vents may need cutting holes in walls or roofs. They take more space and cost more than AAVs. They also need proper slope and size to work right. Traditional vents suit homes with easy roof access.
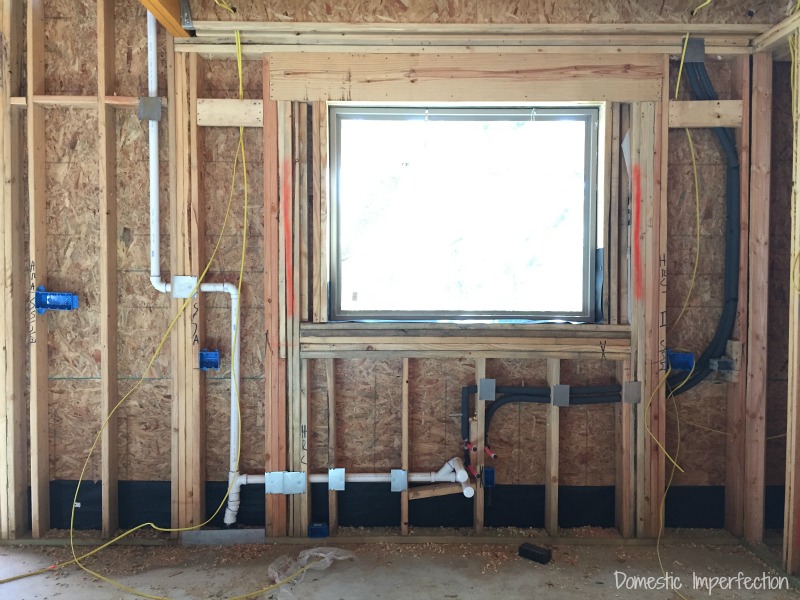
Considerations For Under-window Sinks
Sinks under windows have special challenges. Running a vent pipe up through the wall may block the window. It could also cause leaks if not sealed well. Space under the window is often tight.
AAVs can be a good choice here. They fit inside the cabinet and avoid roof work. Traditional vents need careful planning to avoid window damage. Always check local codes and get professional advice before installing vents under windows.
Tools And Materials Needed
Venting a kitchen sink under a window requires specific tools and materials. Having the right items makes the job easier and safer. This section lists the essential tools and materials you need.
Basic Plumbing Tools
Start with a pipe wrench for gripping and turning pipes. A hacksaw helps cut metal or plastic pipes. Use a tape measure to get exact lengths. A pipe cutter gives clean cuts on copper or PVC pipes. Slip-joint pliers adjust and hold parts firmly. A screwdriver set is necessary for fasteners. Lastly, a level ensures pipes are straight for proper drainage.
Vent Pipe Options
Choose vent pipes made from PVC, ABS, or copper. PVC is light, affordable, and easy to work with. ABS is strong and resistant to impact. Copper offers durability and corrosion resistance. Select the pipe diameter that fits your sink’s vent size. Always pick pipes that meet local plumbing codes.
Sealants And Connectors
Use plumber’s putty or silicone sealant to prevent leaks. Pipe connectors join different pipe sections securely. Use slip joints or compression fittings for easy assembly. Teflon tape helps seal threaded pipe connections. Make sure all seals are tight to avoid odors and water damage.
Credit: terrylove.com
Step-by-step Vent Installation
Installing a vent for a kitchen sink under a window requires careful steps. Proper venting ensures water drains smoothly and prevents bad odors. Follow these steps to install the vent pipe correctly and safely.
Locating The Drain And Vent Points
Start by finding the kitchen sink drain pipe. Look under the sink to spot the main drain line. Next, locate where the vent pipe will connect. The vent should reach above the sink line and pass through the wall or cabinet. Mark the spot for cutting carefully. Check for any obstacles inside the wall before cutting.
Cutting And Fitting The Vent Pipe
Use a pipe cutter or saw to cut the vent pipe to the needed length. Smooth any rough edges with sandpaper. Fit the vent pipe into the drain line using a proper wye fitting. Ensure the pipe runs upward without dips. This helps air flow freely and stops water from getting trapped.
Securing And Sealing The Vent
Secure the vent pipe to the wall or cabinet with pipe brackets. Space the brackets every few feet for strong support. Use plumber’s tape or sealant on all joints. This prevents leaks and keeps the vent airtight. Check that the pipe is stable and sealed tightly.
Testing The Vent System
Run water through the sink and watch the drainage. Listen for gurgling sounds, which show vent problems. Check for leaks around the joints. If water drains quickly and no noise appears, the vent works well. Fix any issues before finishing the installation.
Common Challenges And Fixes
Venting a kitchen sink under a window brings unique challenges. These issues need careful planning to ensure proper function and safety. Here are some common problems and practical solutions to help you handle the task with ease.
Limited Space Under The Window
Space under a window is often tight. Pipes and vents must fit without crowding. Use compact vent fittings designed for small areas. Measure twice before cutting any pipes. This practice avoids mistakes and saves time. Consider flexible vent pipes to navigate tight spots. Keep the vent away from water lines to prevent leaks.
Avoiding Window Obstruction
Vents should not block the window’s operation. Position the vent pipe to the side or below the window frame. Use low-profile vent caps outside to keep clear sightlines. This placement also prevents drafts and water entry. Double-check that window sashes open fully without hitting pipes. A clean look and easy window use matter in kitchens.
Dealing With Building Codes
Building codes control vent placement and pipe size. Study local rules before starting work. Codes require vents to rise above the roof or be properly vented to the outside. Use approved materials and correct pipe diameters. Improper venting causes bad smells and drainage problems. Call a professional if unsure about code requirements. Compliance ensures safety and smooth plumbing performance.

Credit: www.youtube.com
Maintenance Tips For Kitchen Sink Vents
Maintaining your kitchen sink vent ensures it works properly and lasts longer. A well-maintained vent keeps air flowing and prevents bad smells or drainage issues. Regular care can save you from costly repairs and plumbing problems.
Regular Inspection
Check the kitchen sink vent every few months. Look for cracks, leaks, or blockages. Notice any unusual smells or slow draining water. Early detection helps avoid bigger problems later.
Cleaning The Vent
Keep the vent clear of dirt and debris. Use a soft brush or cloth to clean the vent opening. Avoid harsh chemicals that can damage the pipe. Clean vents improve airflow and prevent clogs.
When To Call A Professional
Call a plumber if you see persistent leaks or blockages. Strange noises or foul smells can mean serious issues. Professionals have tools to fix vent problems safely and quickly.
Frequently Asked Questions
How Do I Vent A Kitchen Sink Under A Window?
You need to install an air admittance valve or run a vent pipe through the wall. Venting prevents bad smells and helps water flow smoothly. The pipe should avoid blocking the window opening.
Can I Use An Air Admittance Valve For Sink Venting?
Yes, an air admittance valve is a common solution under windows. It allows air in but stops sewer gases from escaping. This valve is easy to install and saves wall space.
What Are Vent Pipe Options For Sinks Under Windows?
You can use a traditional vent pipe through the wall or roof, or an air admittance valve. The vent pipe must be properly sized and positioned for good airflow. Choose what fits your kitchen layout best.
Why Is Venting A Kitchen Sink Important?
Venting stops water traps from losing their seal, which keeps bad smells out of your home. It also helps water drain faster and avoids noisy gurgling sounds. Proper venting keeps your plumbing working well.
Can I Vent A Kitchen Sink Through The Window Frame?
Venting through a window frame is not recommended due to leaks and code issues. Instead, vent pipes should pass through walls or roofs with proper sealing. This prevents water damage and air leaks.
How High Should A Kitchen Sink Vent Pipe Be?
The vent pipe should rise at least 6 inches above the sink flood level or the roofline. This height ensures good air flow and prevents water from entering the vent. Local codes may require specific heights.
Do I Need A Plumber To Vent A Sink Under A Window?
A skilled DIYer can vent a sink, but plumbing codes can be tricky. Hiring a plumber ensures venting meets safety and building rules. It saves time and prevents future problems.
Conclusion
Proper venting keeps your kitchen sink working well and prevents bad smells. Venting under a window can be tricky but is doable with the right steps. Make sure to follow local codes and use the right materials. A good vent lets air in and water flow out smoothly.
Take your time and check your work as you go. This helps avoid leaks and clogs later on. Venting your kitchen sink correctly means a cleaner, safer kitchen for everyone. Simple steps, clear plans, good results.