
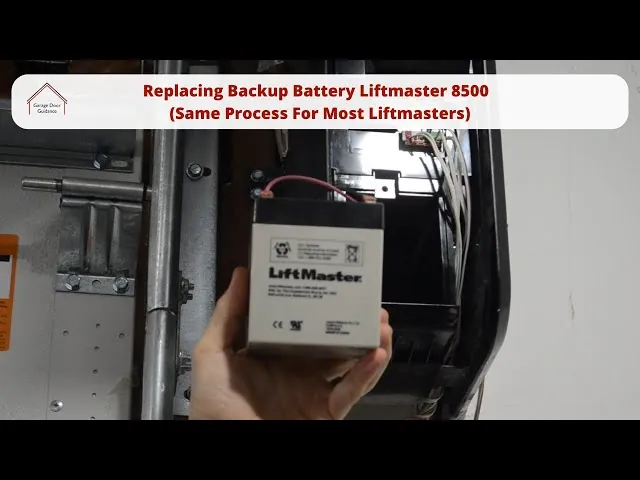
A LiftMaster battery replacement takes about 15 minutes and costs $20 to $40. This easy task requires a stable ladder and the correct battery model. Find your specific model number on the existing battery label or the manufacturer’s website, and always use the exact replacement part recommended for your opener to ensure safety.
Essential tools for your battery swap
You need a few simple items to complete this job safely and efficiently. Don’t attempt to use a battery that doesn’t match the voltage or size of your original unit, as this can damage the internal charging board.
| Item | How much | Why it’s needed | A substitute |
|---|---|---|---|
| Step ladder | 1 unit | Reach the opener safely | Sturdy chair |
| Screwdriver | 1 unit | Remove battery cover screws | None — don’t swap |
| Replacement battery | 1 unit | Power the backup system | None — don’t swap |
| Work gloves | 1 pair | Protect hands from dust | Clean cloth |
| Flashlight | 1 unit | See inside the housing | Phone light |
Verify the voltage rating printed on the side of your old battery before purchasing a replacement. If you see 12V labeled on the casing, buying a 6V unit will cause the system to fail immediately upon installation.
Many people make the mistake of using a magnetic screwdriver to pry open the housing. This can short-circuit the sensitive control board if the tip touches a terminal. Use a non-conductive plastic spudger or a standard screwdriver with a rubber-coated handle to prevent accidental sparks.
If the battery terminals show white, powdery corrosion, don’t simply wipe them clean. This residue indicates a leaking cell that has likely compromised the contact points. In this case, you should clean the terminals thoroughly with a mixture of baking soda and water or a dedicated terminal cleaner, then dry them completely. If the terminals remain shiny and clean, a simple wipe with a dry cloth is sufficient to maintain conductivity.
Preparation before you start
Unplug your garage door opener from the wall outlet to ensure there’s no live power flowing to the motor unit during the swap. This simple step prevents accidental activation while your hands are near the internal gears.
Clear the area directly under the ladder to prevent tripping. Move any heavy objects that might fall if you lose your balance, as even a minor slip can cause significant injury when working at height.
Locate the battery compartment cover, which is typically found on the side or the back of the main motor housing. If you can’t find it, look for a small panel secured by a single Phillips-head screw.
Check your owner’s manual for the specific battery type. Using a non-approved battery can pose a fire risk or fail to hold a charge during a power outage. If you see signs of bulging or leaking acid, handle the unit with gloves to avoid chemical burns.
If you notice frayed wires or heavy corrosion on the terminals, stop the work and contact a professional. Attempting to bypass damaged wiring often leads to short circuits that permanently ruin the logic board.
How to perform the battery replacement
- Position your ladder securely under the garage door opener so you can reach the motor housing without overextending your reach.
- Unscrew the battery compartment cover using your screwdriver, rotating counter-clockwise until the screws are loose enough to remove by hand.
- Pull the old battery out gently by holding the sides, taking care not to pull on the connected wires attached to the terminals.
- Disconnect the two wire leads from the battery terminals by sliding the connectors off, noting which wire goes to which color terminal.
- Check the terminals for any debris or oxidation, wiping them clean with a dry cloth if you see any buildup of dust.
- Connect the new battery by attaching the red wire to the positive terminal and the black wire to the negative terminal.
- Slide the new battery into the housing, ensuring the wires are tucked neatly to the side so they don’t get pinched.
- Replace the cover and tighten the screws clockwise until they’re snug, being careful not to overtighten them, which can crack the plastic.
- Plug the power cord back into the wall outlet and wait for the status light on the opener to show a solid green color.
Signs of a successful installation
When you finish the installation, the status LED on your garage door opener should glow a solid green color within 24 hours. This indicates the unit is fully charged and ready for use during a power outage. If the light flashes orange or red, the battery is still charging or there’s a poor connection at the terminals. Check that the wires are firmly pushed onto the battery posts.
If the light remains off after 24 hours of being plugged in, the battery may be defective or the charging circuit on your main board isn’t working. In this case, double-check your connections one last time. If it still doesn’t charge, you should contact the manufacturer or a certified service technician. Don’t attempt to open the motor housing further, as the internal components can hold a dangerous electrical charge even when the unit is unplugged.
Troubleshooting common battery issues
| What happened | Why | What to do |
|---|---|---|
| Light stays red | Low charge | Wait 24 hours |
| No status light | Bad connection | Re-seat the wires |
| Battery won’t fit | Wrong model | Check manual part |
| Door won’t move | Dead battery | Replace with new |
| Cover won’t close | Wire interference | Tuck wires inside |
Should you encounter no status light at all, inspect the metal contact pins for oxidation. A simple wipe with a dry, lint-free cloth often restores conductivity. If the battery feels warm to the touch while charging, stop immediately. This indicates a short circuit, and continuing risks permanent component damage.
When the cover refuses to latch, don’t force it. Applying pressure often snaps the plastic tabs, turning a minor adjustment into a permanent repair. If the door remains stuck after clearing the wires, check if the battery casing has swollen. A battery that shows any visible signs of swelling or bulging must be replaced, as it’s no longer safe to operate.
Understanding your battery life
You should replace the battery in your garage door opener every 3 to 5 years, depending on your local climate and how often you experience power outages. If you live in an area with extreme temperature swings, the chemical capacity of the lead-acid battery will drop faster than in moderate climates.
Heat is the primary enemy. If your garage consistently gets very hot during the summer, the replacement frequency depends on your specific usage; consult your owner’s manual for the correct maintenance schedule. You can tell it’s time for a replacement if the battery fails to hold a charge for more than a few minutes during a test.
Always test your backup system once a year by unplugging the unit and opening your door once to ensure it has enough power to function correctly. If the door moves sluggishly or the opener beeps continuously during this test, the battery has lost its voltage threshold. Ignoring this warning often results in a total system lockout during an actual storm.
Frequently asked questions
How long does a liftmaster battery last?
A standard battery lasts for a significant period, assuming you keep the unit in a climate-controlled garage and perform regular testing. You can check the date of manufacture on the battery label to estimate its remaining life. If you notice the garage door opener beeping or the status light flashing, the battery is likely reaching the end of its useful life and needs a replacement.
Is it safe to change the battery myself?
It’s safe for most homeowners to change the battery if they follow the steps provided in the owner’s manual. You only need to work on the exterior battery compartment, which doesn’t require you to open the main motor housing. Avoid touching the internal circuits or capacitors inside the motor unit to prevent damage to the electronics or accidental short circuits.
What happens if I use the wrong battery?
Using an incorrect battery can lead to poor performance, a failure to open the door during an outage, or even a fire hazard if the voltage isn’t compatible. Always match the voltage and amp-hour ratings listed on your original battery. If you can’t find the exact match, check the official manufacturer website for the specific replacement part number that corresponds to your opener model.
Why is my garage door opener beeping?
The opener beeps to alert you that the battery is low or has failed to hold a charge. This is a safety feature that tells you the unit won’t work if the main power goes out. You can silence the alarm by replacing the battery, and the beeping will stop once the new unit is installed and the system detects a full charge.
Does the battery affect the door’s speed?
The battery doesn’t change the speed of your garage door under normal power, but it may operate slightly slower when running on battery backup. This is normal behavior designed to conserve energy during a power outage. If the door moves exceptionally slowly or struggles to lift the weight, it may indicate that the battery is old or that your door springs need adjustment by a professional.
Can I leave the battery in the heat?
You should avoid leaving the unit in extreme heat, as high temperatures significantly shorten the lifespan of lead-acid batteries. While most garages aren’t climate-controlled, keeping the battery away from direct sunlight or heat sources will help it last longer. If your garage gets hotter than 100 degrees Fahrenheit regularly, expect the battery to need replacement closer to the 3-year mark rather than the 5-year limit.
Conclusion
Taking the time to replace your battery correctly ensures that you won’t be locked out of your garage when the power goes out. By following these steps and using the right parts, you keep your home secure and your equipment running for years to come.
