
The difference between a toilet bowl vs water closet is that the bowl is simply the ceramic basin used for waste, while the water closet is the entire plumbing assembly including the cistern and flush mechanism. You’ll find that in modern construction, people often use these terms interchangeably to describe the whole fixture. If you’re renovating a bathroom, you need to know that the water closet refers to the complete unit, whereas replacing just the bowl is a specific maintenance task for older systems.
Comparing the bowl and the closet
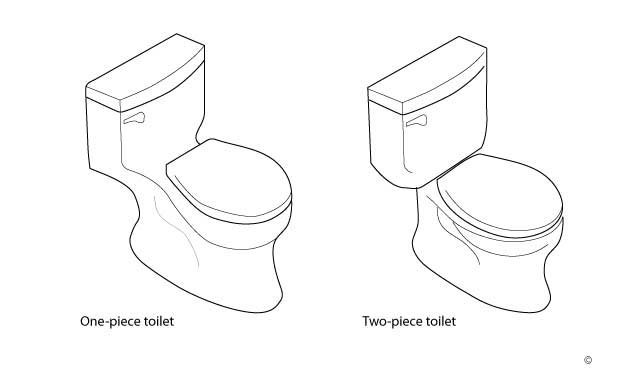
The distinction depends on whether you’re looking at individual components or the finished system installed in your bathroom.
| Method | How long | Effort | Cost | Best for |
|---|---|---|---|---|
| Bowl replacement | 2-4 hours | High | Low | Repairing cracks |
| Full system swap | 4-6 hours | High | Medium | Total renovation |
| Cistern repair | 1-2 hours | Medium | Low | Leaking issues |
| Smart seat add-on | 30 minutes | Low | Medium | Added comfort |
If you’re only replacing the ceramic basin, you must ensure the rough-in measurements match your existing floor drain. Standard rough-ins are typically 12 inches from the wall, but older homes often feature 10 or 14-inch configurations.
This is a common mistake that leads to persistent leaks and eventual water damage to your subfloor. It costs homeowners hundreds in repairs to fix a rotted floor caused by a poorly seated wax ring.
Always check the manufacturer’s technical specifications for your specific model before buying parts. If you’re uncertain about your current rough-in, measure from the wall to the center of the closet bolts. If the distance is not 12 inches, you must purchase a toilet model specifically designed for a 10-inch or 14-inch rough-in. Never attempt to force a standard unit into an incompatible footprint.
Replacing the ceramic basin
Replacing the bowl alone is a technical job that requires disconnecting the water supply and removing the existing seal.
- Turn off the water supply valve located behind the unit and flush the tank to remove all remaining water.
- Disconnect the supply line and use a wrench to remove the bolts connecting the tank to the bowl.
- Unscrew the floor bolts, carefully lift the old basin off the flange, and scrape away the old wax ring.
- Place a new wax ring onto the floor flange, align the new bowl, and press down firmly to create a seal.
- Reattach the tank, tighten the bolts gradually to avoid cracking the porcelain, and turn the water back on.
This method is great for updating a damaged unit without redoing the entire plumbing system. The main weakness is that you’re limited to parts that fit your existing rough-in dimensions. If you’re unsure about handling plumbing joints, consult a licensed professional to avoid water damage.
Installing a complete unit
Installing a full water closet involves replacing the entire assembly, including the tank, the bowl, and the flush handle or button.
- Shut off the water at the wall and drain both the tank and the bowl completely using a sponge for the remaining liquid.
- Disconnect the water supply line and remove the old unit by unbolting it from the floor and the wall.
- Install the new floor flange if the old one is damaged, then set the new bowl and secure it with the provided hardware.
- Attach the tank to the bowl using the manufacturer’s provided gasket to ensure a watertight connection.
- Connect the water supply line, open the valve, and test the flush to check for any leaks at the base or tank bolts.
This is ideal for a full bathroom remodel where you want a matching set. The trade-off is the significant physical effort required to lift and position the heavy porcelain pieces. This varies by model — check the label for the total weight, as some high-efficiency units are heavier than standard ones.
Updating the flush system
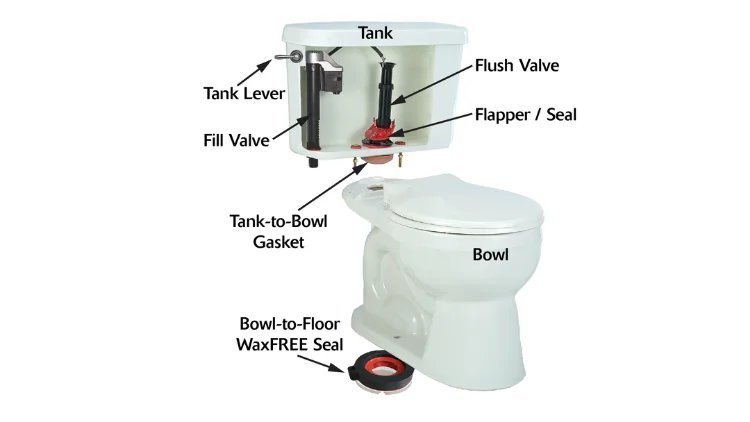
Sometimes the bowl is perfectly fine, but the internal mechanisms of the water closet fail due to mineral buildup or worn seals.
- Turn off the water and remove the tank lid carefully to access the internal valves and flapper.
- Drain the tank and remove the fill valve and flush valve by unscrewing the lock nuts underneath the tank.
- Clean the mounting area thoroughly to remove any residue that might cause the new seals to leak.
- Install the new components according to the ASME A112.19.2/CSA B45.1 standards for plumbing fixture performance.
- Adjust the water level in the tank to the fill line and test the flush cycle to ensure it clears the bowl completely.
This method is perfect for fixing a constantly running unit without the cost of a full replacement. The downside is that internal parts can be specific to certain brands, making it hard to find replacements for older or discontinued models. If you have an extremely old fixture, it’s often more cost-effective to replace the entire unit than to hunt for obsolete internal parts.
Which one should you use?
When you’re in a hurry, the best approach is to perform a simple cistern repair. This focuses only on the moving parts, which are usually standard and easy to swap in under an hour without disturbing the main plumbing connection.
When you’re doing this for the first time, I recommend replacing the entire water closet. Buying a new, complete kit ensures that all parts are designed to work together, which eliminates the guesswork of trying to match a new bowl to an old tank. The instructions provided by the manufacturer are typically written for a DIY audience and provide a clear path to success.
When you want the best possible result whatever it takes, you should opt for a total bathroom renovation. This allows you to inspect the subfloor, replace the flange if necessary, and upgrade to a modern, high-efficiency system that saves water. This is a significant investment of time and money, but it prevents the recurring issues that come with trying to patch together different generations of plumbing parts. The trade-off is always between the ease of a quick fix and the long-term reliability of a full replacement. If your current unit is over fifteen years old, the internal components are likely failing, and a full upgrade will save you more money on water and repairs in the long run.
The rules that apply whichever way you choose
Regardless of which path you take, you must follow local plumbing codes set by your municipal authority. These rules govern the required clearance around the fixture and the type of drain connections allowed. You need to prepare your workspace by clearing all items from the area and laying down towels to catch any spilled water.
Partway through your work, always check for leaks by running a small amount of water through the system before you fully secure the bolts. If you see water pooling, stop immediately and check your gaskets. If you’re working with live plumbing lines, failing to seal a joint correctly can lead to significant water damage, which is why a professional plumber should handle any work involving major pipe modifications.
If the water stays clear, your seal is solid. If you notice any wobbling, tighten the floor bolts slightly, but be careful not to overtighten them, as porcelain cracks easily under pressure. This is a common mistake that can ruin a new unit in seconds. Always prioritize the integrity of the seal over the aesthetic finish of the bolts.
Frequently asked questions
Can I replace just the bowl if my tank is old?
Yes, you can replace just the bowl, but it’s often difficult to find a new basin that matches the mounting holes and rough-in dimensions of an older tank. Most manufacturers change their designs regularly, which can make mixing and matching parts nearly impossible. It’s usually more efficient to replace the entire system rather than spending hours trying to find a compatible bowl for an outdated tank.
Why is my water closet leaking at the floor?
Your unit is leaking at the floor because the wax ring seal has failed or the floor bolts have become loose over time. This happens when the unit shifts slightly, breaking the airtight seal that keeps water in the pipe. You’ll need to remove the unit, clean the old wax, and install a new ring to fix the leak and prevent damage to your floorboards.
How long does a standard water closet last?
A high-quality ceramic fixture can last for several decades, though the internal working parts like the fill valve and flapper usually need replacement every five to ten years. You should check the manufacturer’s warranty information for your specific model to see the expected lifespan of the internal plastic components. If you notice the flush becoming weak or slow, it’s usually a sign that the internal parts are wearing out.
Is it safe to install a new unit myself?
If you have any concerns about your home’s water pressure or the condition of your floor flange, it’s safer to hire a licensed plumber. Never force a connection if it doesn’t fit easily, as this can lead to cracks.
What happens if I use a bowl that doesn’t match the rough-in?
Using a bowl that doesn’t match your rough-in prevents a proper seal, causing leaks that lead to rot and structural damage. Always measure from the wall to the center of the drain pipe before purchasing a new fixture to ensure the unit fits perfectly.
Final Thoughts
Whether you’re updating a single piece or installing a brand-new setup, it’s helpful to check your local building codes first. Don’t hesitate to ask a professional at your hardware store if you’re unsure about compatibility. They’ll help you find the right parts so your next bathroom project goes smoothly.