
If you’re planning a bathroom makeover or building a new shower, one step you can’t afford to miss is waterproofing between the cement board and the shower pan. This crucial detail might seem small, but it makes a huge difference in keeping water where it belongs—outside your walls and off your floors.
Without proper waterproofing, you risk costly water damage, mold growth, and endless repairs. You’ll discover simple, effective ways to create a watertight seal that protects your investment and gives you peace of mind every time you step into your shower.
Keep reading to learn how to do it right the first time.
Choosing The Right Waterproofing Materials
Choosing the right waterproofing materials is crucial for a long-lasting shower installation. Proper waterproofing protects against water damage and mold growth. It also keeps the area safe and clean. Picking suitable materials ensures a secure barrier between the cement board and shower pan.
Types Of Waterproofing Membranes
Waterproofing membranes form the first line of defense against moisture. Sheet membranes are thin, flexible, and easy to install. They offer reliable protection and work well under tiles. Liquid membranes come as a paint or gel. They create a seamless barrier when applied. Both types prevent water from reaching the cement board and shower pan.
Sealants And Tapes For Cement Boards
Sealants fill gaps and joints to stop water leaks. Silicone and polyurethane sealants are popular for showers. They remain flexible and resist mold. Waterproof tapes are easy to apply on seams. They reinforce the joints between cement boards. Using sealants and tapes together strengthens the waterproofing system.
Waterproofing Showers: Best Products
Many products suit shower waterproofing needs. RedGard is a liquid membrane favored for its ease of use. Kerdi membrane is a sheet type that bonds well with thin-set mortar. For sealants, DAP silicone offers strong adhesion and durability. Tapes like Schluter Kerdi-band provide added protection at corners and joints. Choosing trusted products improves the shower’s waterproof barrier.
Credit: www.diychatroom.com
Preparing The Cement Board Surface
Preparing the cement board surface is a key step in waterproofing between the cement board and shower pan. A clean, dry, and properly sealed surface ensures better waterproofing and prevents water damage. Taking time to prepare the surface correctly helps the waterproofing materials stick well. It also extends the life of your shower installation.
Cleaning And Drying The Surface
Remove all dust, dirt, and debris from the cement board. Use a brush or vacuum to clean the surface thoroughly. Make sure no loose particles remain. Dirt can stop waterproofing layers from sticking properly.
Allow the cement board to dry fully before applying any waterproofing products. Moisture can weaken the bond and cause issues later. Check for damp spots and let them dry completely.
Sealing Joints And Seams
Cover all joints and seams with a waterproof tape or mesh. This creates a barrier against water penetration. Use thin-set mortar or a joint compound to embed the tape firmly. Smooth the surface to avoid bumps.
Sealing joints reduces the risk of leaks through gaps. Pay close attention to corners and edges, as these areas are most vulnerable.
Applying Primer For Better Adhesion
Apply a waterproof primer over the entire cement board surface. Primer helps the waterproofing membrane stick better. Use a brush or roller for even coverage.
Let the primer dry according to product instructions. A good primer layer improves adhesion and creates a strong base. This step enhances the overall waterproofing performance.
Installing The Shower Pan Correctly
Installing the shower pan correctly is a key step for a durable and leak-free shower. This process creates a solid base that supports the cement board and waterproofing layers. Proper installation prevents water damage and costly repairs later. Follow each step carefully for the best results.
Leveling And Securing The Pan
Start by placing the shower pan on the subfloor. Use a level to check if the pan sits flat. Adjust by adding shims under the pan if needed. A level pan ensures water flows toward the drain.
Once level, secure the pan to the floor with screws or adhesive. Check the manufacturer’s instructions for the right method. A firmly attached pan prevents movement and protects the waterproofing layer.
Choosing The Right Shower Pan Material
Select a shower pan material that fits your budget and bathroom style. Common materials include acrylic, fiberglass, and solid surface. Acrylic pans are lightweight and easy to install. Fiberglass pans offer strength and flexibility. Solid surface pans provide a seamless look and durability.
Make sure the material is compatible with your waterproofing method. Durable materials reduce the risk of cracks and leaks over time.
Connecting Drain Assembly
Install the drain assembly carefully to stop leaks. Apply plumber’s putty or silicone around the drain flange. Insert the drain through the shower pan’s drain hole.
From beneath the pan, tighten the drain locknut securely. Avoid overtightening, which can crack the pan. Test the drain for leaks by pouring water before finalizing the installation.

Credit: www.reddit.com
Applying Waterproofing Between Cement Board And Shower Pan
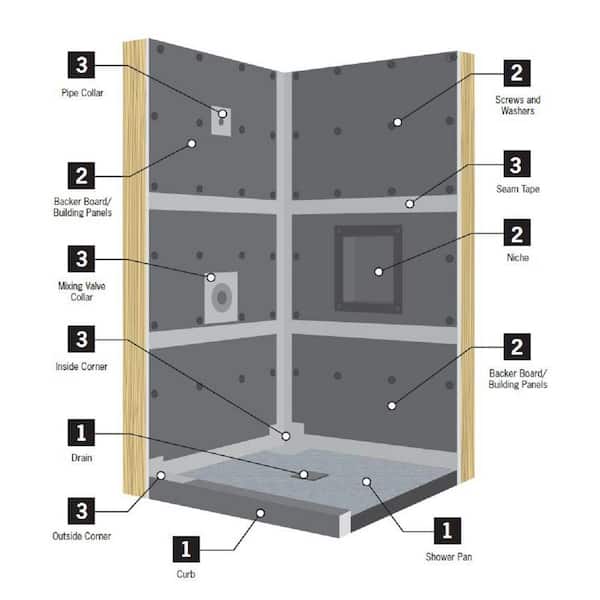
Applying waterproofing between the cement board and shower pan is a vital step. It stops water from seeping into the walls or floor. This process protects your bathroom from damage and mold growth.
Proper waterproofing ensures the shower lasts longer. It also keeps the space clean and safe. Using the right materials and techniques makes a big difference.
Sealing The Transition Area
Seal the joint where the cement board meets the shower pan. Use a high-quality waterproof sealant for this task. Apply it evenly along the seam to cover every gap. This prevents water from leaking into hidden spaces. Let the sealant dry fully before moving on.
Using Waterproofing Tape And Sealant
Waterproofing tape adds extra protection at the seam. Cut the tape to the needed length. Press it firmly onto the sealant while it is still wet. This creates a strong bond between surfaces. Cover the tape with a thin layer of sealant. Smooth it out to make a flat surface.
Ensuring A Continuous Waterproof Barrier
Check the entire area for any holes or cracks. Fill all weak spots with sealant or waterproofing material. The goal is to create one solid barrier against water. Overlap materials slightly to avoid gaps. This continuous layer keeps moisture away from the structure.
Common Mistakes To Avoid
Waterproofing between the cement board and shower pan is crucial for a lasting shower. Many problems start with simple mistakes. Avoiding these errors saves time and money. Focus on these common pitfalls to protect your bathroom from water damage.
Skipping Surface Preparation
Surface preparation is the first step. Dirt, dust, or moisture can stop waterproofing materials from sticking. Always clean and dry the surface before applying any products. A rough or uneven surface reduces waterproofing effectiveness.
Using Incompatible Materials
Not all materials work well together. Some waterproofing membranes may not bond with certain cement boards or shower pans. Check product compatibility before starting. Using the wrong materials leads to leaks and damage.
Ignoring Manufacturer Instructions
Each product comes with specific guidelines. Ignoring these can cause waterproofing failure. Follow drying times, application methods, and layering rules carefully. Manufacturer instructions ensure the best results and long-term protection.
Credit: www.homedepot.com
Testing And Maintaining Waterproofing
Testing and maintaining waterproofing between the cement board and shower pan is crucial. It helps prevent water damage and mold growth. Regular checks ensure your shower stays dry and safe. Small issues caught early save money and effort.
Performing Water Leak Tests
Fill the shower pan with water up to the top edge. Let it sit for at least 24 hours. Check for any water leaks or damp spots around the cement board. Use a moisture meter to detect hidden water. This test shows if the waterproofing layer works well.
Routine Inspection Tips
Look closely at the seam between the cement board and shower pan. Search for cracks, gaps, or peeling waterproofing. Check grout lines and caulking for signs of wear. Inspect these areas every few months. Early detection keeps water from seeping through.
Repairing Minor Damages
Clean damaged spots with a brush and mild soap. Dry the area completely before repairs. Apply waterproof sealant or membrane to small cracks or holes. Smooth the surface for an even finish. Allow the repair to dry fully before using the shower again.
Frequently Asked Questions
What Is The Best Waterproofing Method Between Cement Board And Shower Pan?
Use a waterproof membrane or liquid waterproofing sealant between cement board and shower pan. This prevents water from leaking into the subfloor. Proper sealing ensures a long-lasting, dry shower area.
Can I Use Regular Paint As Waterproofing On Cement Board?
Regular paint is not waterproof and will not protect against water damage. Use special waterproofing membranes or sealants made for wet areas. These products create a strong water barrier on cement board.
How Do I Prepare Cement Board Before Waterproofing?
Clean the cement board surface to remove dust and debris. Fill gaps or seams with waterproof tape or mesh. Smooth the surface to help the waterproofing layer stick well.
Why Is Waterproofing Important Between Cement Board And Shower Pan?
Waterproofing stops water from seeping through and damaging the floor and walls. It helps prevent mold, mildew, and costly repairs. A sealed shower base keeps your bathroom safe and dry.
Can I Install A Shower Pan Without Waterproofing The Cement Board?
Skipping waterproofing risks water leaks and damage under the shower pan. Cement board alone does not block water. Always apply waterproofing to protect your shower’s structure.
How Long Does Waterproofing Last Between Cement Board And Shower Pan?
Properly applied waterproofing can last 10 years or more. Its lifespan depends on product quality and installation care. Regular bathroom maintenance helps keep it effective longer.
What Materials Work Best For Waterproofing Shower Cement Board?
Liquid waterproofing membranes and peel-and-stick waterproof sheets work well. Use materials rated for wet areas and easy to apply. These provide strong, flexible protection against water damage.
Conclusion
Proper waterproofing between cement board and shower pan prevents leaks. It keeps water from damaging walls and floors. Use the right sealants and follow installation steps carefully. Small gaps can cause big problems later. A tight seal ensures a longer-lasting, safe shower space.
Take your time and check your work. This simple step protects your bathroom and saves money on repairs. Waterproofing is key for a strong, durable shower.