
If you’re dealing with a slow or clogged shower drain, removing the Oatey Caspers shower drain might be the first step to fixing the problem. But how do you do it without damaging your shower or making the mess worse?
You’re about to discover simple, clear steps that anyone can follow to remove this drain quickly and safely. Whether you’re a DIY beginner or just want to save time and money, this guide will help you tackle the job with confidence.
Keep reading to learn exactly what you need to know to get your shower drain out and ready for repair or replacement.
Tools Needed
Removing an Oatey Casper shower drain requires the right tools. Having the correct equipment makes the job easier and safer. You will need some basic tools to get started. Some extra tools can help if the drain is stuck or hard to remove.
Essential Equipment
A screwdriver is necessary to remove screws from the drain cover. A pair of pliers helps to grip and turn the drain parts. An adjustable wrench can loosen tight nuts. A utility knife is useful for cutting any sealant around the drain. A flashlight helps to see clearly inside the drain area. Gloves protect your hands from sharp edges and dirt.
Optional Tools For Stubborn Drains
A drain removal tool, designed for Oatey Casper drains, makes removal easier. A putty knife can help pry the drain from the shower base. A hammer may be needed to tap the putty knife gently. A pipe wrench offers extra grip for very tight fittings. WD-40 or a similar lubricant can loosen rust or stuck parts. These tools save time on tough drains.
Preparing The Area
Preparing the area is the first step in removing the Oatey Caspers shower drain. It sets the stage for a smooth and safe process. Taking time to prepare helps avoid accidents and damage. Clear space and safety are key before starting the work.
Clearing The Shower Space
Remove all items from the shower floor. This includes shampoo bottles, soap, and mats. Clear away any rugs near the shower entrance. A clean space gives you room to work freely. It also prevents tripping over objects during the removal.
Use a cloth to wipe down the shower floor. This removes dirt and moisture. A dry surface helps tools grip better. It also prevents slipping accidents.
Ensuring Safety Measures
Wear gloves to protect your hands from sharp edges. Safety glasses keep dust and debris out of your eyes. Make sure the bathroom is well-ventilated. Open a window or use a fan to reduce dust buildup.
Turn off the water supply to the shower. This avoids leaks or water damage during removal. Keep a bucket nearby to catch any leftover water. Planning these safety steps prevents problems later.
Locating The Caspers Drain
Locating the Caspers shower drain is the first step in removal or repair. Knowing its exact position helps avoid damage to the surrounding tiles and plumbing. This section explains how to find the Caspers drain easily and safely.
Identifying The Drain Type
The Caspers drain has a unique design. It often appears as a round or square cover in the shower floor. This drain usually features a removable top with slots or holes for water flow. Recognizing this design helps distinguish it from other drain types.
Checking For Visible Components
Look closely at the shower floor for any visible drain parts. The cover might be flush with the tile or slightly raised. Sometimes, the drain’s metal or plastic rim is visible. Spotting these components confirms the drain’s location before removal.
Credit: terrylove.com
Removing The Drain Cover
Removing the drain cover is the first step in taking out the Oatey Casper shower drain. This task requires care to avoid damage. The cover protects the drain and keeps debris out. Removing it lets you clean or replace the drain parts easily. Two common types of covers need different methods for removal. Identifying your cover type helps you choose the right approach.
Unscrewing Techniques
Some Oatey Casper drain covers attach with screws. Use a screwdriver that fits the screws well. Turn the screws counterclockwise to loosen them. Keep the screws safe for reinstallation later. If screws are tight, apply steady pressure to avoid stripping. Avoid using excessive force that might damage the cover.
Once screws are out, lift the cover gently. If it sticks, wiggle it slightly to release. Do not pry hard with tools. This avoids scratching or bending the drain cover.
Handling Snap-on Covers
Other drain covers snap into place without screws. Look for small notches or tabs around the cover edge. Use a flat tool or your fingernail to press under these tabs. Gently lift the cover up and away from the drain. Work around the cover slowly, releasing all tabs evenly.
Snap-on covers can be fragile. Avoid bending or forcing them off quickly. Take your time to prevent cracks or breaks. After removal, clean the cover and drain before reinstalling.
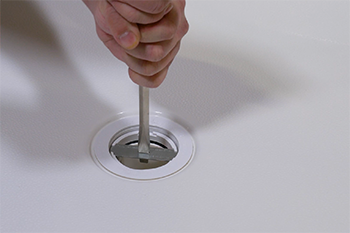
Extracting The Drain Body
Extracting the drain body is a key step in removing the Oatey Caspers shower drain. It requires care and the right technique to avoid damage. This part connects the drain cover to the pipe below. Removing it lets you clean or replace parts easily.
Loosening The Drain Assembly
Start by turning the drain cover counterclockwise. Use a drain wrench or a flathead screwdriver. Apply steady pressure to avoid slipping. Some models have screws; remove them first. Loosening the assembly frees the drain body from the shower floor. Take your time to prevent cracking the surrounding tiles.
Dealing With Stuck Parts
Rust or debris can cause the drain body to stick. Apply a penetrating oil around the edges. Let it sit for 10-15 minutes. Tap gently with a rubber mallet to loosen the grip. Avoid using excessive force to protect the drain and pipes. Repeat the process if needed. Patience pays off in this step.
Cleaning The Drain Area
Cleaning the drain area is a key step after removing the Oatey Caspers shower drain. It helps keep the drain working well and avoids future clogs. A clean drain area also makes installing a new drain easier and more secure.
Taking time to clean the space prevents problems and keeps your shower drainage smooth. Focus on removing all dirt and buildup. Then prepare the area for the new drain to fit perfectly.
Removing Debris And Build-up
Start by clearing out hair, soap scum, and other debris. Use gloves and a small brush or cloth to scrub the drain opening. A gentle cleaner can remove sticky residue without damage.
Check inside the drain for any hidden blockages. A flashlight helps to see better. Remove any loose material carefully to avoid pushing it deeper.
Preparing For New Installation
Dry the drain area completely after cleaning. Moisture can weaken the seal of the new drain. Use a clean cloth or let it air dry.
Inspect the drain flange and surrounding surface. Smooth out rough edges or old adhesive spots. A flat, clean surface ensures a tight fit for the new drain.
Reinstalling Or Replacing The Drain
Reinstalling or replacing the Oatey Caspers shower drain requires careful attention. A proper fit ensures no leaks and smooth drainage. Understanding the right parts and installation steps will make the job easier and more effective.
Choosing Replacement Parts
Select parts that match the original drain size and type. Oatey Caspers offers various drain models for different shower types. Use a drain with compatible threading and flange size. Avoid mixing parts from different brands to prevent leaks. Quality materials like brass or stainless steel last longer and resist corrosion.
Proper Installation Steps
Start by cleaning the drain opening and removing old sealant. Apply a waterproof sealant or plumber’s putty around the drain flange. Insert the new drain carefully into the hole, aligning it evenly. Tighten the locknut under the shower base securely but avoid overtightening. Test for leaks by running water and checking beneath the drain. Fix any leaks before finishing the installation with the shower grate.
Credit: www.oatey.com
Testing For Leaks
Testing for leaks is a key step after removing the Oatey Caspers shower drain. It helps ensure no water escapes and causes damage. Water leaks can lead to mold, stains, and costly repairs. Careful testing prevents these issues and confirms a proper installation.
Check every part around the drain. Small leaks might go unnoticed but cause trouble later. Use simple tests to find leaks quickly. Act fast to fix any found leaks and keep your bathroom safe.
Running Water Tests
Run water in the shower for several minutes. Watch the area around the drain closely. Look for any signs of water pooling or dripping. Water should flow smoothly down the drain without escaping.
Use a cup or bucket to pour water directly into the drain. This helps check if the drain seals hold tight. If water leaks, stop and inspect the drain parts again. Repeat the test after making adjustments.
Inspecting Seals And Connections
Examine the seals around the drain carefully. Seals should fit snugly and show no cracks or gaps. Loose seals often cause leaks under the shower floor.
Check all pipe connections near the drain. Tighten any loose fittings with a wrench. Use plumber’s tape on threaded connections to improve the seal. Replace damaged parts to avoid leaks later.
Maintenance Tips
Proper maintenance keeps your Oatey Caspers shower drain working well. It helps avoid slow drainage and bad smells. Simple steps can extend your drain’s life and keep water flowing smoothly.
Regular Cleaning
Clean the drain cover often. Remove hair and soap scum. Use a soft brush or cloth to scrub gently. Flush the drain with hot water weekly. This clears minor buildup before it clogs the pipe.
Deep clean every few months. Use a mild cleaner safe for plastic and metal parts. Avoid harsh chemicals that can damage the drain. Rinse well after cleaning to remove residue.
Preventing Future Clogs
Use a drain screen to catch hair and debris. Empty it regularly. Avoid pouring grease or thick liquids down the drain. These can stick inside and block water flow.
Run hot water after each shower. This helps wash away soap and oils. Check the drain for slow water flow. Act quickly to clear blockages before they worsen.

Credit: www.reddit.com
Frequently Asked Questions
How Do I Remove An Oatey Caspers Shower Drain?
Start by loosening the drain cover with a screwdriver. Use a drain removal tool or pliers to twist the drain body counterclockwise. Pull it out carefully once it’s loose.
What Tools Are Needed To Remove This Shower Drain?
You need a screwdriver, drain removal tool or pliers, and possibly a wrench. A flashlight helps to see inside the drain better. Gloves can protect your hands during the process.
Can I Remove The Shower Drain Without Damaging Tiles?
Yes, by working slowly and carefully. Avoid using excessive force or sharp tools near tiles. Protect tiles with a cloth or tape before starting.
How Long Does It Take To Remove An Oatey Caspers Drain?
The removal usually takes 10 to 20 minutes. It depends on how tight the drain is and your experience level. Preparation and the right tools speed up the process.
What Should I Do If The Drain Is Stuck?
Apply a rust remover or lubricant around the drain threads. Let it sit for 10-15 minutes to loosen corrosion. Use a drain removal tool to twist it free gently.
Is It Safe To Remove The Drain Myself?
Yes, as long as you follow safety steps and use the right tools. Turn off water supply and wear gloves. If unsure, consider calling a plumber.
How Do I Clean The Drain After Removal?
Remove any debris or hair from the drain body. Use a brush and mild cleaner to scrub inside the drain pipe. Rinse with water before installing a new drain.
Conclusion
Removing the Oatey Caspers shower drain is simple with the right tools. Follow each step carefully to avoid damage. Clean the area well before installing a new drain. Taking your time can save you from future problems. This task does not require expert skills, just patience.
You can do it yourself and save money. A properly removed drain helps keep your shower clean and working well. Try it out and see how easy it can be.