
A standard 12-volt backup battery for a LiftMaster garage opener typically lasts several years, depending on usage and garage temperature. You’ll need to replace the unit when the battery status light on your motor head turns solid orange or flashes red. Replacing this part is a simple task that costs roughly $20 to $40. You must have a replacement 12V lead-acid battery that matches the exact physical size and terminal type of your current one before you begin.
Essential tools for battery replacement
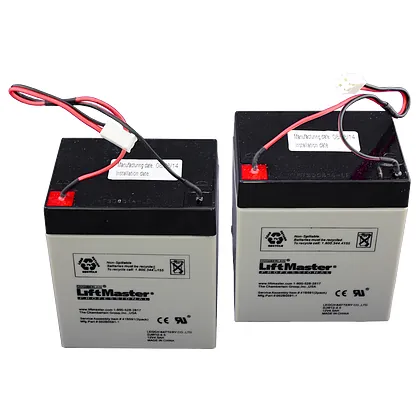
You only need a few basic tools to complete this swap safely. Most units require a simple screwdriver to open the housing cover and disconnect the old battery terminals.
| Item | How much | Why it’s needed | A substitute |
|---|---|---|---|
| Phillips screwdriver | 1 tool | Remove the plastic cover | Flathead screwdriver |
| Replacement battery | 1 unit | Power the opener unit | None — don’t swap this |
| Work light | 1 lamp | See inside the housing | Cell phone flashlight |
| Safety glasses | 1 pair | Prevent dust contact | None — don’t swap this |
Don’t reach for a power drill to remove the housing screws. The plastic casing is brittle; the high torque of a drill often strips the screw heads or cracks the mounting tabs, rendering the unit impossible to close securely. Use a manual #2 Phillips driver to maintain tactile control.
If your battery terminals are corroded with white, chalky residue, don’t simply swap the unit. You must clean the contacts with a cotton swab dipped in white vinegar first. If you skip this, the new battery will fail to conduct power, leaving you to troubleshoot a perfectly functional cell.
If the battery is stuck, use a plastic spudger or a dull butter knife to gently pry it loose. Never use a metal screwdriver to lever the battery out, as you risk puncturing the casing and causing a short circuit.
Preparing your garage opener
Pull the emergency release cord first to disconnect the door from the trolley so the motor doesn’t engage while you work. Manually lift the door halfway; if it drifts down or snaps upward, your torsion springs are improperly balanced and require professional adjustment before you proceed with any electrical work.
Unplug the garage door opener from the ceiling outlet to ensure no live electricity flows into the housing during the process. Unplug the garage door opener from the ceiling outlet to ensure the unit is disconnected from AC power before beginning work.
Consult the manufacturer support documentation for your specific motor model to confirm the correct battery chemistry and voltage requirements before purchasing a new one. Don’t assume a standard 12-volt lead-acid battery fits every unit, as newer models often utilize lithium-ion packs that require specialized charging circuits.
If you find the battery case is swollen, cracked, or leaking fluid, stop immediately and contact a professional technician for safe disposal and replacement. Attempting to force a damaged battery into the housing risks a chemical fire or permanent damage to the logic board.
Steps to replace your LiftMaster garage opener battery
- Locate the battery compartment cover on the side or bottom of your LiftMaster motor head.
- Use your screwdriver to loosen the screws holding the plastic cover in place and pull it off.
- Slide the old battery out of its slot slowly to avoid pulling on the attached wires.
- Disconnect the red and black spade connectors from the battery terminals by pulling them firmly straight back.
- Check the new battery to ensure it’s the same 12-volt specification as the original unit.
- Connect the red wire to the positive terminal and the black wire to the negative terminal on the new battery.
- Slide the new battery into the compartment, ensuring the wires aren’t pinched by the plastic housing.
- Reattach the plastic cover and tighten the screws until they’re snug but not over-tightened.
- Plug the power cord back into the ceiling outlet and test the door operation using your wall control.
Confirming the repair was successful
A successful replacement is confirmed when the battery status light on your garage door opener changes from a solid or flashing red color to a solid green or turns off completely. If the light remains red, the new battery may need up to 24 hours of continuous charging to reach full capacity.
If the light doesn’t change after 24 hours, check that the spade connectors are pushed firmly onto the terminals. A loose connection is the most common cause of a persistent red light and costs you the security of a backup system.
If the opener still doesn’t function during a power outage after the battery is installed, the circuit board may have a fault. Don’t attempt to repair the circuit board yourself, as it contains sensitive components that require professional handling. A properly installed battery provides power for the motor to lift the door during a standard power failure.
If your garage stays below 32 degrees Fahrenheit for long periods, the battery may need replacement sooner. Cold temperatures increase internal resistance, which can reduce the battery’s usable lifespan. If you live in a climate with harsh winters, test the backup system manually based on your usage patterns and consult your owner’s manual for specific guidance.
Troubleshooting common battery issues
| What happened | Why | What to do |
|---|---|---|
| Light stays red | Low charge | Wait 24 hours |
| No power | Loose wire | Check terminal clips |
| Door moves slow | Cold weather | Warm the garage |
| Battery won’t fit | Wrong size | Check model number |
| Beeping sound | Battery failure | Replace the battery |
If the indicator light remains red after a full day of charging, the internal cells have likely lost their ability to hold a voltage. Don’t attempt to force a charge, as this creates a fire risk.
When checking terminal clips, ensure the metal-to-metal contact is free of white, crusty corrosion. This buildup acts as an insulator that prevents power flow. Use a wire brush to clear the debris until the metal shines silver.
If your door moves slowly during winter, the grease in the tracks has likely thickened. Apply a silicone-based lubricant to the rollers to reduce friction.
Most users mistake a failing battery for a motor issue when they hear a constant beeping. If the beeping persists after you install a fresh unit, the control board has likely tripped a fault code. Reset the system by unplugging the main power for sixty seconds before reconnecting.
How often to change your battery
You should expect to replace your battery periodically under normal conditions. Two main factors influence this timeline: the number of cycles the battery performs during power outages and the ambient temperature of your garage.
If you live in an area with frequent power interruptions, your battery will naturally reach its discharge limit faster. Conversely, extreme heat or deep cold can degrade the lead-acid chemistry inside, shortening the total lifespan regardless of use. If your garage consistently exceeds 90 degrees Fahrenheit during the summer, plan to replace the unit closer to the 3-year mark.
Check the battery status light regularly to ensure your system is ready for an emergency, following the frequency recommended in your owner’s manual based on your specific usage. If the light shows a solid red, it indicates the battery is no longer holding a charge and requires immediate replacement.
Many owners mistakenly wait for a power outage to test their system. This is a costly oversight, as a dead battery often prevents the door from opening manually during a power failure.
Frequently asked questions
Can I use a generic battery for my LiftMaster?
Yes, you can use a generic battery as long as it’s a 12-volt sealed lead-acid battery with the same physical dimensions and terminal style as the original. Check the label on your existing battery for the exact “Ah” (Amp-hour) rating and physical size codes to ensure the new one fits in the compartment correctly. Using the wrong size often leads to pinched wires or a cover that won’t close.
Is it safe to change the battery myself?
Yes, it’s safe to change the battery yourself provided you unplug the unit from the power source first. The battery itself is low voltage and doesn’t pose a shock risk, but the internal components of the garage door opener motor can hold a lethal charge. Never open the main motor housing; only remove the small, designated battery compartment cover to perform this specific maintenance task.
How long does it take for the battery to charge?
It takes up to 24 hours for a new battery to reach a full charge when the opener is plugged into a standard wall outlet. The system charges the battery automatically whenever the main power is active. You don’t need to perform any special settings or programming steps on the opener after the battery is installed, as the system detects the voltage automatically once the connection is made.
What happens if I don’t replace the battery?
A dead garage door battery prevents the motor from operating during a power outage. Without a functional battery, you lose the backup feature that allows the door to open or close when the house loses electricity. Some models may also emit a periodic beeping sound to alert you that the backup system is inactive.
Does the battery brand matter?
No, the brand doesn’t matter as long as the battery meets the exact technical specifications required by your LiftMaster unit. Focus on the voltage, the amp-hour rating, and the physical terminal layout rather than the brand name. Many third-party manufacturers produce high-quality batteries that fit perfectly and perform just as well as the factory-branded versions, provided they’re designed for standard alarm or UPS systems.
How do I know if the battery is truly dead?
You know the battery is dead when the status light on your motor head displays a solid or flashing red color while the unit is plugged in. This light is the primary indicator provided by the manufacturer to signal that the battery has failed a self-test. If the light doesn’t turn green even after the unit has been plugged in for over 24 hours, the internal chemistry has failed.
Conclusion
Once you’ve installed the new power source, don’t forget to test it by unplugging your opener from the wall outlet. If the door still operates smoothly, you’re all set for the next few years. It’s a good idea to mark the installation date on the casing so you won’t lose track.
