
Is your faucet wobbling or leaking on your beautiful granite countertop? It’s a common problem that can cause frustration and even damage if not fixed quickly.
But don’t worry—you don’t need to call a plumber or replace your entire sink. You can tighten your faucet yourself with just a few simple steps. You’ll discover easy and effective tips to secure your faucet firmly, saving you time and money.
Keep reading, and you’ll feel confident tackling this handy repair on your own.
Credit: www.reddit.com
Tools Needed
Having the right tools makes tightening a faucet on a granite countertop easier. You need tools that fit tight spaces and protect the granite. Using the wrong tools can cause damage or make the job harder. Below is a list of essential tools for this task.
Adjustable Wrench
An adjustable wrench fits different bolt sizes. It helps loosen or tighten faucet nuts securely. Choose one with a smooth grip for better control.
Basin Wrench
A basin wrench is made for hard-to-reach places under sinks. It has a long handle and a swiveling jaw. This tool makes tightening faucet nuts easier in tight spaces.
Plumber’s Putty Or Silicone Sealant
Use plumber’s putty or silicone sealant to create a watertight seal. This prevents leaks around the faucet base. Choose a product safe for granite surfaces.
Soft Cloth Or Towel
A soft cloth protects the granite from scratches. Place it between the wrench and the countertop. This prevents damage while you work.
Flashlight
A flashlight helps you see under the sink clearly. Good lighting ensures you tighten the faucet properly. Use a small, bright flashlight for best results.

Credit: diy.stackexchange.com
Preparing The Area
Preparing the area is the first step to tighten a faucet on a granite countertop. A clean and safe workspace makes the job easier. Taking time to prepare helps avoid damage to the granite and keeps tools handy.
Start by clearing the countertop. Remove items near the faucet to create space. This prevents accidents and protects your belongings from water or scratches.
Clear The Countertop
Clear all objects near the faucet. Move soap bottles, towels, and other items. Wipe the surface to remove dust or dirt. This keeps the granite safe during the repair. A clean space helps you see what you are doing clearly.
Turn Off Water Supply
Locate the water shut-off valves under the sink. Turn them clockwise to close. This stops water flow to the faucet. Test by turning the faucet on to check no water comes out. Turning off water prevents leaks and water damage while tightening the faucet.
Accessing The Faucet Mount
Accessing the faucet mount is the first step to tighten your faucet on a granite countertop. You need to reach the parts that hold the faucet firmly in place. This area is often under the sink, where you can find the mounting hardware. Knowing where to find these parts makes the job easier and faster.
Locate Mounting Hardware
Look under the sink for the faucet’s mounting hardware. These are usually nuts or brackets that secure the faucet to the countertop. The hardware might be hidden behind water pipes or other fittings. Use a flashlight to get a clear view. Identify which parts need tightening to stop faucet movement.
Work Under The Sink
Crawl or kneel in front of the cabinet under the sink. Clear any stored items to give yourself space. Use a wrench or pliers to tighten the mounting nuts. Turn the nuts clockwise to make the faucet secure. Check the faucet on top while tightening. Stop once the faucet feels steady and does not wobble.
Tightening The Faucet
Start by turning off the water supply below the sink. Use a wrench to tighten the mounting nuts under the granite countertop carefully. Check the faucet for any movement and tighten more if needed.
Use The Right Tools
Tightening a faucet on a granite countertop needs careful handling. Using the correct tools makes the job easier and safer. A basin wrench works well for hard-to-reach nuts under the sink. An adjustable wrench helps with different sizes of bolts. Avoid using pliers that can slip and damage parts.
Before starting, check the faucet’s mounting hardware. Some faucets use nuts, others use screws. Having a flashlight helps to see under the sink clearly. Keep a towel or rag nearby to catch any drips or dirt.
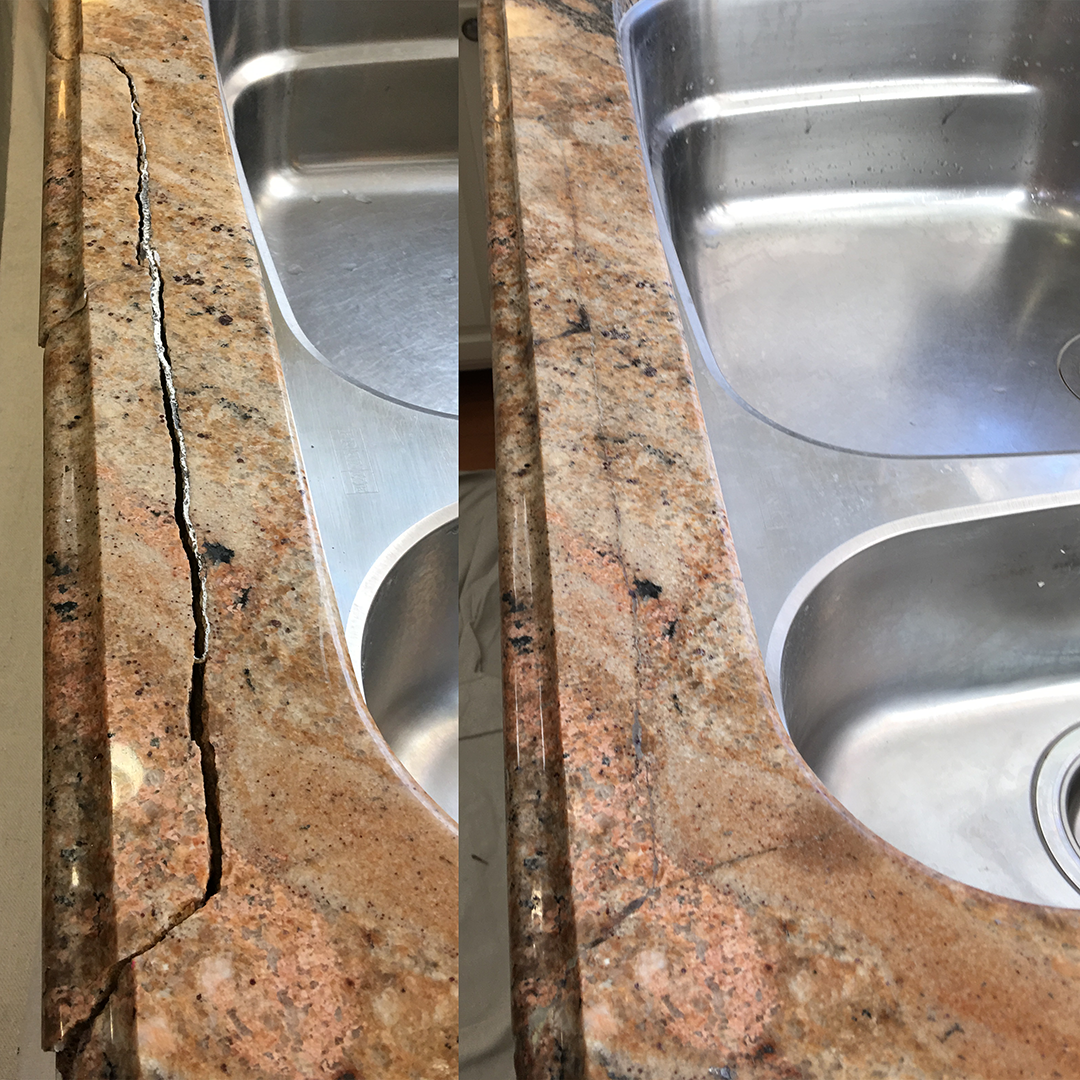
Avoid Damaging Granite
Granite is strong but can chip or crack under pressure. Always protect the countertop edges near the faucet base. Use painter’s tape or soft cloth to cover the granite around the work area. Do not apply force directly on the granite.
Work slowly and gently tighten the faucet nuts. Stop tightening once the faucet feels secure. Over-tightening can stress the mounting holes in the granite. Check the faucet stability after tightening to avoid leaks or movement.
Checking For Stability
Start by gently shaking the faucet to see if it feels loose. Check under the countertop for any wobbly parts or missing screws. This helps find where to tighten and keeps the faucet steady.
Test Faucet Movement
Start by gently moving the faucet side to side and up and down. Check if it wiggles or feels loose at the base. A faucet that moves easily may cause leaks or damage to your granite countertop. Firm stability means the faucet is properly tightened and secure.
Hold the faucet firmly and try to twist it slightly. Any noticeable movement shows the need for further tightening. Ensure you do not force it too hard to avoid damaging the fixture or granite surface.
Make Additional Adjustments
Locate the mounting nuts under the sink or countertop. Use a basin wrench or adjustable wrench to tighten these nuts carefully. Turn each nut slowly and check the faucet’s movement again.
Do not over-tighten as it can crack the granite or damage the faucet parts. Tighten just enough to stop the faucet from moving. Repeat testing the stability after each adjustment. This careful approach protects your countertop and ensures a long-lasting faucet installation.
Credit: sureshinecares.com
Preventing Future Loosening
Keeping your faucet tight on a granite countertop saves time and effort. Loose faucets can cause leaks and damage. Preventing future loosening helps maintain your kitchen’s look and function. Small steps can make a big difference.
Use Thread Seal Tape
Thread seal tape creates a strong seal between faucet parts. Wrap the tape around the threads before tightening. This prevents water leaks and keeps connections firm. Use tape designed for plumbing to ensure durability. Avoid overwrapping; two to three layers is enough.
Regular Maintenance Tips
Check your faucet regularly for looseness or leaks. Tighten screws and nuts gently if needed. Clean around the faucet base to stop dirt buildup. Dirt can wear down seals and cause movement. Use mild soap and water to clean without damage. Regular checks catch problems early and keep faucets secure.
Frequently Asked Questions
How Do I Tighten A Loose Faucet On A Granite Countertop?
Start by turning off the water supply below the sink. Use a basin wrench to tighten the mounting nuts under the granite carefully.
What Tools Do I Need To Tighten A Faucet On Granite?
You will need a basin wrench, adjustable wrench, and possibly a flashlight to see under the sink clearly.
Can I Tighten A Faucet Without Damaging The Granite?
Yes, use gentle pressure and avoid overtightening. Place a cloth between tools and granite to prevent scratches.
How Do I Access Faucet Nuts Under A Granite Countertop?
Look under the sink for the mounting nuts. Use a basin wrench with a long handle to reach tight spots.
What Causes A Faucet To Become Loose On Granite Countertops?
Faucet loosening happens from regular use and vibrations. Improper installation can also cause mounting nuts to loosen over time.
How Often Should I Check My Faucet’s Tightness?
Check your faucet every six months to ensure it stays secure and prevent leaks or damage.
Can I Tighten A Granite Countertop Faucet Myself Safely?
Yes, with the right tools and care, most people can tighten their faucet without professional help. Take your time.
Conclusion
Tightening a faucet on a granite countertop is simple with the right steps. Take your time and follow each instruction carefully. Using the correct tools helps avoid damage. Regular checks keep your faucet secure and leak-free. A tight faucet saves water and prevents bigger problems.
Small fixes like this improve your kitchen’s function. You can handle this task without needing a professional. Try it yourself and enjoy a steady, well-fixed faucet.