
Are you tired of that bulky kitchen soffit hanging over your cabinets, making your space feel cramped and outdated? Removing a kitchen soffit can instantly open up your room, giving it a fresh, modern look.
But you might be wondering, “Is it difficult? Will it create a mess? Can I do it myself? ” This guide will walk you through simple, step-by-step instructions to take down your kitchen soffit safely and efficiently. By the end, you’ll know exactly how to transform your kitchen without breaking the bank or calling in the pros.
Ready to see your kitchen’s true potential? Let’s get started!
Tools And Materials Needed
Removing a kitchen soffit requires the right tools and materials. Preparation is key for a smooth process and a clean finish. Gathering everything before starting helps avoid interruptions and safety risks.
Essential Tools
- Hammer – for removing nails and loosening parts
- Utility knife – to cut caulking and paint edges
- Crowbar or pry bar – to pry off soffit panels
- Reciprocating saw – for cutting wood or drywall
- Drill with screwdriver bits – to remove screws
- Measuring tape – to measure repair areas
- Stud finder – to locate framing behind the soffit
Safety Gear
- Safety goggles – to protect eyes from dust and debris
- Dust mask or respirator – to avoid inhaling dust
- Work gloves – to prevent cuts and splinters
- Ear protection – if using loud power tools
- Long sleeves and pants – to protect skin
Materials For Repair
- Drywall sheets – to patch gaps after removal
- Wood filler or spackle – to fix holes and dents
- Joint compound – to smooth drywall seams
- Sandpaper – for sanding repaired areas
- Primer and paint – to match existing walls and ceiling
- Caulk – to seal edges and prevent cracks
- Replacement wood or trim – for finishing touches

Credit: www.riversideconstruction.com
Preparing The Kitchen
Preparing your kitchen is the first step to safely remove a soffit. This process helps avoid damage and keeps the area clean. Proper preparation makes the job easier and faster. Below are key tasks to prepare your kitchen for soffit removal.
Clearing The Workspace
Remove all items from countertops and cabinets near the soffit. Move small appliances, dishes, and utensils to another room. Clear the floor space under the soffit. This prevents accidents and provides room to work freely. A clear workspace helps you focus and work safely.
Protecting Surfaces
Cover countertops, floors, and appliances with drop cloths or plastic sheets. Use painter’s tape to secure coverings and avoid slipping. Protecting surfaces prevents scratches, dust, and paint damage. It also makes cleanup faster and easier after the removal.
Turning Off Utilities
Switch off power to any lights or fans in the soffit area. Turn off the gas or water supply if plumbing runs through the soffit. Use the circuit breaker and main valves to cut utilities safely. This step reduces the risk of electric shock or leaks during removal.
Identifying Soffit Structure
Identifying the soffit structure is the first step in removing a kitchen soffit safely. Understanding what type of soffit you have and what lies behind it helps avoid damage. It also keeps you safe from unexpected hazards like wires or pipes.
Careful inspection helps plan the removal process. It makes the work quicker and less stressful. Know what to expect before you start tearing down.
Types Of Soffits
Soffits come in different materials and shapes. Some are made of drywall, others use wood or metal. Drywall soffits are common in modern kitchens. Wood soffits may appear in older homes. Metal soffits often hide vents or wiring.
Check if the soffit is simple or has built-in features like lighting. This affects how you remove it. A basic drywall soffit is easier to handle than one with electrical parts inside.
Locating Fasteners
Fasteners hold the soffit to the wall and ceiling. They can be nails, screws, or staples. Find these fasteners before you start removing the soffit. Use a flashlight and a stud finder if needed.
Mark where fasteners are located. This helps avoid damaging the wall or ceiling. Removing fasteners carefully keeps the area clean and ready for repairs.
Checking For Electrical Or Plumbing
Soffits often hide electrical wires or plumbing pipes. Always check for these before removal. Turn off power to the kitchen to stay safe from shocks.
Look for switches, outlets, or vent fans on the soffit. These signals mean wires might be inside. Plumbing pipes might be behind if the soffit runs over a sink or dishwasher.
Use a voltage tester to confirm no live wires. Call a professional if you find plumbing or electrical inside. Safety is the top priority in this step.
Step-by-step Removal Process
Removing a kitchen soffit can seem tough, but breaking it down into clear steps helps. Follow each step carefully for a smooth removal process. This guide covers removing trim, detaching drywall, and handling framing parts. Take your time and work safely.
Removing Trim And Molding
Start by removing any trim or molding around the soffit. Use a pry bar or putty knife to gently lift the trim. Work slowly to avoid damaging walls or cabinets. Keep nails or screws as you remove the trim. Set the pieces aside for reuse or disposal.
Detaching Drywall Or Panels
Next, remove the drywall or panels covering the soffit. Cut along the edges with a utility knife to break the paint seal. Use a hammer and pry bar to carefully pull the drywall away. Watch for electrical wires or plumbing behind the panels. Remove all screws or nails holding the drywall in place.
Handling Framing Elements
Finally, deal with the framing that supports the soffit. Check if the framing is nailed or screwed to the ceiling or walls. Use a crowbar and hammer to loosen the framing pieces. Remove all nails and screws to free the structure. Dispose of framing wood properly or save for reuse.
Dealing With Electrical And Plumbing
Removing a kitchen soffit often means dealing with electrical wires and plumbing pipes hidden inside. These utilities need careful handling to avoid damage or safety risks. Planning ahead helps make the process smooth and safe.
Safely Disconnecting Fixtures
Turn off the power at the main circuit breaker before touching any wires. Check with a voltage tester to confirm no electricity flows. Remove light fixtures and switches connected to the soffit. Shut off water supply lines before handling plumbing pipes. Use proper tools to disconnect pipes without causing leaks.
Consulting Professionals
Electricians and plumbers have the right skills for this job. They know local codes and safety rules. Hiring them reduces risks of injury or costly mistakes. Professionals can inspect hidden wiring and pipes inside the soffit. They also offer advice on the best way to proceed.
Re-routing Utilities
After removing the soffit, wires and pipes may need new paths. Plan routes that keep utilities safe and accessible. Use approved materials and follow building codes. Secure wires and pipes properly to prevent future problems. Re-routing ensures your kitchen stays functional and safe.
Repairing And Refinishing
Removing a kitchen soffit leaves the walls and ceiling uneven and damaged. Repairing and refinishing these areas is important for a clean, smooth look. This process restores the surface and prepares it for painting or other finishes. Proper repair helps hide any signs of the soffit removal and blends the space seamlessly.
Patching Walls And Ceilings
Start by cleaning the damaged areas of dust and debris. Use a putty knife to apply joint compound or spackle to holes and gaps. Press the compound firmly into cracks and dents. Let it dry fully before adding more layers. Larger holes may require drywall patches for better support. Apply thin layers until the surface is level with the surrounding wall.
Sanding And Smoothing Surfaces
Once the patching compound is dry, sand the area with fine-grit sandpaper. Sand in circular motions to remove bumps and rough spots. Check the surface by touch; it should feel flat and smooth. Wipe away dust with a damp cloth before painting. Smooth surfaces ensure paint sticks well and looks even.
Painting And Finishing Touches
Choose paint that matches your kitchen walls or ceiling. Use primer first to help paint adhere to patched areas. Apply paint in thin, even coats. Allow each coat to dry before adding another. Use a small brush for edges and corners. Finish with a clean, fresh look that hides all repairs.
Alternative Design Ideas
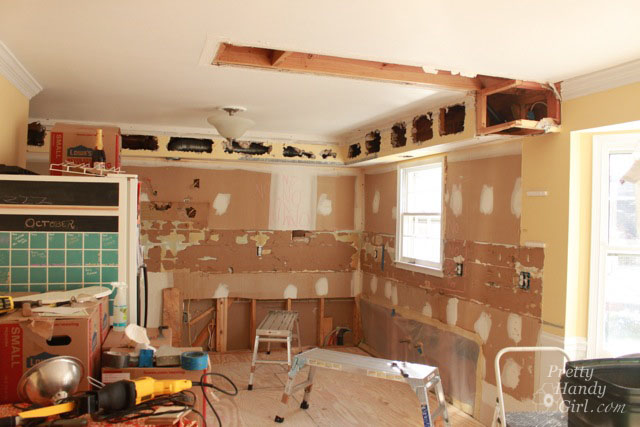
Removing a kitchen soffit opens up new design possibilities. It can make your kitchen feel larger and brighter. Explore these simple ideas to enhance your kitchen after soffit removal.
Open Ceiling Concepts
Open ceilings create a spacious and airy look. Removing the soffit reveals more of the ceiling height. This change gives your kitchen a fresh, modern feel. You can add exposed beams or keep the ceiling plain. Both choices add character and style.
Adding Crown Molding
Crown molding adds a polished finish to your kitchen walls. Without the soffit, molding highlights the edge where the wall meets the ceiling. It adds elegance and can match your kitchen’s style. Choose simple or detailed molding to fit your taste.
Installing Recessed Lighting
Recessed lighting fits well in kitchens without soffits. It offers clean, even light across the space. These lights save room and avoid clutter. Proper placement brightens work areas and enhances kitchen ambiance.
Credit: prettyhandygirl.com
Common Mistakes To Avoid
Removing a kitchen soffit might seem easy at first. Many make mistakes that cause delays and extra costs. Knowing what to avoid helps you finish the job smoothly. Below are common mistakes to watch out for during soffit removal.
Ignoring Safety Precautions
Safety is the top priority. Always wear protective gear like gloves and goggles. Dust and debris can cause injuries. Use a sturdy ladder and keep your work area clean. Avoid rushing to prevent accidents.
Damaging Utilities
Soffits often hide electrical wires, plumbing, or HVAC ducts. Cutting or pulling without checking can cause damage. Turn off power and water before starting. Use a stud finder or call a professional if unsure.
Skipping Surface Preparation
After removing the soffit, the wall or ceiling may look rough. Skipping surface prep leads to poor paint or drywall finish. Clean the area, remove nails, and patch holes. Sand the surface smooth before painting or refinishing.
Cost And Time Estimates
Removing a kitchen soffit can change the look of your space. Knowing the cost and time helps plan better. This section breaks down what to expect during the process. It covers budgeting, timing, and whether to hire pros or do it yourself.
Budgeting For Removal
The cost depends on soffit size and materials. Small soffits may cost less to remove. Larger or complicated soffits might need more money. Expect to pay for tools, debris disposal, and possible repairs. Always set extra funds for unexpected expenses. Planning your budget avoids surprises.
Expected Timeframe
Time varies by soffit size and skill level. Simple soffits take a few hours to remove. Complex soffits can take a full day or more. Removing soffits carefully prevents damage and saves time later. Allow extra time for cleanup and fixing walls or ceilings.
Hiring Professionals Vs Diy
Professionals work faster and handle challenges easily. They bring tools and experience to avoid mistakes. Hiring pros costs more but saves time and stress. DIY saves money but takes longer and needs skill. Choose based on your budget, skills, and time availability.

Credit: www.youtube.com
Frequently Asked Questions
What Tools Do I Need To Remove A Kitchen Soffit?
You need a pry bar, hammer, utility knife, screwdriver, and safety gear. These tools help safely detach the soffit from walls and ceiling. Always turn off power if electrical fixtures are involved. Proper tools prevent damage and ensure a smooth removal process.
How Long Does It Take To Remove A Kitchen Soffit?
Removing a kitchen soffit typically takes 2 to 4 hours. The time depends on soffit size, construction type, and your experience. Careful removal avoids wall or ceiling damage. Planning and preparation can make the process quicker and more efficient.
Can I Remove A Soffit Without Damaging The Kitchen Walls?
Yes, careful and slow prying minimizes wall damage. Use a utility knife to cut caulk or paint lines first. Gently separate the soffit from drywall with a pry bar. Patience and proper tools help preserve your kitchen walls.
Is It Necessary To Hire A Professional For Soffit Removal?
Hiring a professional is advisable if you lack experience. Professionals ensure safe removal, especially with electrical or plumbing inside soffits. They prevent costly damages and handle cleanup efficiently. DIY is possible but requires skill and caution.
Conclusion
Removing a kitchen soffit can open up your space and update its look. Take your time and follow safety steps carefully. Use the right tools to make the job easier. Check for wires or pipes before you start cutting. Clean up debris as you go to keep the area safe.
This project can improve your kitchen’s feel and value. Small effort, big change. Ready to transform your kitchen?