
Putting a scooter together takes about 15 to 30 minutes for a standard kick model, costs nothing if you use the boxed tools, and rates as easy. You need the matching hex key from the package before turning a single screw. This job isn’t for complex electric mopeds with hydraulic lines. The main trade-off is portability versus stability: folding models pack down quickly, but solid clamp scooters stay rigid and rattle less over time.
Tools to put your scooter together
| Item | How much | Why it’s needed | A substitute |
|---|---|---|---|
| Hex key wrench | 1 piece, usually 5mm | Tightens clamp and axle bolts | Standard metric Allen wrench |
| Open-end wrench | 1 piece, usually 13mm | Holds axle nuts during wheel tightening | Adjustable crescent wrench |
| Clean rag | 1 dry cloth | Wipes shipping grease from headset tube | Paper towel |
| Scooter clamp | 1 unit with hardware | Secures handlebar stem to fork | none — don’t swap this |
| Grip tape | 1 deck strip | Prevents feet slipping off deck surface | none — don’t swap this |
Before you start
- Clear a flat floor space of at least six feet by six feet so dropped bolts don’t roll away.
- Unpack all parts and count your bolts against the included manual’s diagram to ensure nothing is missing.
- Wipe off thick factory oil from the bare metal fork tube using a clean rag.
- Check the fork direction so the front brake or wheel offset faces forward before sliding parts on.
- Stop and contact a certified mechanic if your model has exposed high-voltage wiring, cut motor cables, or cracked deck welds.
Step by step
-
Unfold the deck base on the floor until the spring-loaded joint clicks loudly into its open slot. The locking pin must sit completely flat inside the groove so the deck can’t drop while you work.
-
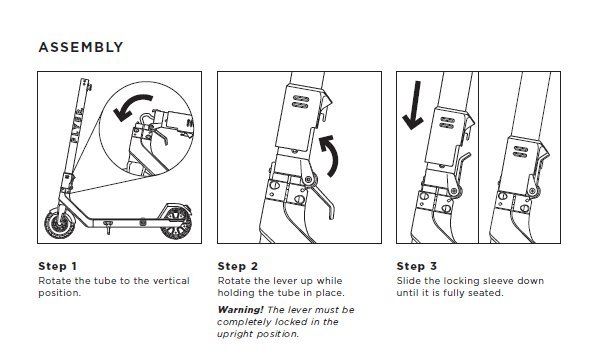
Slide the collar clamp over the base of the handlebar stem with the bolt heads pointing backward. If the clamp is too tight to slide onto the tube, loosen the bolts further until the clamp expands naturally.
-
Push the handlebar tube down onto the fork steering column until it stops against the lower bearing ridge. Ensure the handlebar tube is inserted past the minimum insertion mark etched into the tube.
-
Center the front wheel between your feet and align the handlebars so they sit at a straight ninety-degree angle to the wheel. Stand directly over the scooter to confirm the crossbar looks perfectly square across the tire.
-
Tighten the bottom clamp bolt until it’s snug but not fully torqued. Don’t tighten it fully yet, or the clamp will bind unevenly against the inner fork column.
-
Tighten the upper clamp bolt until it’s snug, ensuring the gap remains even. The clamp openings behind both bolts must show equal spacing from top to bottom.
-
Alternate between both bolts, giving each one full turn until the wrench resists firm palm pressure. The stem must not twist independently of the front wheel when you hold the wheel firmly between your knees.
-
Insert the handlebar grips into the upper T-bar until the push-button metal detents snap out through the drilled holes. Tug each grip outward with about ten pounds of force to ensure the metal buttons stay locked.
-
Spin both wheels by hand to verify they rotate freely for at least ten seconds without rubbing the brake pad. Listen closely for scraping sounds between the brake mechanism and the wheel.
How to know it worked
A properly built scooter makes a dull, solid thud when you drop it onto its wheels from three inches off the ground. It shouldn’t make a loose metal rattling sound. Stand on the deck and push the handlebars forward with your full body weight; the bars must stay rigid without slipping down or tilting. Check the front wheel alignment against the handlebars again. The tire must track in an exact straight line with the stem.
A mistake people actually make is leaving clamp bolts uneven, which strips the soft aluminum threads and ruins a fifty-dollar steering column.
If something goes wrong
| What happened | Why | What to do |
|---|---|---|
| Stem twists while wheel stays straight | Clamp bolts lack sufficient torque | Loosen, realign straight, tighten bolts alternately |
| Front wheel grinds or stops spinning | Axle bolt is overtightened | Loosen axle nut quarter turn with wrench |
| Folding latch refuses to lock open | Locking pin misaligned in track | Push stem forward firmly until pin clicks |
| Handlebar grips wobble inside T-bar | Push buttons failed to extend | Twist grip until spring button pops through |
| Front end rattles during riding | Headset compression bolt is loose | Remove clamp and tighten top headset bolt |
How often to do this
A full build happens once, but safety checks must occur regularly for daily riders or occasionally for weekend users. Rough asphalt roads and high curbs shake bolts loose faster than smooth concrete parks do. If you jump off curbs, inspect your hardware frequently. This varies by model — check the manufacturer’s manual for weight ratings and maintenance intervals. Strip the scooter down for a full rebuild only if you replace worn headset bearings or swap out a bent front fork.
Frequently asked questions
Can you put a scooter together without tools?
No. You need at least one hex wrench to clamp the handlebar stem to the fork column securely. A scooter pressed together by hand will slip apart during your first turn, which causes immediate loss of steering control.
How long does scooter assembly take out of the box?
About 15 to 20 minutes for a standard kick scooter. Unboxing the parts and peeling off protective foam wrapping takes roughly five minutes, while aligning the stem and torquing the clamp bolts takes the rest of the time.
Why won’t my scooter handlebars go into the base?
The clamp is squeezed too tight or shipping burrs block the tube. Loosen every clamp bolt completely until the metal collar slides freely, then push the stem down with a steady twisting motion until it seats.
Is it safe to ride if the stem has a slight wobble?
No. Any play between the stem and deck loosens the headset bearings rapidly and damages the steering column threads. Tighten the internal compression bolt before you ride to eliminate all forward and backward movement.
What happens if you overtighten the clamp bolts?
You’ll strip the internal aluminum threads or snap the steel bolt head clean off. Once the threads strip, the clamp can’t hold the steering column tight, requiring a completely new clamp replacement.
Does it matter which way the front fork points?
Yes. The fork blades must curve or offset forward toward the front of your scooter. Installing the fork backward changes the steering geometry, making the scooter pull sharply to one side and handle dangerously at speed.
Final Thoughts
Once you’ve tightened every bolt, take your new ride for a slow spin on a flat, smooth surface to check that everything feels solid. Don’t forget to wear a helmet, as you’ll want to stay safe while you’re out exploring the neighborhood. It’s time to enjoy the fresh air.