
If your Kirby vacuum isn’t picking up dirt like it used to, the problem might be a worn-out belt. Knowing how to put a belt on a Kirby vacuum can save you time and money.
You don’t need to be a repair expert to fix this yourself. In this guide, you’ll find simple, step-by-step instructions that anyone can follow. By the end, your vacuum will be running smoothly again. Keep reading to learn how to get your Kirby back in top shape quickly and easily.
Tools Needed
Replacing the belt on a Kirby vacuum needs a few simple tools. Having these tools ready makes the task easier and faster. You do not need many items for this job. Just a few basic tools will do.
Flathead Screwdriver
A flathead screwdriver helps open the vacuum’s belt cover. It fits into the screws or clips holding the cover. This tool is important to access the belt area.
New Kirby Vacuum Belt
Always use a new belt that fits your Kirby model. Old belts can break or slip. The new belt keeps your vacuum working well.
Clean Cloth
A clean cloth helps wipe dust and dirt inside the vacuum. Cleaning the area before putting the new belt improves performance. It also protects the vacuum parts.
Small Container
Use a small container to keep screws safe while you work. This prevents losing tiny parts. It keeps your work area neat and organized.
Locate The Belt Area
Start by finding the belt area under the vacuum’s brush roll cover. This spot usually holds the belt that turns the brush roll. Removing the cover helps you see where the belt fits.
Understanding The Belt Area Location
The belt area is key to fixing your Kirby vacuum. This is where the belt sits and powers the brush roll. Knowing its exact place helps you replace the belt quickly. The belt area is usually at the bottom of the vacuum.
Removing the vacuum’s base plate reveals the belt and brush roll. This part holds the belt tight and keeps the brush spinning. Clean this area if you see dust or hair stuck around.
Steps To Find The Belt Area
First, unplug your Kirby vacuum for safety. Turn the vacuum upside down on a flat surface. Look for screws holding the base plate. Use a screwdriver to remove them carefully.
Lift the base plate gently. You will see the brush roll and the belt around it. This is the belt area where the belt fits. Check for wear or damage before placing a new belt.
Signs You Are In The Right Place
You see a round brush with bristles under the vacuum. A thin, rubbery belt connects the brush to a motor pulley. The belt might be loose or broken if your vacuum won’t clean well.
This section is the belt area. Handle the parts with care to avoid damage. Knowing this spot makes belt replacement easy and fast.
Remove The Vacuum Bottom Plate
Removing the vacuum bottom plate is the first step to replace the belt on your Kirby vacuum. This plate covers the brush roll and belt area. Taking it off gives clear access to these parts. It makes the belt replacement easier and safer.
Keep the vacuum unplugged before starting. This avoids any accidental starts. Also, work on a flat surface to keep all parts steady and within reach.
Gather Your Tools
Find a screwdriver that fits your vacuum’s screws. Most Kirby models use a Phillips head screwdriver. Having the right tool saves time and prevents damage.
Turn The Vacuum Upside Down
Lay the vacuum on its back. Make sure the power cord is out of the way. This position shows the bottom plate clearly for easy removal.
Locate The Screws Holding The Bottom Plate
Look around the edges of the bottom plate. You will see several screws. Count them to ensure none get lost during removal.
Unscrew The Bottom Plate Carefully
Loosen each screw slowly. Keep them in a small container. This keeps all screws safe and stops them from rolling away.
Lift Off The Bottom Plate
Gently pull the plate away from the vacuum. If it feels stuck, check for any missed screws. Set the plate aside on a clean surface.
Take Off The Old Belt
Removing the old belt from your Kirby vacuum is the first step to keep it running well. The belt helps the brush roll spin and pick up dirt. Over time, belts wear out and need replacing.
Take your time with this step. A careful approach makes the process easier and prevents damage to the vacuum parts.
Unplug The Vacuum
Always unplug the vacuum before starting. Safety first. This stops the vacuum from turning on by accident.
Turn The Vacuum Over
Flip the vacuum upside down. This gives you clear access to the brush roll area.
Remove The Bottom Plate
Look for screws or clips holding the bottom plate. Use a screwdriver to remove them. Keep the screws safe for later.
Take Out The Brush Roll
Gently lift the brush roll out. Sometimes it may need a little wiggling to come free.
Slip Off The Old Belt
Slide the old belt off the brush roll. If it is tight or broken, be careful not to snap it suddenly.
Position The New Belt
Positioning the new belt on your Kirby vacuum is a key step for proper cleaning. The belt must fit tightly for the brush roll to spin well. A loose or twisted belt will stop the brush from turning. Take time to place the belt carefully. This ensures your vacuum works at its best.
Locate The Brush Roll
Find the brush roll inside the vacuum base. It is the long cylinder with bristles. The belt wraps around this part. Check that the brush roll is clean and free of hair or debris. This helps the belt fit smoothly and work better.
Slip The Belt Onto The Brush Roll
Hold the new belt by the edges. Slide it over the brush roll carefully. Make sure the belt sits flat without twists. Twists can cause the belt to wear out quickly. The belt should fit snugly but not too tight.
Attach The Belt To The Motor Shaft
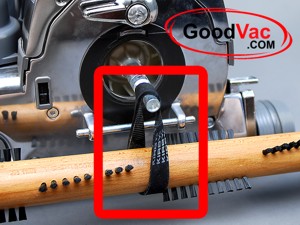
Next, stretch the belt to the motor shaft. The motor shaft is a small metal rod next to the brush roll. Loop the belt over this shaft. Keep the belt tight so it will spin the brush when the vacuum runs. Check the belt is aligned straight.
Attach The Brush Roll
Attaching the brush roll is a key step in putting a belt on a Kirby vacuum. The brush roll helps clean carpets by spinning and picking up dirt. Properly attaching it ensures the vacuum works well.
Remove The Vacuum Base Plate
Start by turning off the vacuum and unplugging it. Lay the vacuum on its back. Use a screwdriver to remove the screws holding the base plate. Lift the base plate off carefully.
Place The Brush Roll In Position
Find the brush roll and its slots inside the vacuum. Slide the brush roll into place, fitting its ends into the slots. Make sure it sits snugly and spins freely.
Attach The Belt To The Brush Roll
Take the new belt and loop it around the brush roll’s center. Hold the brush roll firmly. Pull the belt tight but do not overstretch it. Ensure the belt is straight and not twisted.
Secure The Brush Roll And Base Plate
Lower the base plate back onto the vacuum. Align the screw holes with the base plate. Tighten the screws to hold the base firmly. Check that the brush roll still spins smoothly.
Reassemble The Vacuum
Reassemble the vacuum by carefully placing all parts back in their original spots. Ensure the belt fits snugly around the motor and brush roll. Double-check each piece to keep your Kirby vacuum working well.
After placing the belt on your Kirby vacuum, the next step is to put the vacuum back together. This process ensures the vacuum works properly and safely.
Take your time during reassembly. Each piece must fit correctly for the vacuum to run smoothly.
Attach The Base Plate
Start by aligning the base plate with the vacuum’s bottom section. Make sure the belt sits correctly on the motor shaft and brush roll.
Press the base plate firmly until it clicks into place. This secures the belt and brush roll inside.
Secure The Screws
Use a screwdriver to tighten all screws you removed earlier. Tight screws keep parts stable and prevent damage.
Check each screw for tightness. Loose screws may cause noise or reduce cleaning power.
Reattach The Brush Roll Cover
Place the brush roll cover over the brush roll and belt area. It protects the belt and keeps dirt out.
Snap or screw the cover back into position. Ensure it is secure but not forced.
Plug in the vacuum and turn it on briefly. Listen for any unusual sounds or vibrations.
If everything runs smoothly, your Kirby vacuum is ready to clean efficiently.
Credit: www.goodvac.com
Test The Vacuum
Check the vacuum after fitting the belt to ensure it runs smoothly. Listen for any unusual sounds or vibrations. Confirm the brush roll spins freely and the vacuum cleans properly.
Testing the vacuum after placing the belt is important. This step ensures the belt works properly. It also checks that the vacuum cleans well and runs smoothly.
Turn on the Kirby vacuum. Listen for any strange sounds or vibrations. The vacuum should run quietly without jerks or stops.
Check Brush Roll Movement
Look under the vacuum to see the brush roll spinning. The brush roll must turn freely and quickly. If it does not spin, the belt may be loose or broken.
Inspect Vacuum Suction
Place your hand near the vacuum opening to feel suction. Strong suction means the vacuum is working well. Weak suction might mean the belt is not tight enough or installed wrong.
Observe Vacuum Performance
Push the vacuum slowly across the floor. It should pick up dirt and debris easily. If it struggles, stop and recheck the belt and brush roll.
Tips For Belt Maintenance
Keep the belt clean and free from dust to help it last longer. Replace the belt if it looks worn or cracked. Always fit the belt tightly on the Kirby vacuum for proper working.
Keep The Belt Clean
Dirt and dust can wear out the belt quickly. Wipe the belt with a dry cloth after every use. Avoid using water or cleaning chemicals on the belt. This keeps the belt flexible and strong.
Check For Wear And Tear
Look at the belt often for cracks or stretching. A worn belt can slip or break during vacuuming. Replace the belt if you see signs of damage. This prevents damage to your vacuum’s motor.
Store The Vacuum Properly
Store your Kirby vacuum in a cool, dry place. Heat and moisture can weaken the belt material. Avoid leaving the vacuum in direct sunlight. Proper storage helps the belt last longer.
Use The Vacuum Correctly
Do not push the vacuum too hard on thick carpets. This puts extra strain on the belt. Let the vacuum glide smoothly over surfaces. Using it gently saves the belt from damage.
Credit: www.goodvac.com

Credit: www.youtube.com
Frequently Asked Questions
How Do I Know When To Change My Kirby Vacuum Belt?
A worn or broken belt causes the brush roll to stop spinning. If suction drops or you see visible damage, change it. Regular checks keep your vacuum working well.
What Tools Do I Need To Put A Belt On A Kirby Vacuum?
Most models require just a screwdriver to open the vacuum base. Sometimes, no tools are needed to slide the old belt off. Keep the new belt ready before starting.
Can I Use Any Belt For My Kirby Vacuum?
Always use belts made specifically for your Kirby model. Generic belts may not fit or work correctly. Using the right belt ensures proper brush roll rotation.
How Do I Remove The Old Belt From My Kirby Vacuum?
Turn the vacuum off and unplug it for safety. Open the base plate and gently pull the belt off the motor shaft and brush roll. Avoid forcing to prevent damage.
What Is The Correct Way To Install A New Belt?
Place the new belt around the motor shaft first. Then stretch it carefully over the brush roll. Make sure it fits snugly without twisting or slack.
How Often Should I Replace The Kirby Vacuum Belt?
Replace the belt every 6 to 12 months, depending on use. Check it regularly for signs of wear or cracking. Timely replacement keeps cleaning efficient.
Can A Loose Belt Cause My Kirby Vacuum To Stop Working?
Yes, a loose belt can stop the brush roll from spinning. This reduces cleaning power and can strain the motor. Tightening or replacing the belt fixes this issue.
Conclusion
Putting a belt on a Kirby vacuum is simple with the right steps. Take your time and follow each part carefully. Check the belt’s position before closing the vacuum. A properly fitted belt helps your vacuum work well. Keep your vacuum clean and maintain it regularly.
This small task can save money and extend your vacuum’s life. Now, you can feel confident doing this repair yourself. Easy, quick, and helpful.