
Is your well check valve stuck, causing your water flow to slow down or stop completely? This common problem can be frustrating, especially when you rely on your well for daily water needs.
But don’t worry—fixing it might be easier than you think. You’ll learn simple, effective steps to unstick your well check valve quickly and safely. By the end, you’ll have the confidence to get your system working smoothly again without costly repairs.
Keep reading to discover how to save time, money, and hassle with your well check valve.
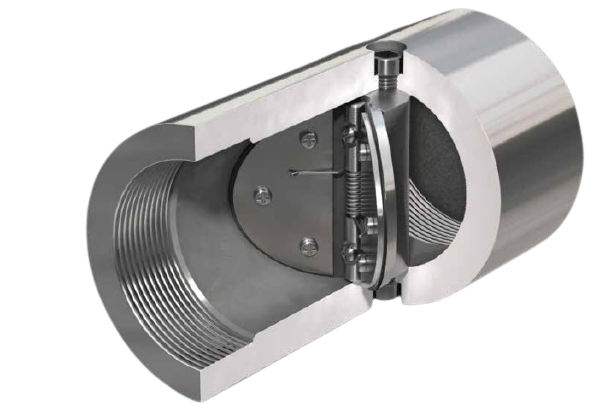
Credit: www.usvalve.com
Signs Of A Stuck Check Valve
Recognizing the signs of a stuck check valve is important for maintaining a well system. A check valve prevents water from flowing backward. If it gets stuck, it can cause problems in your water system. Early detection helps avoid costly repairs and water damage.
Common Symptoms
Water pressure drops suddenly or stays low. You hear strange noises near the valve. Water flow feels weaker than usual. The pump runs more often or for longer periods. Water may leak or drip around the valve area. These signs suggest the valve might be stuck.
Impact On System Performance
A stuck check valve reduces water flow efficiency. The pump works harder, using more energy. Water may backflow, causing contamination risks. The system may lose prime and stop working. Overall, a stuck valve lowers system reliability and increases maintenance needs.

Credit: scwellservice.com
Safety Precautions Before Fixing
Before starting to fix a stuck well check valve, safety comes first. Taking the right precautions protects you from injury and damage. Simple steps can prevent accidents and make the job easier. Always prepare well and follow safety rules carefully.
Shutting Down The System
Turn off the water pump and power supply. This stops water flow and electric shock risk. Release pressure in the pipes by opening a faucet. Confirm no water pressure remains before touching the valve. This step avoids sudden bursts of water that can hurt you.
Wearing Protective Gear
Wear gloves to protect your hands from sharp edges and dirt. Use safety goggles to shield your eyes from debris or splashes. Put on long sleeves and sturdy shoes to avoid cuts and bruises. Proper gear keeps you safe during the repair work.
Tools And Materials Needed
To unstick a well check valve, gather the right tools and materials first. Having everything ready saves time and effort. It also helps you work safely and efficiently. This section lists the basic tools and cleaning supplies needed for the job.
Basic Tools
You need a few simple tools for this task. A wrench or adjustable spanner helps loosen bolts and fittings. Pliers provide a strong grip on small parts. A screwdriver, usually flathead or Phillips, helps remove screws. A flashlight can light up dark spaces inside the well. Finally, gloves protect your hands from dirt and sharp edges.
Cleaning Supplies
Cleaning is important to free the valve. Use a brush with stiff bristles to scrub away dirt and rust. Rags or old cloths help wipe surfaces clean. A bucket holds water or cleaning solutions. Mild detergent or vinegar works well to dissolve grime. Avoid harsh chemicals that may damage the valve parts.
Step-by-step Valve Inspection
Inspecting a well check valve carefully helps find the cause of sticking. This step-by-step guide makes the process simple and clear. Proper inspection saves time and prevents damage.
Locating The Check Valve
The check valve is often near the well pump or pressure tank. Look for a small, round device on the water line. It usually has a cap or cover that you can remove. Identifying the exact spot avoids confusion during inspection.
Removing The Valve For Inspection
Turn off the water supply before removing the valve. Use a wrench to unscrew the valve carefully. Keep a bucket nearby to catch any water inside. Once removed, check inside the valve for dirt or debris. Clean the parts gently with a cloth or brush. Look for cracks or worn-out seals that need replacement.
Cleaning And Lubricating The Valve
Cleaning and lubricating the well check valve is key to restoring its function. Dirt and grime can cause the valve to stick and block water flow. Regular maintenance keeps the valve working smoothly and extends its life.
Start by cleaning the valve carefully. Removing dirt and debris opens up the valve parts. After cleaning, apply lubricant. It helps the valve move freely without sticking.
Removing Debris
First, turn off the water supply. This stops water flow and makes cleaning easier. Use a soft brush or cloth to wipe away dirt. Focus on the valve seat and moving parts. Remove any visible mud, sand, or mineral buildup. Rinse the valve with clean water to wash out small particles. Avoid using harsh tools that may damage the valve surface. Clean parts allow the valve to open and close smoothly.
Applying Lubricant Safely
Choose a lubricant made for water valves. Avoid oil or grease that can damage rubber seals. Apply a small amount to the valve’s moving parts. Use a brush or your finger to spread it evenly. Do not over-lubricate, as excess lubricant can attract more dirt. After applying, move the valve parts gently to spread the lubricant. Proper lubrication reduces friction and prevents sticking. Ensure the valve is dry before reassembling and turning on water.

Credit: zeroinstrument.com
Manual Techniques To Unstick The Valve
Manual techniques offer simple ways to unstick a well check valve. These methods require no special tools and often work well. Patience and care are key to avoid damage. Try these easy steps before calling a professional.
Tapping And Gentle Movements
Start by tapping the valve gently with a small hammer. Light taps can help loosen dirt or rust causing the valve to stick. Avoid strong hits that may break the valve.
Next, try moving the valve back and forth by hand. Gentle rocking often frees stuck parts inside. Keep the motions slow and steady to prevent damage.
Repeat tapping and moving until the valve moves smoothly. These simple actions often restore normal function without extra tools.
Using Compressed Air
Compressed air can blow out dust and debris blocking the valve. Use a can of compressed air or an air compressor with moderate pressure.
Direct the air nozzle at the valve opening. Short bursts of air help clear inside parts. Avoid too much pressure to protect the valve seals.
After blowing air, test the valve movement again. This method often improves valve performance quickly and safely.
Testing Valve Function After Repair
Testing the valve function after repair is a key step in ensuring your well system works properly. This step confirms that the valve moves freely and seals correctly. It helps avoid future issues like leaks or pressure loss.
Careful testing gives you confidence the repair was successful. You can catch any problems early before fully reinstalling the valve. Follow clear steps to check the valve performance and system pressure.
Reinstalling The Valve
Start by placing the valve back into its original spot. Make sure the valve sits correctly and aligns with the pipes. Tighten all connections securely but avoid overtightening.
Use thread tape or sealant on pipe threads to prevent leaks. Check for any visible damage or dirt before final installation. Proper reinstalling helps the valve work smoothly.
System Pressure Check
Turn on the water supply slowly after reinstalling the valve. Watch for any leaks around the valve area. Listen for unusual noises like hissing or banging.
Measure the water pressure using a pressure gauge. The pressure should remain steady without sudden drops. Open and close the valve to check if it moves easily.
Repeat the pressure test a few times to confirm consistency. If the valve sticks or leaks, it may need further adjustment or cleaning.
When To Replace The Check Valve
Knowing when to replace a well check valve is important to keep your water system working well. A stuck or damaged valve can cause water to flow backward. This can lead to damage and waste. Replacing the valve at the right time saves money and prevents bigger problems. Watch for signs that the valve needs replacement. Choose the right valve for your system to ensure long-lasting performance.
Signs Replacement Is Needed
Water leaks near the valve show it may be broken. The valve may not close tightly, causing water to flow backward. Low water pressure can mean the valve is stuck or damaged. Strange noises in the pipes might come from a faulty valve. Rust or corrosion on the valve is a clear sign to replace it. If cleaning or unsticking the valve does not help, replacement is needed.
Choosing The Right Replacement Valve
Match the new valve to your well system’s size and type. Check the valve’s material; stainless steel lasts longer in water systems. Ensure the valve fits properly to avoid leaks or damage. Choose a valve with good reviews for durability and performance. Buying from a trusted supplier ensures quality parts. Proper installation of the replacement valve is key for smooth operation.
Preventing Future Valve Sticking
Stopping a well check valve from sticking again saves time and money. Small steps help keep the valve working well. Focus on care and water quality to prevent problems.
Regular Maintenance Tips
Check the valve every few months. Look for dirt or rust on the valve parts. Clean the valve with a soft brush or cloth. Tighten any loose bolts or screws. Replace worn parts quickly. Regular checks stop dirt buildup and rust. Keep a simple schedule to avoid missing inspections.
Water Quality Management
Test your well water regularly. High minerals or debris can cause the valve to stick. Use filters to remove particles from the water. Clean or replace filters often. Avoid letting dirt enter the well system. Good water quality helps the valve work smoothly. Clear water means fewer problems with sticking valves.
Frequently Asked Questions
What Causes A Well Check Valve To Get Stuck?
A well check valve can get stuck due to dirt, rust, or debris buildup. Wear and tear over time also affects its movement. Regular maintenance helps prevent sticking.
How Do I Safely Unstick A Stuck Well Check Valve?
Turn off the pump and relieve pressure before working on the valve. Gently tap the valve with a rubber mallet to loosen it. Avoid using excessive force to prevent damage.
Can Cleaning Help Fix A Stuck Well Check Valve?
Yes, cleaning the valve can remove dirt and debris causing the jam. Use a soft brush and water to clean the valve parts. Make sure the valve is fully dry before reassembling.
What Tools Do I Need To Unstick A Well Check Valve?
Common tools include a wrench, rubber mallet, bucket, and cleaning brush. Having a flashlight helps inspect inside the valve. Use only tools suitable for plumbing tasks.
How Often Should I Check My Well Check Valve?
Check your valve at least once a year for signs of wear or sticking. Frequent checks prevent larger problems and costly repairs. Regular inspections keep your system running smoothly.
Can A Stuck Well Check Valve Damage The Well Pump?
Yes, a stuck valve can cause pressure buildup and damage the pump. It may lead to reduced water flow or pump failure. Fixing the valve quickly protects your equipment.
When Should I Replace A Well Check Valve Instead Of Fixing It?
Replace the valve if it is cracked, corroded, or damaged beyond repair. Old valves may not seal properly even after cleaning. New valves ensure better performance and reliability.
Conclusion
Stuck well check valves can cause water flow problems. Regular checks help keep them working well. Cleaning or lubricating can often fix the issue. Always turn off the water before starting repairs. Small steps save time and money. Keep your tools handy and follow safety tips.
Quick action prevents bigger damage later. Simple care keeps your system running smoothly. You can handle this with patience and care. Keep your water flowing without stress or hassle.